
Harness.io's CI pipeline plugins, as Docker containers, enable extensible and efficient task execution, such as cloning git repositories or building Docker images, simplifying pipeline management and enhancing productivity.
Plugins are Docker containers that perform predefined tasks. They can be used to clone the git repository, build Docker containers, upload artifacts, and more. Plugins are configured as a step in the CI pipeline.
Why Plugins Matter
Plugins are highly extensible and container-based. They are essentially templatized scripts which can be written in any programming language. It is cleaner & easier to manage plugins as compared to scripts in steps of the pipeline. In this article, we’ll be going over how to write your first plugin for CI. It’ll be a fairly simple one, just to get you acclimated to the process. When it comes to plugins, the world really is your oyster, so we hope you’ll learn more on the topic and keep writing! Let’s dive into the plugin step.
Plugin Step
First things first: What’s a plugin step? In a nutshell, CI stages are composed of three different types of steps: the run step, runtest step, and plugin step. The plugin step runs the Docker image of the plugin as a Docker container to execute the task defined by it.
The plugin step takes 3 inputs:
- Image: This is the plugin Docker image. A plugin step executes the ENTRYPOINT present in the plugin Docker image by running the Docker container.
- ConnectorRef: This is a Docker connector that provides the credentials for pulling the plugin image. If the image is public, an anonymous Docker connector can be used.
- Settings: Settings are plugin parameters that are provided as environment variables to the plugin. Environment variable names are capitalized and prefixed with PLUGIN_ to prevent naming conflicts. Example environment variables can be:
- PLUGIN_SOURCE=awscli.amazonaws.com
- PLUGIN_DESTINATION=awscli.zip
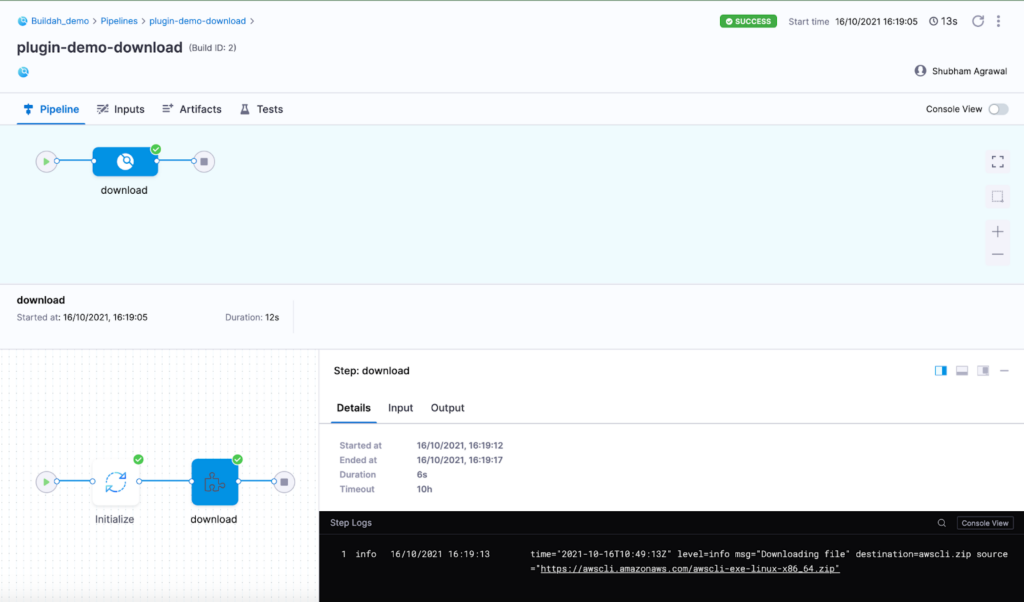
Let’s take a look at an example plugin step. The below step uses the “plugins/download” plugin image, which downloads the url mentioned in source to destination path. Here, it is downloading the AWS CLI to the workspace directory with file name awscli.zip:
- step:
type: Plugin
name: download
identifier: download
spec:
connectorRef: dockerhub
image: plugins/download
settings:
source: https://awscli.amazonaws.com/awscli-exe-linux-x86_64.zip
destination: awscli.zip
Here’s a CI pipeline with the above plugin step in action:
Writing Your First Plugin for CI
Now that we have covered the basics of the plugin step, let’s write a custom plugin!
We will be writing a custom git plugin that clones a public git repository and prints the last commit information. It will take the following settings as input:
- repo_url: Git repository URL.
- branch: Branch of the repository to check out to.
- path: Directory path to clone the repository. By default, it is assumed to be the workspace directory.
Here is the bash script clone.sh that implements the functionality of the custom git plugin:
#!/bin/sh
set -xe
# If path setting is not set, then use current directory
path=${PLUGIN_PATH:-.}
mkdir -p ${path}
cd ${path}
# Clones the public git repo and checkout to a branch
git clone ${PLUGIN_REPO_URL} .
git checkout ${PLUGIN_BRANCH}
# Prints the last commit
git log -1 --stat
Now, we have to create a Docker image that runs the above script. This can be achieved by specifying this script as an ENTRYPOINT in Dockerfile. Here is the complete Dockerfile:
FROM alpine/git
# Copies the clone script to the Docker image
COPY clone.sh /usr/local/bin/
# Makes the clone script executable
RUN chmod +x /usr/local/bin/clone.sh
ENTRYPOINT [ "/usr/local/bin/clone.sh" ]
After this, we need to build and publish this image to a Docker registry, and use it in the CI pipeline. For this example, the image is pushed to “shubham149/git-plugin” Docker Hub repo.
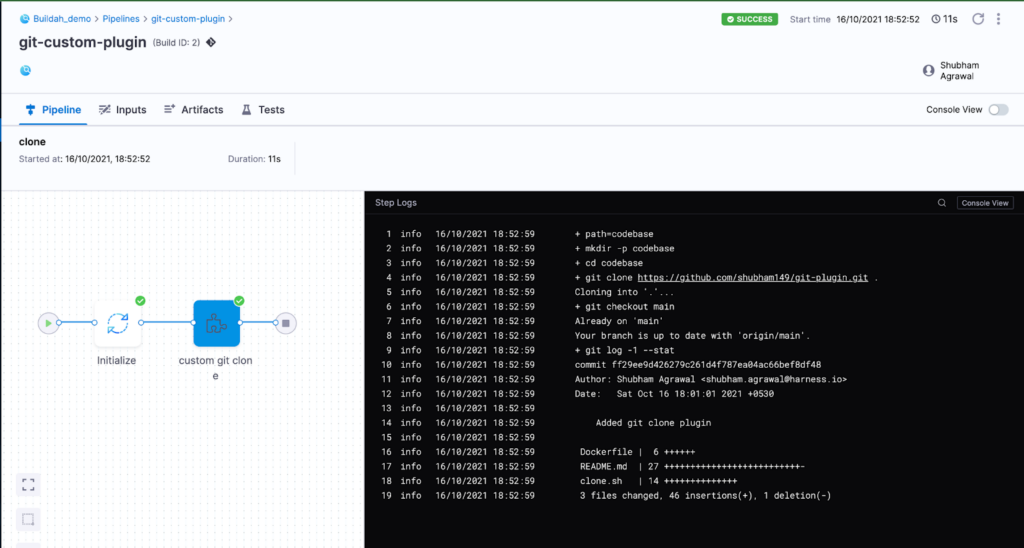
Let’s use this custom git plugin in the CI pipeline. The below plugin step will clone “shubham149/git-plugin” github repository in the codebase directory.
- step:
type: Plugin
name: custom git clone
identifier: clone
spec:
connectorRef: dockerhub
image: shubham149/git-plugin
settings:
path: codebase
repo_url: https://github.com/shubham149/git-plugin.git
branch: main
Here’s the CI pipeline run with our custom git plugin step:
Link for the source code of the custom git plugin: GitHub
The above example uses a bash script to create a plugin. But there is no such restriction to write a plugin. Plugins can be written in any programming language of your choice. Here is a boilerplate template for writing a plugin in golang: GitHub
Testing a Plugin Locally
Plugins can be tested in a local environment by running it as a Docker container. Here is an example Docker command to run the custom git plugin locally:
docker run --rm \
-e PLUGIN_PATH=codebase \
-e PLUGIN_REPO_URL=https://github.com/shubham149/git-plugin.git \
-e PLUGIN_BRANCH=main \
shubham149/git-plugin
Conclusion
We hope you enjoyed your first foray into plugins! As we can see from our plugin registry, so much extensibility can be achieved from plugins. From notifications into Slack to a full Datadog integration, plugins can take a great product and make it even better. We hope that by learning more about plugins, you’ll be inspired to write your own. Who knows what common problem you could solve?
For further reading on plugins, let’s take a look at how Jenkins missed the mark with our article on Dependency Hell!

All this author’s posts
Shubham is a software development engineer currently part of the Azure Storage Performance team.