Blog
Continuous Delivery & GitOps

JFrog Artifactory & Harness - Don’t Get Bogged Down With Continuous Delivery | Harness Blog

JFrog has been a pioneer and leader in how artifacts are managed. Learn more about integrating Artifactory in Harness today.

TL;DR

Harness simplifies Continuous Delivery by integrating with JFrog Artifactory, enabling dynamic deployment pipelines and artifact promotion across environments, significantly reducing the complexity and manual effort traditionally associated with deployment processes.

Everyone is doing CI/CD these days. If you attend any DevOps conference, you’ll notice two things: 1.) Lots of teams claiming to do ten billion deployments a day and 2.) Lots of vendors claiming to help enable ten billion deployments a day.

Truth is, Continuous Delivery is misunderstood, and it's very much a problem that remains unsolved for the masses.

“Bullsh!t, we’ve built our own CI/CD process/platform,” I hear you say, and thereby lies the problem: nearly everyone has tried to build it themselves.

The normal recipe is Jenkins plus several hundred thousand lines of BASH scripts (aka jobs). That’s a great way to make your production deployment... croak.

Continuous Integration != Continuous Delivery

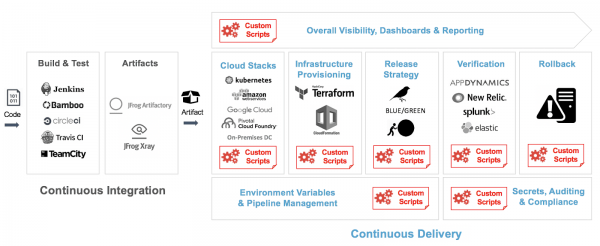
Taking code to artifact (Continuous Integration) has largely been solved by Jenkins, and JFrog has been a pioneer and leader in how those artifacts are managed.

Despite lots of innovation in infrastructure automation technologies and frameworks like Ansible and Terraform, taking artifacts into production still remains a complex, manual, and painful process if you build it with Jenkins or similar.
<a href=
CI/CD" id="" width="auto" height="auto" loading="auto">


Deployment scripting is not automation. Why? Because deployment scripts change more frequently than Tesla’s stock price. This is not automation; it’s called software maintenance.

It's also still not uncommon for deployment pipelines to be babysat by a team of DevOps engineers. Truly enabling developers to deploy and test on their own remains a massive challenge, both from a capability and governance perspective.

Continuous Delivery-As-A-Service With Harness and JFrog

At Harness, we’re trying to solve Continuous Delivery by offering it as a turnkey service for DevOps and developers.

Harness will integrate with your cloud stack and tools in minutes, and then you can build dynamic deployment pipelines to promote artifacts across your environments.

In that journey, our JFrog story and integration has been critical. In fact, we recently supported one of the largest Artifactory implementations on the planet (> 1 PB). Below is a quick primer on how you can integrate JFrog into your deployment pipelines.

Configuring Artifactory With Harness

First thing you need to do is register your Artifactory instance(s) inside Harness.
To do this, go to: Setup > Connectors > Artifact Servers > Add Artifact Server

Add Artifact Server


Now enter your artifactory URL, username and password.

Optional: you can also place usage restrictions on your Artifactory servers. E.g. Artifactory A can only be used for Application X and Environment D, E and F.

Creating Apps/Services Based on Artifactory Artifacts

With Artifactory now integrated, you can start to define your application and service hierarchy in Harness.
Let’s create a simple microservice using Artifactory.

Go to: Setup > Your App > Services > Add Service
Give your service a name and select ‘Docker’ as the artifact type.
Now, click ‘Add Artifact Source

Add Service


Now point Harness to your Artifactory Server, Repository, and Image Name:
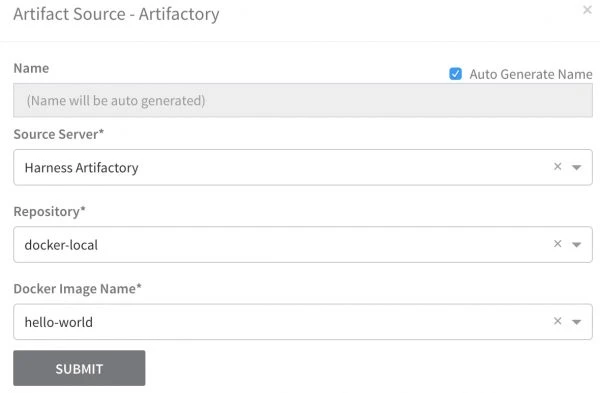
Artifactory Setup


That’s it. Harness will now automatically version control every new artifact build or version from your Artifactory instance:

Artifact History - Artifactory

Building Your First Deployment Pipeline (With Xray)

With your service artifacts now defined inside Harness, you can build deployment workflows and pipelines in minutes.

Go to: Setup > Your Application > Workflows > Create Workflow

For example, we can build a 3-phase canary deployment workflow to deploy our new microservice that starts with a JFrog Xray security scan on the container artifact:

Workflow


To integrate JFrog Xray, simply click ‘Add Step’ under the ‘Pre-deployment Steps’ section. Choose ‘HTTP’ and create a webhook to Xray that references the ${artifact.displayName} and ${artifact.artifactPath} within your workflow. That’s it!

When this deployment workflow (or pipeline) is kicked off, you can watch all these deployment steps execute in real time, with full insight into console output and logs.

Run Workflow


With JFrog and Harness, it's now possible to create end-to-end deployment pipelines in minutes using your artifact repository as the source/trigger.

For more information and a free trial, visit Harness today.

Request a demo

Learn more: Efficiently Managing Artifact Dependencies

Cheers,
Steve.
@BurtonSays

← Previous:
Next: →

Related Resources

Harness CI and Harness CD - Your First True CI/CD Pipeline

Continuous Delivery & GitOps

Harness CI and Harness CD - Your First True CI/CD Pipeline

August 13, 2020

Harness Team

+ more
Time to Read

Harness now allows you to have both best of breed Continuous Integration and Continuous Delivery capabilities. Let’s take a look at what leveraging a Harness CI / Drone Pipeline to build then leveraging Harness CD to deploy to a Kubernetes cluster. 

The goal of this example will be to have Harness CI / Drone build and push a GoLang Docker Image to DockerHub then have Harness CD pickup on the new artifact and deploy to an awaiting Kubernetes cluster. This potentially can take you from idea to production easier than ever. 

The Moving Pieces

There are not many moving pieces to see an end-to-end example. You need a Harness CI / Drone Instance, a Docker Hub Account, a Harness Account, and of course, a Kubernetes cluster which could even be Minikube.

Like always you can follow along with the blog and/or watch the video.

CI and Harness CD Together">

If leveraging the example Harness CI / Drone GitHub project, you will have to edit the information to be your own Docker Registry for where the Docker Push goes. I will be referencing mine below. 

Docker Hub repository rlachhman/amazingapp showing the drone-build image tag under the Tags tab

The Harness CD Piece

If this is your first time leveraging the Harness Platform, the quickest way to get started is to leverage a Kubernetes Delegate

The first step of getting a Harness Delegate installed in your Kubernetes Cluster is pretty straight forward. 

Setup -> Harness Delegates -> Download Delegates -> Kubernetes YAML

Download Delegate dropdown menu in Harness with the Kubernetes YAML option selected

Give the Delegate a name.

Delegate Setup modal in Harness with the name 'cicd-k8s' and profile 'Primary' filled out, showing the Download button

Hit submit to download. Expand the tar.gz which is downloaded.

The extracted harness-delegate folder next to the downloaded harness-delegate.tar.gz archive

Inside the delegate folder, run kubectl apply -f harness-delegate.yaml to install the delegate.

Terminal output of running kubectl apply -f harness-delegate.yaml to create the Harness Delegate resources

In a few moments, your Harness Delegate will be available.

Harness Delegates screen showing an active Kubernetes delegate named cicd-k8s-nkuryn-0

Next, add the Kubernetes cluster for Harness to deploy to by adding the Kubernetes cluster as a Cloud Provider.  

Setup -> Cloud Providers + Add Cloud Provider

Cloud Providers setup page in Harness showing the Add Cloud Provider button

Add a Kubernetes Cluster

Selecting Kubernetes Cluster from the Add Cloud Provider dropdown menu

Give the Kubernetes cluster a name then for Cluster Details, Inherit from selected Delegate [deployed Delegate]. Hit Test then Submit and you are all wired up.

Add Kubernetes Cluster Cloud Provider form in Harness showing a successful connection test using a selected delegate

Next, creating a Harness Application is a simple process. 

Setup -> + Add Application.

Harness Application creation form with the name Captain Canary and description CI and CD together at last

The next step inside the Application is to create a Harness Service. You can create a Service by going to 


Setup -> Captain Canary -> Services + Add Service. The Deployment Type will be Kubernetes.

Add Service form with Name set to Amazing App and Deployment Type configured as Kubernetes

Inside the Amazing App Service, + Add Artifact Source from a Docker Registry

Service Overview screen showing Amazing App with Kubernetes deployment type and the Add Artifact Source button

Can wire to your Docker Image of choice.

Docker Registry artifact source configuration with Harness Docker Hub and amazingapp image details

Once you hit submit, the scaffolding will be there for the deployment and no need for additional configuration.

Harness Service Overview for Amazing App with Kubernetes deployment type, Docker artifact source, and manifest files

With the Service out of the way, we can wire a Harness Environment to deploy to. 

Setup -> Captain Canary -> Environments + Add Environment

Environment creation form with Name set to 'The Greatest Environment' and Environment Type set to 'Non-Production'

Once you hit Submit, next can wire an Infrastructure Definition.

Environment Overview for 'The Greatest Environment' showing the Add Infrastructure Definition button

Next click + Add Infrastructure and add the Kubernetes cluster.  The Cloud Provider Type and Deployment Type will be Kubernetes.

Harness Infrastructure Definition form configured for a Kubernetes cluster named The Greatest K8s

Once you hit Submit, can wire together a Harness Workflow to define the steps to deploy.

Setup -> Captain Canary -> Workflows + Add Workflow. The Workflow Type will be Rolling Deployment. Select the Environment, Service, and Infrastructure Definition that was created in the previous steps.

Harness Workflow form configured for a Rolling Deployment of Amazing App to The Greatest K8s infrastructure

Next you can create a Harness Trigger on the presence of a new artifact in DockerHub. This will trigger the Workflow once the Docker Push is complete in the Harness CI / Drone Pipeline. 

Setup -> Captain Canary -> Triggers + Add Trigger

Creating a Harness Trigger with the Name field set to DockerHub Artifact

Hit Next after giving a Name. DockerHub can send out a webhook or we can use a polling interval from Harness to look out for a new artifact. Without the need to manage webhooks, we can just simply configure On New Artifact. Select your artifact source and can filter on specific tags. For the example we just want to deploy what gets picked up and “.*” is fine as a filter.

Harness trigger condition screen with On New Artifact selected, Amazing App source, and a regex filter of dot star

Hit Next and define the Actions. Execution Type will be Workflow and will execute the Workflow that was created in the previous steps. Can leverage the Last Collected Artifact. If leveraging the example will pick up on the newest explicit tag with the same filter “.*”.

Actions configuration with Workflow execution type, Last Collected artifact source, and a regex tag filter

Click Next and review the Trigger then hit Submit.

Harness Trigger configuration summary showing DockerHub Artifact condition and Deploy Amazing App workflow action

Once you hit Submit, all you have to do is kick off a Harness CI / Drone build and push. 

Harness CI / Drone Steps

If you do not have a don’t have a running Harness CI / Drone instance don’t worry, not difficult to accomplish. We have a detailed blog and video to get you started. For the example to work will need to be building and pushing a Docker Artifact. The example project has a simple GoLang application. The Harness CI / Drone introduction blog and video go through wiring Harness CI / Drone to a GitHub repository. 

To kick off a Harness CI / Drone Build and Push, simply modify the configuration / Drone.yaml which Harness CI / Drone is monitoring for. To explicitly build to a specific version, can add tags to Drone.yaml which works well with the example. 

In the example, pushing build version 1.0.2. Make sure to update your repository information also.

Drone YAML configuration showing the publish step with highlighted repository and tag 1.0.2

Can modify/increment then commit.

GitHub commit dialog showing Drone.yaml updated with tag 1.0.2 and commit message 'Hello version 1.0.2!'

Once you hit Commit, Harness CI / Drone will take over.

Drone CI pipeline execution showing git checkout logs for the clone step and the status of build and publish steps

Once the publish step is finished, a new image will be in DockerHub.

Docker Hub repository showing the newly published image tag 1.0.2 for rlachhman/amazingapp

Watch the Magic

Within the polling interval, Harness will pick up on the newest build/tag and start deploying on your behalf.

Harness CD pipeline execution interface showing the Deploy Amazing App workflow running with live deployment logs

With the Deployment kicked off, you have an end-to-end CI/CD pipeline. From code to production!

Partner with Harness in your CI/CD Journey

No matter where you are in your CI/CD journey, Harness can simplify and scale your capabilities. With the lightweight and convention-based Harness CI / Drone and the power of the Harness Platform, achieving CI/CD nirvana has never been easier. Get started with Harness CI / Drone and sign up for a Harness Account today!

Cheers,

-Ravi 

How to Configure Your Builds with JFrog Artifactory and Harness

Continuous Integration

How to Configure Your Builds with JFrog Artifactory and Harness

October 21, 2022

Pavan Belagatti

+ more
Time to Read

JFrog Artifactory is a solution for managing binaries, packages, and repositories, which are known as “software assets” in the world of continuous integration (CI) and delivery (CD). Artifactory helps software developers codify, store, and track files and their metadata without needing to understand their inner workings. It also offers centralized storage of binary assets, so other team members can reuse them. Since all the build artifacts and binaries are stored in a single place, Artifactory provides a single view of the entire development process, enabling developers to share their work seamlessly.

This article will explain how a developer can easily use best-of-the-breed DevOps tools, like Harness and JFrog Artifactory, to test and build with CI and store the build artifacts. This makes it easy for other developers in the team to collaborate and use the stored artifacts, which not only enhances developer productivity but also speeds up the software delivery process. 

Harness has a seamless integration with Artifactory. Users just need to set up a free trial of Harness Continuous Integration, add the test and build steps, and then push the build artifacts to Artifactory. We will see this with a simple example and learn how Artifactory and Harness work together to streamline your software development lifecycle

Code pushed from local machines triggers Harness CI to test, build, and store artifacts in JFrog Artifactory.

Pre-requisites

Setup

First, build a simple Java project with Maven. For the purpose of this tutorial, I have created a simple application, and you can clone it. You can find the example on Github.

Then, log in to your Harness account and create a project.

Harness project creation wizard with the project name artifactory-maven-example filled in

Select the continuous integration module from the list.

Selecting the Continuous Integration module on the Harness project setup screen

Start doing the project set-up by adding a Delegate to the project first. 

Note: You might be a little overwhelmed by thinking about what a delegate is and why it’s required. The Harness Delegate is a service/software you need to install/run on the target cluster (Kubernetes cluster in our case) to connect your artifacts, infrastructure, collaboration, verification, and other providers with the Harness Manager. When you set up Harness for the first time, you install a Harness Delegate. If you want to know more about Delegate, read the Harness Delegate documentation. 

Delegates option selected under Project Setup in the Harness navigation menu

Then add Artifactory as a new connector. 

Harness Project Connectors page showing the New Connector button to begin adding Artifactory

Selecting Artifactory from the Artifact Repositories options in the Harness Connectors menu

Add your Artifactory details like URL, username, and password. Passwords are securely protected at Harness with a strongly encrypted approach. 

Artifactory Repository configuration form in Harness showing URL, username, and password secret fields

Make sure your connection is successful.

Successful connection test for the Artifactory Repository connector in the Harness UI

Next, you need to add your repo as a connector. Various code repository management platforms are supported at Harness. Since our code is on GitHub, we will select Git.

Code Repositories selection screen in Harness showing AWS CodeCommit, Bitbucket, Git, GitHub, and GitLab

After selecting Git, add the repository details.

Configuring GitHub Connector details in Harness with Repository URL type, HTTP connection, and repository URL

Configuring credentials for the GitHub Connector with username and personal access token secrets in Harness

Harness GitHub Connector connection test screen showing a successful verification message

Make sure the connection is successful.

Now, go to creating the pipeline step and add all the relevant details.

Harness empty state screen showing 'There are no pipelines in your project' with a 'Create a Pipeline' button

Name the pipeline and proceed. 

Create new Pipeline dialog in Harness with the name field set to build and push

Then select Build as the stage.

Harness Select Stage Type modal with the Build stage option selected

This step fetches our already connected GitHub repo and the connector. Click on set up stage.

Configuring a Build stage in Harness with a GitHub repository and maven-repo connector

Next, define the infrastructure. We are using a Kubernetes cluster, and we will specify the same.

Selecting Kubernetes or VMs as the build infrastructure in the Harness pipeline editor
Configuring Kubernetes build infrastructure in Harness with maven-kube cluster and default namespace

In the execution stage, Add Step and select Run.

Clicking Add Step in the Execution stage of a Harness pipeline to open the step options menu

Selecting the Run step in the Harness Build step library to execute commands on a container image in a CI stage

Configure Run Step interface in Harness with step parameters for Name, Container Registry, Image, and Command

One more connector to add is our DockerHub Registry. Let’s add that as a connector.

Docker Registry connector setup in Harness, showing DockerHub provider type and username credentials

Make sure the connection is successful.

Harness Connection Test screen showing a successful verification for the Docker Registry connector

Configure the run setup with the details required like name, docker registry connector, image, and command.

Configure Run Step panel in Harness with maven-docker-reg container registry and a maven clean install command

After adding the run step, add another step to push the build artifacts to the Artifactory.

Harness pipeline editor showing the Execution tab with a menu to Add Step after the run test step

Select JFrog Artifactory.

Selecting the Upload Artifacts to JFrog Artifactory step in the Harness Step Library

Mention the details required as we did in the previous step. Just make sure your target and source path is correct. 

Harness step parameters for uploading artifacts to JFrog Artifactory, showing connector, target, and source path

You can see your source path in the target folder of your project after you run mvn install 

Terminal output showing a successful Maven build and the generated JAR file inside the target directory

Now, we are all set. Save the settings and run the pipeline.

Harness pipeline execution flow showing a Build stage with run test and push to artifactory steps

Harness Run Pipeline modal with Git Branch selected and branch name set to main

Harness pipeline execution console logs showing a successful artifact upload to JFrog Artifactory

After the successful execution of all the steps, you should see your build artifacts getting pushed to Artifactory. Let’s verify the same by going to our Artifactory account/dashboard.

Harness pipeline execution showing successful completion of Initialize, Git clone, run test, and push to artifactory
JFrog Artifactory dashboard showing the gs-maven-0.1.0.jar artifact inside the default-maven-local repository

Congratulations, you just pushed our build artifacts to Artifactory with the help of Harness. 

Harness Artifactory Integration

Artifactory is one of the best solutions in the market to keep your binaries intact. In addition, it helps developers speed up the software delivery process by reusing the binaries and promoting them throughout the development pipeline. Harness is a modern software delivery platform that has a strong integration with Artifactory to help organizations simplify DevOps. 

Ready to try this out with Harness CI? Download a free trial.

Learn more: Efficiently Managing Artifact Dependencies

Read more about JFrog Artifactory & Harness

Get Started

Get Started with Harness AI

Try the full platform free. No module restrictions, no credit card.

Harness Team
Harness
Harness delivers intelligent AI automation, so your team ships code faster, safer, and smarter.
harness-team
Harness Team
https://www.linkedin.com/company/harnessinc/