
Learn how to use OPA to ensure that your DevOps team follows best practices when releasing software to production. Then, dive deep in how to write Rego policies in Harness.
DevOps governance is a crucial aspect of modern software delivery. To ensure that software releases are secure and compliant, it is pivotal to embed governance best practices within your software delivery platform. At Harness, the feature that powers this capability is Open Policy Agent (OPA), a policy engine that enables fine-grained access control over your Harness entities.
In this blog post, we’ll explain how to use OPA to ensure that your DevOps team follows best practices when releasing software to production. More specifically, we’ll explain how to write these policies in Harness.
Policy Enforcement in Harness
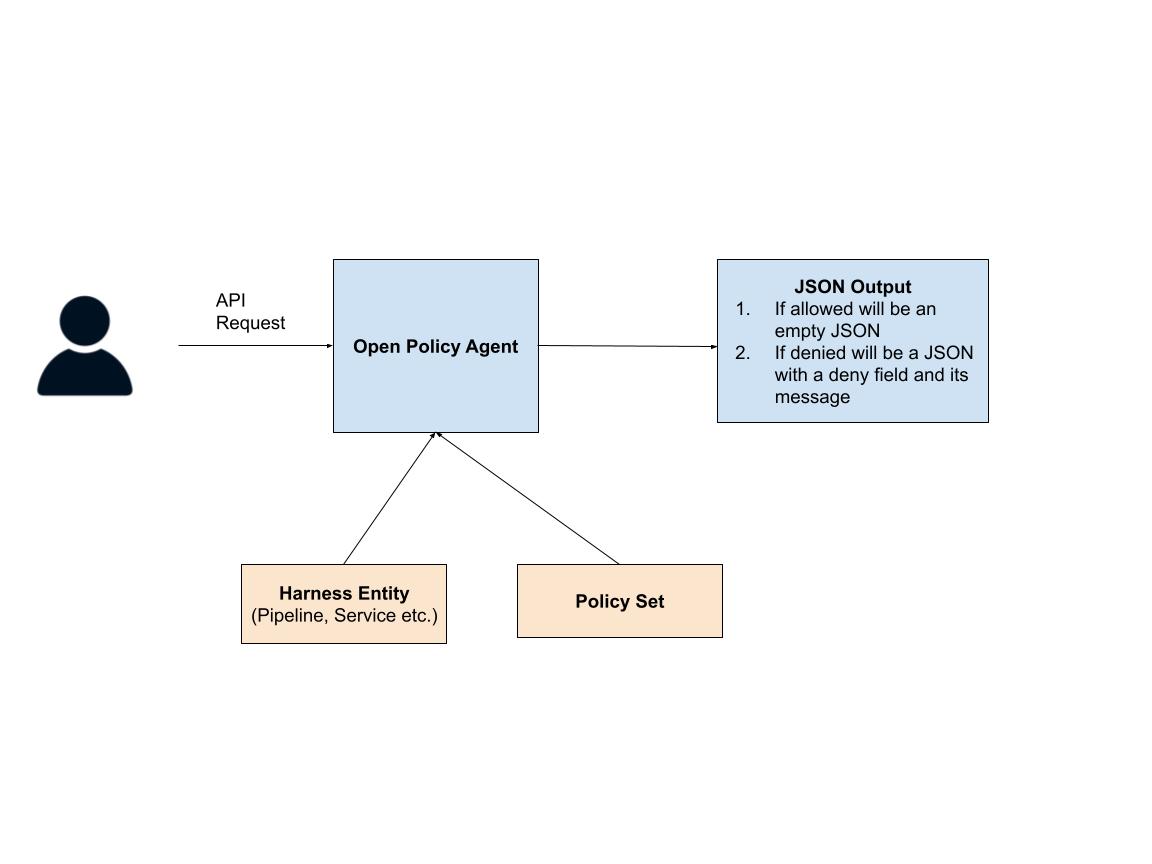
Every time an API request comes to Harness, the service sends the API request to the policy agent. The policy agent uses three things to evaluate whether the request can be made: the contents of the request, the target entity of the request, and the policy set(s) on that entity. After evaluating the policies in those policy sets, the agent simply outputs a JSON object.
If the API request should be denied the JSON object looks like:
{
  “deny”:[<reason>]
}
And the JSON object is empty, if the API request should be allowed:
{}Let’s now dive a bit deeper to look into how to actually write these policies.
Rego: The Policy Language
OPA policies are written using Rego, a declarative language that allows you to reason about information in structured documents. Let’s take an example of a possible practice that you’d want to enforce within your Continuous Delivery pipelines. Let’s say you don’t want to be making HTTP calls to outside services within your deployment environment and want to enforce the practice: “Every pipeline’s Deployment Stage shouldn’t have an HTTP step”
Now, let’s look at the policy below that enforces this rule:
package pipeline


deny[msg] {
   # Check for a deployment stage ...
   input.pipeline.stages[i].stage.type == "Deployment"
   # For that deployment stage check if there’s an Http step ...
   input.pipeline.stages[i].stage.spec.execution.steps[j].step.type == "Http"


   # Show a human-friendly error message
   msg := "Deployment pipeline should not have HTTP step"

}
First you’ll notice some interesting things about this policy language. The first line declares that the policy is part of a package (“package pipeline”) and then the next line:
deny[msg] {is declaring a “deny block,” which tells the agent that if the statements in the policy are true, declare the variable deny with the message variable.
Then you’ll notice that the next line checks to see if there’s a deployment stage:
input.pipeline.stages[i].stage.type == "Deployment"
You may be thinking, there’s a variable “i” that was never declared! We’ll get to that later in the blog but for now just know that what OPA will do here is try to see if there’s any number i for which this statement is true. If there is, it will assign that number to “i” and move on to the next line,
input.pipeline.stages[i].stage.spec.execution.steps[j].step.type == "Http"Just like above, here OPA will now look for any j for which the statement above is true. If there are values of i and j for which these lines are true then OPA will finally move on to the last line:
msg := “deployment pipeline should not have HTTP step”Which sets the message variable to that string. So for the following input
{
 "pipeline": {
   "name": "abhijit-test-2",
   "identifier": "abhijittest2",
   "tags": {},
   "projectIdentifier": "abhijittestproject",
   "orgIdentifier": "default",
   "stages": [
     {
       "stage": {
         "name": "my-deployment",
         "identifier": "my-deployment",
         "description": "",
         "type": "Deployment",
         "spec": {
           "execution": {
             "steps": [
               {
                 "step": {
                   "name": "http",
                   "identifier": "http",
                   "type": "Http",
                  …
    }
The output will be:
{
  “Deny”:["Deployment pipeline should not have HTTP step."]
}
Ok, so that might have made some sense at a high level, but let’s really get a bit deeper into how to write these policies. Let’s look into how Rego works under the hood and get you to a point where you can write Rego policies for your use cases in Harness.
Rego’s Declarative Approach
You may have noticed that throughout this blog we’ve been referring to Rego as a “declarative language” but what does that exactly mean? Most programming languages are “imperative” which means that each line of code explicitly states what needs to be done. In a declarative language, at run time, the program walks through a data source to find a match. With Rego what you do is you define a certain set of conditions, and OPA searches the input data to see whether those conditions are matched. Let’s see what this means with a simple example.
Imagine you have the following Rego policy:
x if input.user == “alex”
y if input.tokens > 100
and the engine gets the following input:
{
  “user”: “alex”,
  “tokens”: 200
}
The Policy engine will take the input and evaluate the policy line by line. Since both statements are true for the input shown, the policy engine will output:
{
    "x": true,
    “y”: true
}
Now, both of these were simple rules that could be defined in one line each. But you often want to do something a bit more complex. In fact, most rules in Rego are written using the following syntax:
variable_name := value {
  condition 1
  condition 2
  ...
}
The way to read this is, the variable is assigned the value if all the conditions within the block are met.
So let’s go back to the simple statements we had above. Let’s say we want our policy engine to allow a request only if the user is alex and if they have more than 100 tokens left. Thus our policy would look like:
allow := true {
  input.user == “alex”
  input.tokens > 100
}
It would return true for the following input request:
{
  “user”: “alex”,
  “tokens”: 200
}
But false for either of the following
{
  “user”: “bob”,
   “tokens”: 200
}


{
  “user”: “alex”,
   “tokens”: 50
}
Now let’s look at something a bit more complicated. Let’s say you want to write a policy to allow a “delete” action if the user has the “admin” permission attached. This is what the policy would look like (note: this policy is for illustrative purposes only and will not work in Harness)
deny {
  input.action == “delete”
  not user_is_admin
}

user_is_admin {
  input.role == “admin”
}
So the first line will match only if the input is a delete action. The second line will then evaluate the “user_is_admin” rule which checks to see if the role field is “admin” and if not, the deny will get triggered. So for the following input:
{
    "action": "delete",
    “role": “non-admin”
}
The policy agent will return:
{“deny”: true}because the role was not “admin” . But for the following input
{
    "action": "delete",
    “role": “admin”
}
The policy agent will return:
{}Variables, Sets, Arrays
So far we’ve only seen instances of a rego policy taking in input and checking some fields within that input. Let’s see how variables, sets, and arrays are defined. Let’s say you only want to allow a code owner to trigger a pipeline. If that’s the case then the following policy will do the trick (note: this policy is for illustrative purposes only and will not work in Harness):
code_owners = {"albert", "beth", "claire"}

deny[msg] {
  triggered_by = input.triggered_by
  not code_owners[triggered_by]

  msg := "Triggered user is not permitted to run publish CI"
}
Here, on line 1 we are defining the code owners variable as a set with three names. We are then entering the deny block. Remember, for the deny block to evaluate to true, all three lines within the block need to evaluate to true. The first line sets the “triggered_by” variable to see who triggered the pipeline. The next line
not code_owners[triggered_by]Checks if the code_owners set does not contain the variable triggered_by. Finally if that line evaluates to true, the next line is then run, where the value of message is set and finally the deny variable is established.
Now let’s look at an example of a policy that contains an array. Let’s say you want to ensure that every last step of a Harness pipeline is an “Approval” step. The policy below will ensure that’s the case (this policy will work in Harness):
package pipeline

deny[msg] {
  arr_len = count(input.pipeline.stages)
  not input.pipeline.stages[arr_len-1].stage.type == "Approval"
  msg := "Last stage must be an approval stage"
}
The first line will first assign the length of the array to the variable “arr_len” and then the next line will ensure that the last stage in the pipeline is an Approval stage.
Ok, let’s look at another slightly more complicated policy that’ll work in Harness. Let’s say you want to write a policy: “For all pipelines where there’s a Deployment step, it is immediately followed by an Approval step”
deny[msg] {
  input.pipeline.stages[i].stage.type == "Deployment"
  not input.pipeline.stages[i + 1].stage.type == 'Approval'
}
The first line matches all values of ‘i’ for which the stage type is ‘Deployment’. The next line then checks whether there’s any value of i for which the stage at i+1 is not an ‘Approval’ stage. If for any i those two statements are true, then the deny block gets evaluated to true.
Objects and Dictionaries
Finally, Rego also supports objects and dictionaries. An object is an unordered key-value collection. The key can be of any type and so can the value.
user_albert =  {
"admin":true, "employee_id": 12, "state": "Texas"
}
To access any of this object’s attributes you simply use the “.” notation (i.e. user_albert.state).
You can also create dictionaries as follows:
users_dictionary =  {
"albert": user_albert,
"bob": user_bob ...
}
And access each entry using the following syntax users_dictionary[‘albert’]
Harness Objects
Of course in order to be able to write these policies correctly you need to know the types of objects that you can apply them on and the schema of these objects:
- Pipeline
- Flag
- Template
- Sbom
- Security Tests
- Terraform plan
- Terraform state
- Terraform plan cost
- Service
- Environment
- Infrastructure
- Override
- Variable
A simple way to figure out how to refer to deeply nested attributes within an object’s schema is shown in the gif below.
- Navigate to the policy creation window as shown below.
- Then click on testing terminal.
- Copy/paste a sample YAML object into the “Testing Terminal”
- As you navigate through the YAML you’ll see the dotted notation to refer to each field right above the policy editor.

Get Started
Visit our documentation to get started with OPA today!
See Also

All this author’s posts
Abhijit Pujare is a Senior Product Manager at Harness, where he leads product strategy and execution for developer productivity and software delivery solutions.

All this author’s posts
Sushrut Athavale is a software developer that has worked in the DevOps industry for 4 years.