
Harness Infrastructure Provisioners streamline the deployment of Azure resources using ARM templates, enabling dynamic, repeatable, and idempotent infrastructure setups. This approach eliminates manual scripting and portal navigation, ensuring consistent environments across development and production with parallel deployments for efficiency.
Harness Infrastructure Provisioners define deployment infrastructure blueprints from known infrastructure as code technologies, such as Terraform and CloudFormation, and map their output settings to provision the infrastructure. Infrastructure Provisioners enable Harness Workflows to provision infrastructure on the fly when deploying Services. In this blog, we will learn about the Harness ARM provisioner. But before that, let’s understand the basic concept of Azure ARM.
What Are ARM Templates?
Azure Resource Manager (ARM) is the native platform for infrastructure as code (IaC) in Azure. ARM templates are a form of infrastructure as code – a concept where you define the infrastructure that you need to deploy. You no longer have to click around the portal, creating virtual machines or writing scripts to deploy a storage account. Instead, the template defines the resources, and the ARM management layer creates the infrastructure.
Benefits of Using ARM Templates
Using ARM templates when managing your Azure environment has many benefits. For example, using declarative syntax removes the requirement of writing complicated deployment scripts to handle multiple deployment scenarios.
Furthermore, these templates provide repeatable results and are idempotent, meaning that you can write and deploy the same template many times to get the same result. In turn, can take the same template that you used for the development infrastructure and use it to deploy the production environment. Using the same template makes sure that the resources and settings are identical.
ARM also handles the order of operations for deployment. As a result, ARM deploys dependent resources in the correct order and, when possible, deploys in parallel for faster deployments. Moreover, you can extend the templates with deployment scripts written in PowerShell or Bash for a complete end-to-end environment setup.
ARM Template Basics
Templates use a JavaScript Object Notation (JSON) syntax that also includes advanced capabilities.
Templates use declarative syntax. In this way, you can specify what to deploy without writing a series of commands that specify how to deploy it. In particular, templates specify the resources to be deployed and their properties.
The template is ready for deployment only after it is validated by the Resource Manager. This makes it unlikely that the deployment will fail midway.
The template includes the following parts:
- Parameters – values that let you use the same template in different environments during deployment.
- Variables – values to be reused in different templates. Variables can use the values from parameters.
- User-Defined Functions – let you define customized elements to simplify templates.
- Resources – specify Azure resources to be deployed.
- Outputs – the return value of the deployed resource.
The following is an ARM template for creating a storage account.
{
"$schema": "https://schema.management.azure.com/schemas/2019-04-01/deploymentTemplate.json#",
"contentVersion": "1.0.0.0",
"parameters": {
"storagename": {
"type": "string",
"defaultValue": "temp"
}
},
"functions": [],
"variables": {},
"resources": [{
"name": "[parameters('storagename')]",
"type": "Microsoft.Storage/storageAccounts",
"apiVersion": "2019-06-01",
"location": "[resourceGroup().location]",
"kind": "StorageV2",
"sku": {
"name": "Standard_LRS"
}
}],
"outputs": {}
}
Parameters
Parameters let you pass different values to the ARM template for use during deployment. Some common examples include the names of resources, or which Azure region to host them. Parameters enable your templates to be more dynamic and used across different environments.
{
"$schema": "https://schema.management.azure.com/schemas/2019-04-01/deploymentParameters.json#",
"contentVersion": "1.0.0.0",
"parameters": {
"storagename": {
"value": "anilstorage"
}
}
}
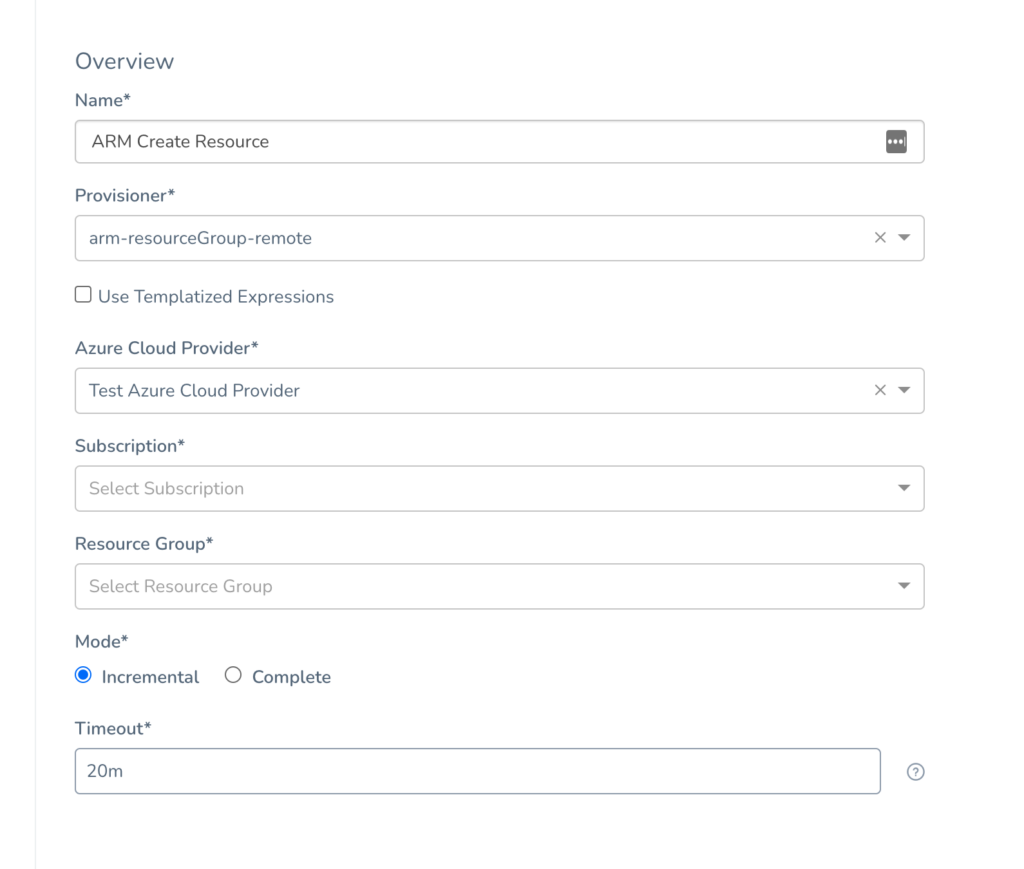
ARM deployments can be done in the following modes:
- Incremental
- In this mode, the deployment will create new resources present in the ARM template. However, it doesn’t change the state of the existing resources in the Resource Group unless explicitly mentioned in the template.
- Complete
- In this mode, only the resources mentioned in the template will be created. Any other existing resources will be deleted.
To illustrate the difference between the incremental and complete modes, consider the following scenario:
The Resource Group contains:
Resource A
Resource B
Resource C
The Template contains:
Resource A
Resource B
Resource D
When deployed in Incremental mode, the Resource Group has:
Resource A
Resource B
Resource C
Resource D
When deployed in Complete mode, Resource C is deleted. The Resource Group has:
Resource A
Resource B
Resource D
How Harness Deploys the ARM Template
First, the user must define the ARM provisioner, which is essentially providing the ARM template definition.
Step 1: Define ARM Provisioner
This can be defined as:
- Inline
- Harness will store the templates in its local storage.
- During deployment, it will fetch from its local storage and perform the ARM deployment.
- Remote
- If your templates are present in the Git repository, then you can define the ARM provisioner as remote. Harness will fetch the ARM templates from the user GIT repository, and then perform the deployment.
Note: Harness also supports Azure Blueprint deployments. Users need to select the ARM resource type as ARM. We will have a separate blog for discussion on how Harness supports Azure Blueprint.
Step 2: Define ARM Workflow
- The user must create the ARM workflow and map it to the provisioner that they created in Step 1.
- Here, you can provide the Parameters file. Again, this can be provided as inline or as a path to your Git repository.
During workflow execution, Harness will download the template and Parameter files. These files are downloaded in the Delegate working directory. Then, the Harness Delegate will send a request for deployment to Azure using these files.
Inline:

Remote:

We must create a workflow and select the above ARM Provisioner.
Once the workflow execution is over, all of the resources mentioned in the template will be provisioned in Azure.

The following steps are performed:
- Download Files → Download ARM templates from the Git repository.
- Execute ARM Deployment → Send the deployment request to Azure for deployment using ARM templates, which the user has configured in the provisioner step.
- ARM Deployment Steady state → Show the real-time status of the ongoing deployment.
Deployment Flow for Inline Templates:

When you create an inline ARM provisioner, the template is saved in the Harness Mongo.
- The UI sends the request to the Manager to start the workflow execution.
- The Manager sends the request to get templates from the Mongo collection.
- The Manager receives all of the template (arm/params) files.
- The Manager bundles all of the templates and other metadata and sends a Task request to Delegate.
- The Delegate sends a request to Azure to start an ARM deployment with templates.
- The Delegate keeps polling at regular intervals to get the status of the deployment until it succeeds or fails.
- The status of the polling request is sent to Manager at regular intervals.
- The UI periodically polls the status from the Manager about the deployment status and displays it on the execution logs.
Deployment Flow for Remote Templates:

Multiple instances of the Delegate service would be running.
- The UI sends a request to Manager to start the workflow execution.
- The Manager sends a Git Fetch Task request with Git repository details to the Delegate. Out of multiple Delegates, one delegate will be selected for execution.
- The Delegate then checks out the Git path.
- The Delegate downloads the templates from the Git repository.
- The Delegate sends the template’s details as a response to the Manager.
- The Manager renders any Harness variables present in the templates, and sends a new request for ARM deployment.
- The Delegate sends a request to Azure to start the ARM deployment using the rendered templates.
- The Delegate periodically checks for the deployment status.
- The deployment status is periodically reported back to the Manager.
- The UI periodically polls the deployment status from the Manager and displays it on the execution logs.
You might be wondering why the delegate didn’t send the request for deployment after Step 4 instead of sending the templates to the Manager, since the delegate already has the ARM templates. As it turns out, these templates may have Harness in-built variables (which we’ll cover in the second part of this blog series). A Delegate is stateless, meaning that it knows nothing about variables. It only knows how to execute the task. The Manager has all of the relevant details required to resolve these variables. Therefore, after downloading the templates, they are sent to the Manager so that it can resolve any Harness variables to which the templates are referring. Then, these rendered templates are sent to the Delegate for execution as a separate Task.
Conclusion
In this post, we learned the basics of ARM templates, and how we can deploy them using the Harness workflow engine. Furthermore, we learned the Harness deployment process and how communication happens between UI, Manager, and Delegate. In the next part of this series, we’ll learn about using Harness variables inside of the ARM template, and how Harness provides rollback support.
Stay tuned! And until then, perhaps you’d be interested in this piece on how Harness uses Harness CD?
Learn more: The Four Stages of Infrastructure Automation

All this author’s posts
Anil Chowdhury has spearheaded the development of our Continuous Delivery product at Harness, innovatively integrating it with major cloud providers like AWS and Azure.