Harness Blog
Featured Blogs
TLDR: Today, Harness is introducing the Harness Cursor Plugin, bringing the power of the Harness AI-native software delivery platform directly into Cursor. This integration, along with the Harness Secure AI Coding hook for Cursor, allows developers and AI agents to move from code changes to vulnerability detection, CI/CD execution, security validation, approvals, deployments, and operational insight without leaving the editor.
AI has completely changed how we write code. You can spin up functions, refactor entire files, and generate tests in seconds. The inner loop, writing and iterating on code, has never been faster. But the moment you try to ship that code, everything slows down. This is what we call the AI Velocity Paradox.
You are suddenly back to juggling pipelines, waiting on approvals, checking security scans, debugging failed runs, and bouncing between tools just to get a change into production.
That gap, between fast code and slow delivery, is what we kept running into. So we built something to fix it.
Today, we are introducing the Harness Plugin for Cursor, a way to go from PR to production without leaving your editor.
AI Made Coding Faster, But Delivery Did Not Catch Up
If you are using agentic coding tools, such as Cursor, you have probably felt this.
You can:
- Generate code instantly
- Understand unfamiliar repos faster
- Fix bugs and open PRs in minutes
But shipping still depends on everything outside your editor:
- CI/CD pipelines
- Security checks
- Approval flows
- Policy enforcement
- Deployment tooling
- Monitoring and debugging
And none of that got simpler just because AI showed up. In fact, AI makes the problem more obvious.
Now you can create changes faster than your delivery process can safely handle. And if those controls are not tight, you are introducing a whole new category of risk. Fast-moving code with fragmented governance.
AI did not break software delivery. It exposed how disconnected it already was.
What If You Could Just Ask
Instead of jumping between tools, what if you could just tell your editor what you want to happen?
Something like:
“Deploy PR #4821 to staging once the security scan passes, and Slack me if anything fails.”
That is the idea behind the Harness Cursor Plugin.
It connects Cursor directly to Harness, so you can trigger and manage your entire delivery workflow using natural language, right inside Cursor.
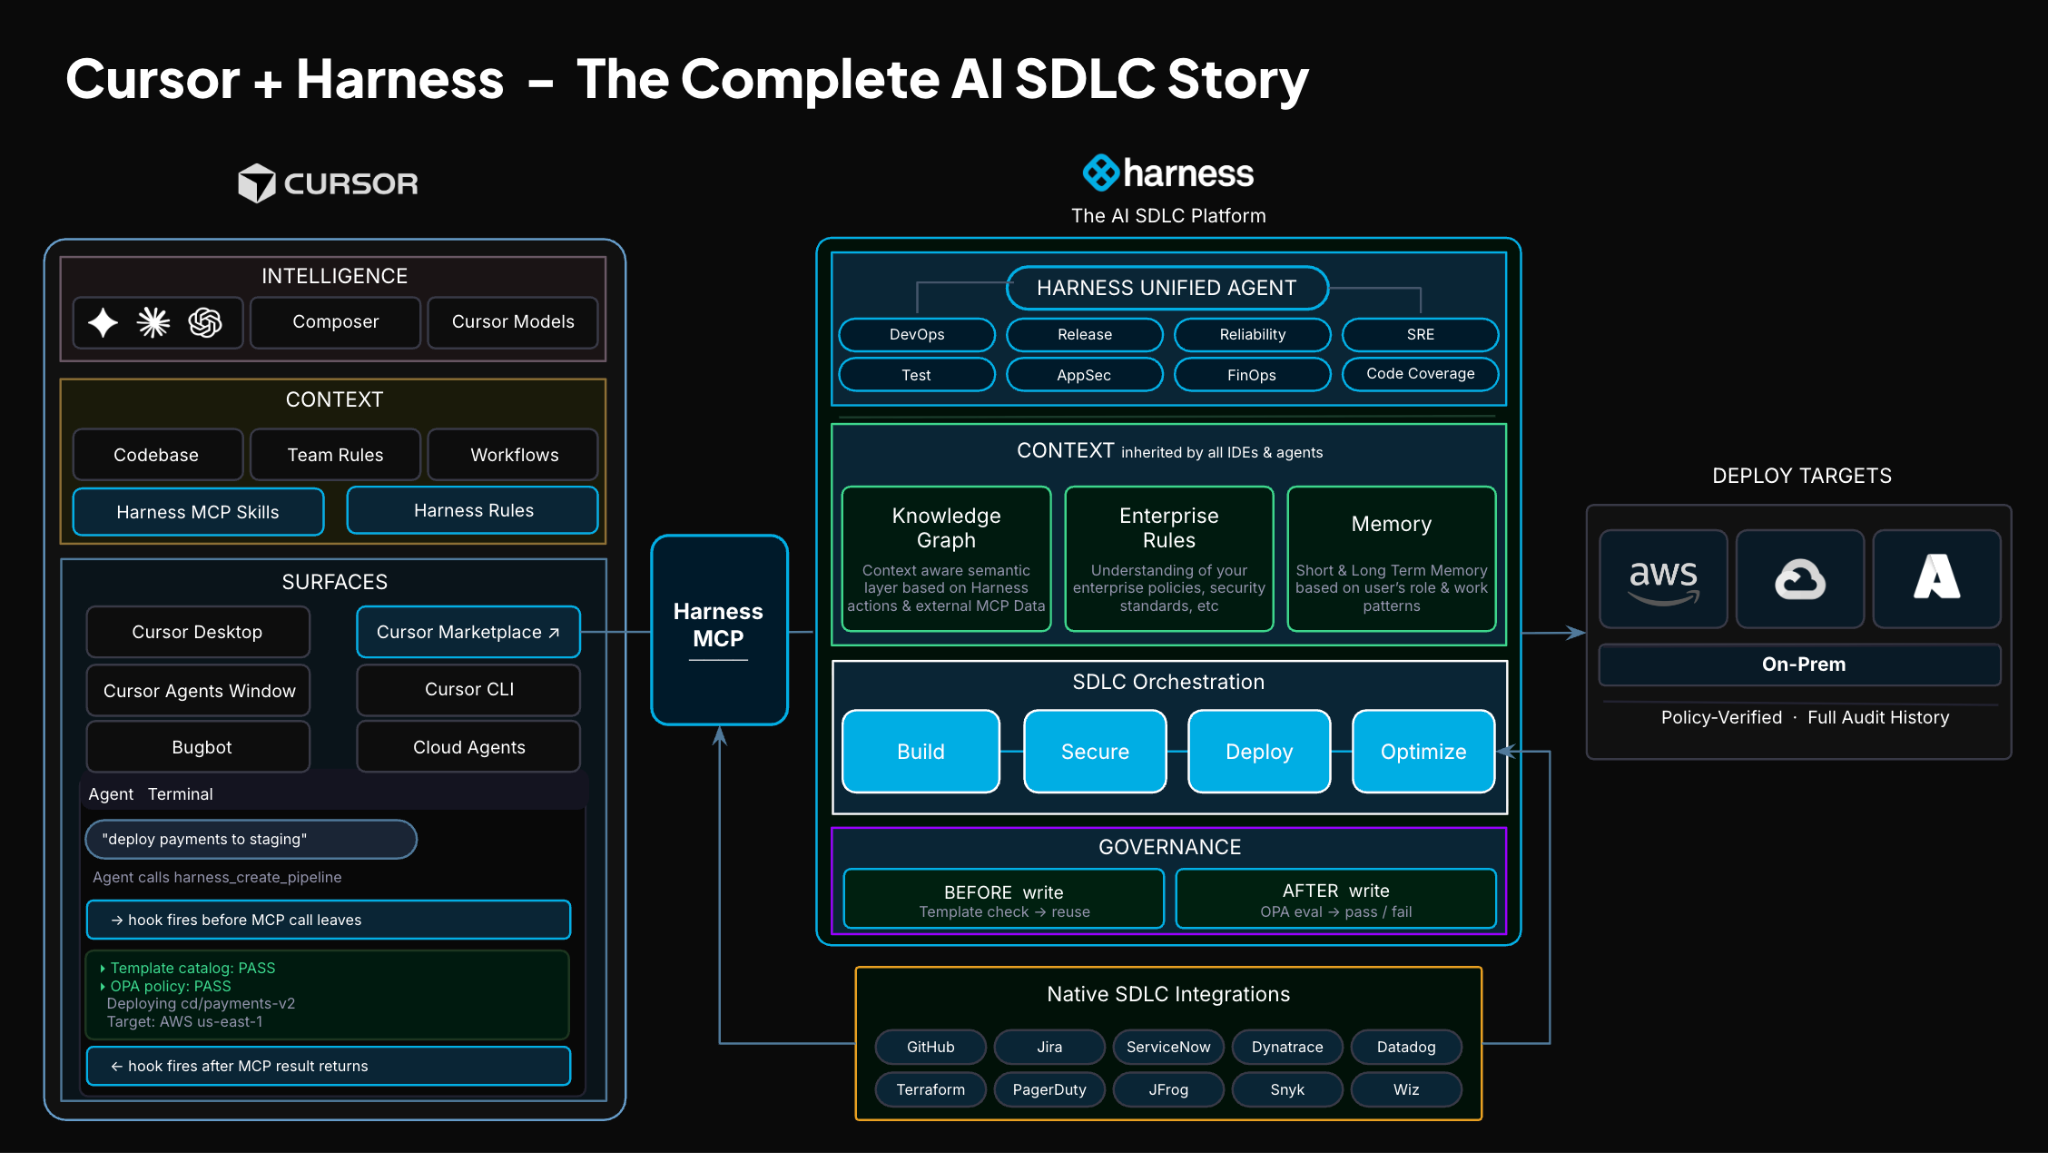
No tab switching. No manual orchestration. No guessing what is happening in the pipeline.
Some Sample Use Cases
Once connected, you can use Cursor to interact with your delivery system just as you do with your code.
For example, you can:

This builds on what we introduced last month, Secure AI Coding, which integrates directly with Cursor and scans code at the moment of generation rather than waiting for a PR review. Developers see inline vulnerability warnings with the option to send flagged code back to the agent for remediation, without leaving their workflow. Under the hood, it leverages Harness's Code Property Graph (CPG) to trace data flows across the entire codebase, surfacing complex vulnerabilities that simpler linting tools would miss.
The key thing is that you are no longer just interacting with code. You are interacting with the entire delivery system from the same place.
The Important Part: This Is Not Skipping Control
One of the biggest concerns with AI in delivery is obvious:
“Are we about to let agents push code to production without guardrails?”
No.
With Harness, everything runs through the controls that you can rely on:
- Granular RBAC permissions
- OPA policies
- Approval gates
- Audit logs
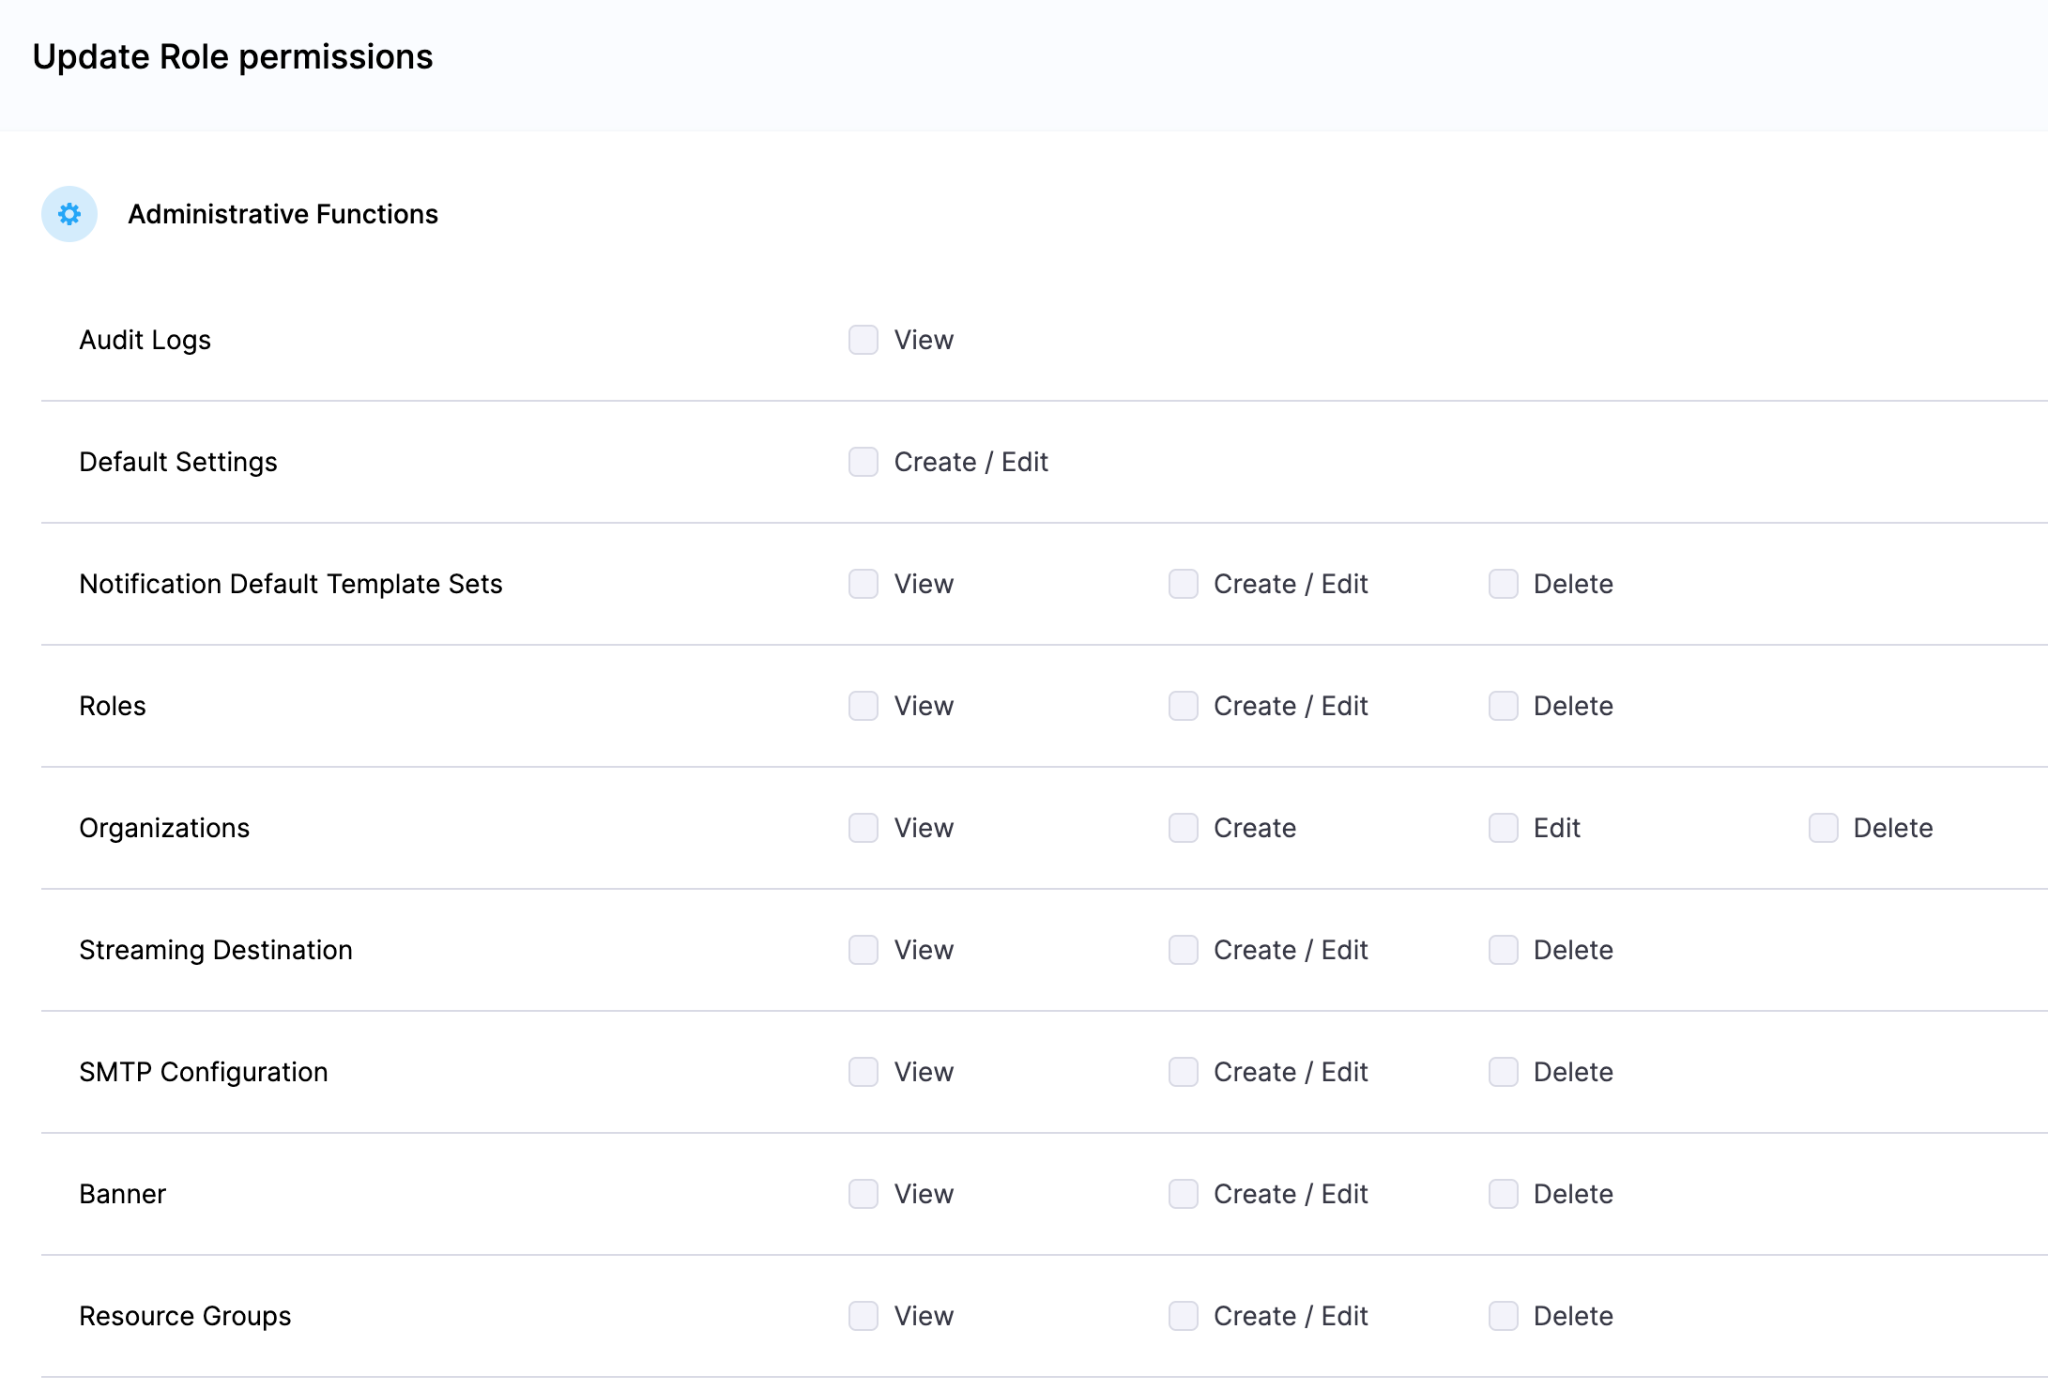
Instead of being manual checkpoints spread across tools, they are enforced automatically as part of the workflow while you stay in flow.
So AI can help move things faster, but it cannot bypass the governance that matters.
Why We Built It This Way
Most integrations today expose APIs or bolt AI onto existing systems. That is not what we wanted to do.
We designed the Harness Cursor Plugin specifically for how AI agents actually work:
- It is built around actions and workflows, not raw endpoints
- It spans the full delivery lifecycle, not just one step
- It gives agents enough context to reason about what to do next
Because shipping software is not a single action. It is a chain of decisions across CI, CD, security, approvals, and operations. If AI is going to help here, it needs access to that full picture. That’s where the Harness Software Delivery Knowledge Graph comes into play. It provides the necessary context for AI to take actions for you.
The knowledge graph models the relationships between services, pipelines, environments, policies, and operational signals in real time. Instead of treating each step in delivery as an isolated task, it creates a connected system of record that AI can reason over. This allows agents to understand not just what to do, but when and why to do it, based on dependencies, risk signals, and historical behavior.

In practice, this means smarter automation: deployments that adapt to context, approvals that are triggered based on policy and impact, and faster root cause analysis because the system already understands how everything is connected.
This Changes How Ideas Move To Prod
This is not just about convenience. It is a shift in how software actually moves from idea to production.
Instead of:
- Writing code in one place
- Managing delivery somewhere else
- And stitching it all together manually
You get a single, connected workflow:
- Code to pipeline to validation to deployment to operations
All accessible from your editor. Cursor accelerates the building. Harness governs the shipping. And the handoff between the two disappears.
Watch the demo:
Getting Started
If you want to try it:
- Install the Harness Cursor Plugin from the Cursor Marketplace
- Authenticate with Harness using OAuth. No API keys or setup headaches
- Start using natural language to run pipelines, debug issues, and manage deployments
For example:
“Run the CI pipeline for this branch, check if the security scan passed, and promote to staging if it did.”
That is it.
AI is not just changing how we write code. It is changing expectations for how fast we should be able to ship it. But speed without control does not work in real environments. What we are building toward is something simpler:
A world where every step, from PR to production, is:
- Fast
- Governed
- Observable
- Auditable
Without forcing developers to leave their flow. This plugin is one step in that direction.

- Harness IaCM introduces native Terragrunt support, enabling true enterprise-grade orchestration at scale.
- Teams can now manage Terraform, OpenTofu, and Terragrunt in a single platform without fragmented tooling.
- Built-in governance, policy enforcement, and approvals streamline secure infrastructure operations.
- End-to-end visibility and drift detection improve reliability across complex, multi-environment deployments.
- The launch marks a major step toward a unified, multi-IaC control plane for modern infrastructure teams.
Bringing First-Class Terragrunt Support to IaCM
“We’ve been operating in a hybrid environment with both OpenTofu and Terragrunt, and Harness has made it much easier to bring those workflows together into a single, consistent platform with IaCM. The addition of Terragrunt support is a valuable step toward simplifying how we manage infrastructure at scale.”
— Lead Platform Engineer, Enterprise Customer
Infrastructure as Code is now a standard for modern cloud operations, with most enterprises using IaC to provision and manage environments. However, as adoption grows, so does complexity. Teams are no longer managing a handful of environments. They are operating across multiple regions, accounts, and services, often at massive scale.
This is where traditional approaches begin to fall short.
As organizations scale their infrastructure, Terraform alone is often not enough. Teams adopt Terragrunt to manage complex, multi-environment deployments, but they are often forced to stitch together fragmented tooling that lacks visibility, governance, and consistency.
At Harness, we are changing that.
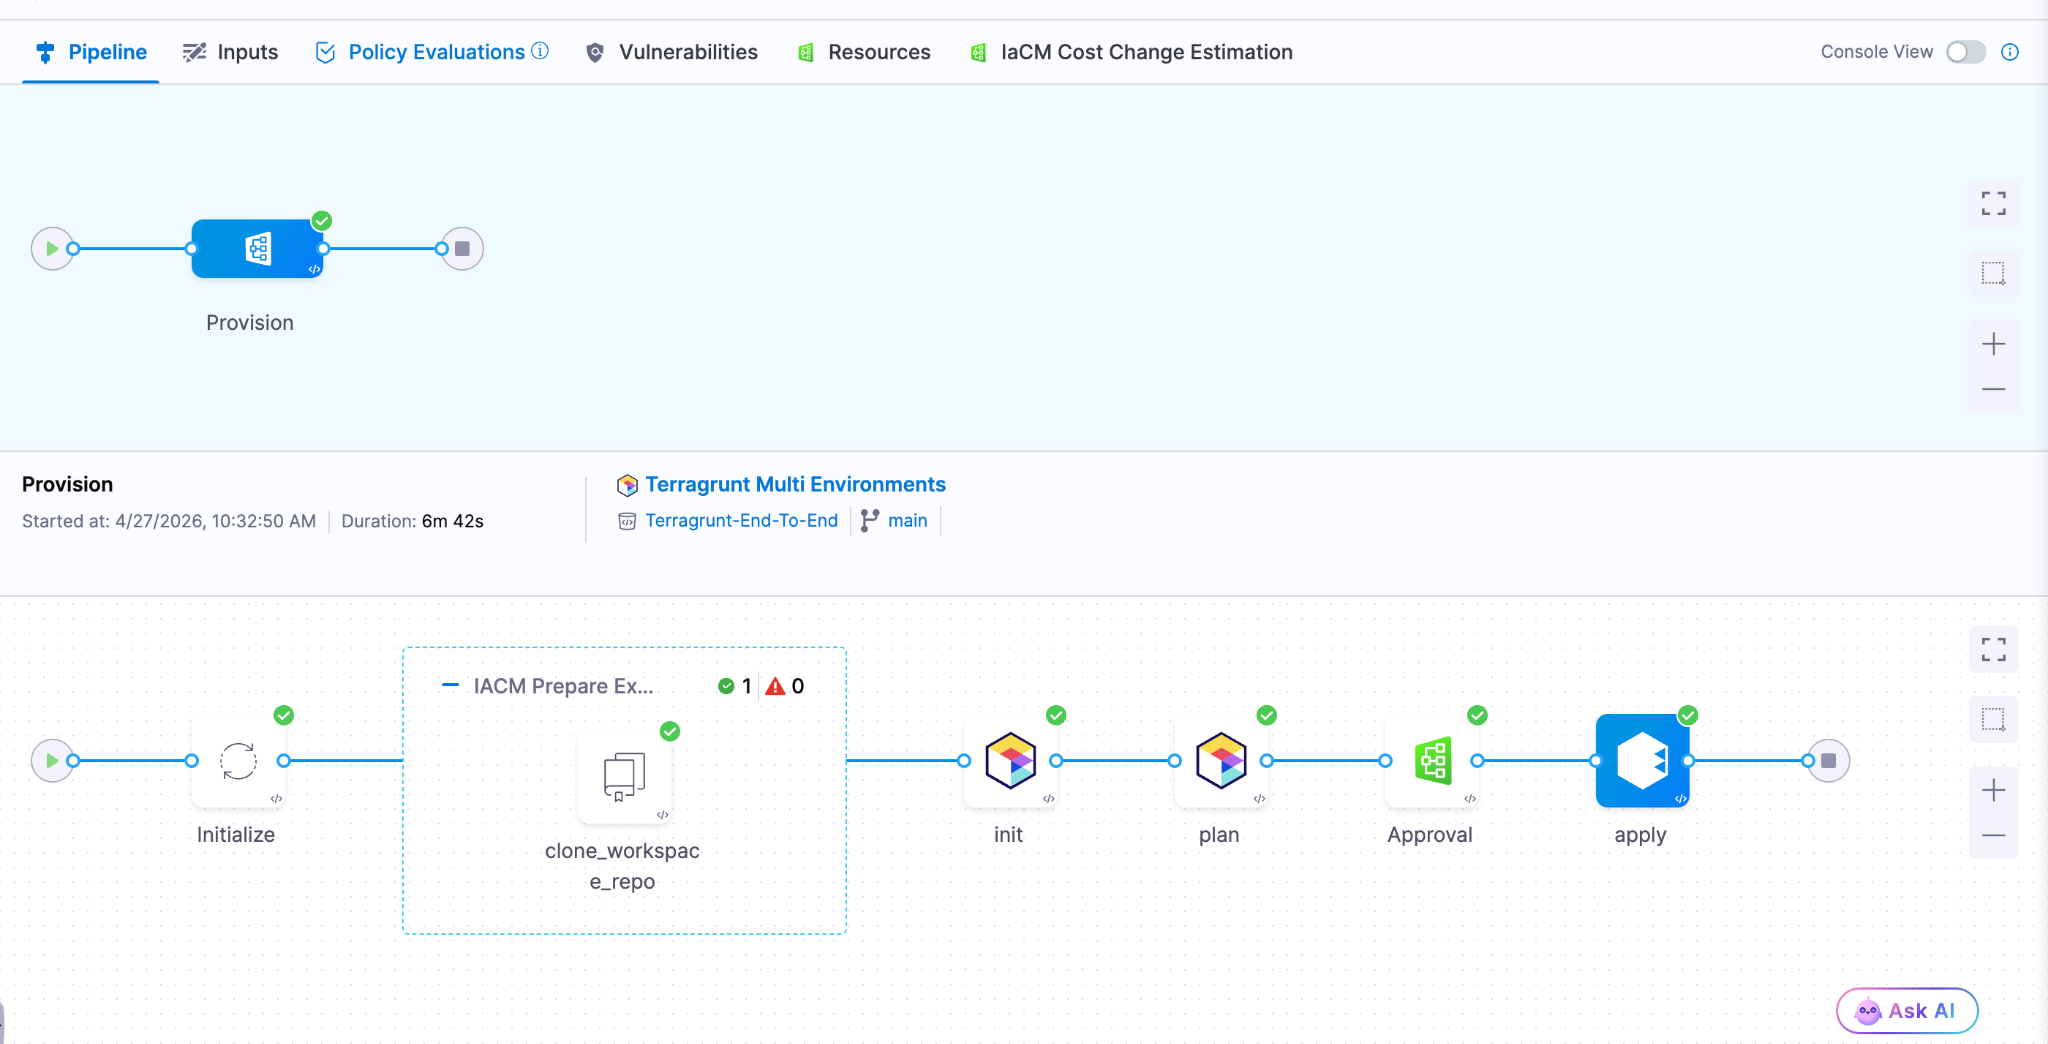
Today, we are excited to announce native Terragrunt support in Harness IaCM, bringing it to full parity with Terraform and OpenTofu while delivering capabilities that go beyond what is available in standalone tooling. This is more than support. It is about making Terragrunt a first-class platform for enterprise infrastructure management.
With Harness IaCM, teams can now:
- Orchestrate complex Terragrunt environments with full visibility across all units
- Apply cost estimation, approvals, and policy enforcement natively
- Detect and manage drift across environments with granular insights
- View infrastructure changes at the resource level across orchestrated deployments
Terragrunt has become a critical layer for managing infrastructure at scale because it simplifies how teams structure and reuse configurations across environments. Harness builds on that foundation with deep, native integration, enabling platform teams to operate with both flexibility and control.
This is especially important for enterprises where a single deployment spans multiple environments and services. Harness abstracts that complexity while maintaining governance, auditability, and consistency.
Extending IaCM to a Multi-IaC Future
Terragrunt is part of a broader shift toward multi-tool infrastructure strategies.
Modern teams are no longer standardized on a single IaC tool. Instead, they operate across:
- Terraform and OpenTofu for provisioning
- Terragrunt for orchestration
- CDK for developer-driven infrastructure
- Ansible for configuration and automation

This creates challenges around consistency, visibility, and governance. Harness IaCM is built for this reality. We are evolving IaCM into a unified control plane for multi-IaC workflows, where teams can manage different frameworks with a consistent experience, shared policies, and centralized visibility.
This means:
- Eliminating fragmented pipelines across tools
- Standardizing governance across environments
- Gaining full visibility into infrastructure state and changes
Instead of managing infrastructure in silos, teams can now operate from a single platform across the entire lifecycle.
What’s Next for Infrastructure as Code?
The next phase of Infrastructure as Code is not just about supporting more tools. It is about making infrastructure systems more intelligent and automated.
We are investing in two key areas:
Expanded IaC Support
We are continuing to support modern frameworks like AWS CDK, enabling developer-centric infrastructure workflows alongside provisioning, configuration, and orchestration tools.
AI-Driven Automation
We are introducing intelligence into IaC workflows to simplify tasks such as drift management and optimization. This helps teams reduce manual effort and operate more efficiently at scale.
Together, these investments move IaCM toward a unified, multi-IaC platform that combines flexibility, governance, and automation. Terragrunt has become essential for managing infrastructure at scale but until now, it hasn’t had a platform that truly supports it. As infrastructure continues to grow in complexity, our focus remains the same. Helping teams move faster, reduce risk, and scale with confidence no matter which IaC tools they use.

The release of Anthropic Mythos and Project Glasswing marks an exciting and pivotal new chapter in software development. As the industry advances, the speed and economics of vulnerability exploitation have fundamentally shifted. What once took weeks of manual reconnaissance can now be scaled rapidly through automated models. However, this is not just a security problem to solve. It is a massive engineering opportunity to build cleaner, more robust systems. By leaning into AI-accelerated defense, engineering teams are uniquely positioned to lead the charge and redesign the landscape of modern software architecture.
Breaking Down Silos and Establishing Shared Accountability
To succeed in this new era, the traditional silos separating security and engineering must fall. Defense at machine speed requires a unified front.
- Organizations need a shared roadmap and accountability model across Engineering, Infrastructure, and Security.
- These roadmaps must be crafted jointly with clear responsibility assigned per action item.
- Every executive and their corresponding team will be affected and accountable for changing the way work is done.
- Preparations for these improvements should be treated exactly like new product features.
- Savvy customers will start to pay attention to companies who are responding to Mythos, turning your proactive resilience into a highly visible competitive advantage.
Core Engineering Imperatives
The foundation of AI-accelerated defense relies on sound, proactive engineering practices. Developers must take ownership of architectural hygiene from the ground up.
- Accelerate velocity: Teams must focus heavily on shortening patch and change cycles (such as with Harness CI and CD). The single most important metric is how quickly you can safely make changes.
- Shift left completely: You must find bugs before you ship code. Achieve this by integrating SAST, SCA, and auto-pen testing into a secure pipeline, and prefer using memory safe code languages.
- Design for resilience: Always build with breach assumed. In practice, this means implementing zero-trust, isolating services by identity, and using short lived tokens by default.
- Simplify the architecture: As you engineer and build for resilience and simplicity , take time to audit your current code base to reduce dependencies and standardize on known good services and libraries. Additionally, actively reduce and inventory what you expose.
- Pay attention runtime: Aside from bugs, engineering teams haven’t traditionally paid attention to the run-time security of their applications. Aside from the functional insights developers can glean from runtime security tools, understanding how a system is attacked can help you make better architectural and functionality decisions.
Planning for the Unexpected
Even with the best architecture, unexpected friction will occur. Resilient engineering means planning comprehensively for your ecosystem.
- Ensure you know your software dependencies and precisely who to contact in emergencies.
- Engineering teams should build technical work-arounds for times when providers or internal systems experience issues.
- Organizations must establish a surge defense capability. When faced with a severe situation, have a SWAT team established with pre-approved authority, budget, and standard operating procedures across domains and outside help.
- At the company level, pre-position high-visibility incident response. This includes having pre-approved and crafted messaging triggered by established conditions.
Security as an AI-Powered Partner
To keep pace with the increased velocity of engineering teams, Security teams must also evolve their operational models.
- Security needs to leverage AI to de-toil high calorie activities.
- Practical applications include putting a model in front of your alert queue and testing it regularly.
- AI should also handle the triage and prioritization of scan findings alongside ticket ops automation.
- It is crucial to automate the technical incident response pipeline.
- By automating the bookkeeping around incidents, human decisions should be made with assistance at most.
- The ultimate goal is to find places to leverage AI and accelerate the time between incident and resolution.
Leading the Charge
Engineering leaders and developers are in the perfect position to navigate this industry inflection point. By taking ownership of these structural changes today, you ensure the long-term viability of your products and the enduring strength of your codebase. Bring your security, infrastructure, and engineering teams together into the same room and start building your shared roadmap today.
Latest Blogs

Automated Release Management: From CABs to Continuous Delivery
- CABs optimize for perceived safety, not actual risk reduction. Batched releases, surface-level reviews, and meeting cadence latency create the very risks they are intended to mitigate.
- Policy as code, automated quality gates, and continuous change tracking enforce the same rules on every change, consistently and at scale.
- Speed and safety are not a trade-off if you build the right controls. Smaller, iterative releases with automated verification limit the blast radius and shorten recovery time.
The thing with Change Advisory Boards is that the intent was always good. Get smart people in a room, look at the evidence, and make sure nothing catastrophic goes out the door. In theory, that's hard to argue with.
It doesn't scale in practice. Things happen between meetings. Teams rush to hit the window. The CAB meeting may not catch every risky deployment, but at least everyone can feel good about the process before the incident happens.
Automated release management asks a different question entirely. Not "did a human approve this?" but "has this change actually proven it's safe?" Governance moves into the pipeline itself, running the same checks on every change at whatever speed your teams ship.
That's exactly what Harness Continuous Delivery is built for: policy-driven pipelines, automated assurance, and governance that scales with your teams.
Automated Release Management: What Is It?
Automated release management replaces manual review and approval steps with automated quality gates, policy enforcement, and deployment orchestration.
Rather than routing change decisions through a central committee, automated systems evaluate each change against defined criteria like test coverage, security scans, rollback definitions and compliance checks, then approve or block it based on objective results.
That does not get rid of governance. It brings governance into the delivery pipeline and consistently applies it to all changes, not just the ones that make it onto a CAB agenda.
Automated release management paired with a continuous delivery platform allows teams to deploy frequently, recover quickly, and audit completely, with no meeting necessary.
The Traditional Model: Why CABs Can't Keep Up
The CAB model made sense when software changed slowly and release cycles were long. Cross-functional stakeholders would review evidence packets, testing results, deployment plans, security scans and determine if a release was safe to promote.
The problem is that the model doesn't scale well as the speed of delivery accelerates. Some patterns keep repeating themselves:
- Surface inspection. CAB members typically don't have deep, application-level context on the changes they are approving. Reviews are about whether the evidence packet looks complete, not if the change is actually safe.
- Grouped risk. Changes build up between cycles and ship together in larger releases. The bigger the release, the bigger the blast radius when things go wrong.
- Delayed compounding. Delays build up across teams and sprints waiting for the next CAB slot. Delivery speed becomes a function of the meeting cadence, not the capability of the team.
- Big overhead for engineers. Senior engineers spend hours compiling evidence packets and presenting to committees, time that could be spent shipping.
DORA's research provides a useful gut-check here: high-performing engineering teams deploy far more frequently than their peers with lower change failure rates, not higher. It's not approval volume that matters; it's pipeline discipline.
The fundamental problem is not that governance is bad. It is that a meeting-based governance model cannot keep up with a continuous delivery operating model.
From Approval Gates to Automated Assurance
The difference in automated release management boils down to a different question at the heart of the process.
Old model: Who approved this? New model: What did this change prove before we shipped it?
That reframe yields a meaningfully different architecture. Governance takes place on every change, not at scheduled times. Pass/fail criteria are deterministic, not subjective. Compliance is an output of the pipeline, not a prerequisite to enter it.
Building an Automated Release Management Pipeline

1. Continuous Change Tracking
All changes must be traceable without requiring manual compilation. Version control becomes the single source of truth. CI systems automatically generate commit history, build artifacts and deployment-linked changelogs as part of normal pipeline execution. By default, the audit trail is there.
Harness GitOps takes this a step further, using Git as the single source of truth for the state of the deployment. All configuration changes are versioned, all deployments are tracked, and drift is detected automatically.
2. Automated Quality Gates
Validation moves from presentations to execution. Quality gates run on every change: unit and integration tests, end-to-end validation, security and compliance scans, and performance checks. These are not release-window activities. They are part of the standard CI/CD pipeline, running continuously on every change that moves through.
Harness Powerful Pipelines supports multi-stage pipeline orchestration across complex environments with built-in test intelligence and conditional execution logic. Quality gates run fast and don't create unnecessary bottlenecks.
3. Policy as Code
CAB rules get codified in an automated release management model. No critical vulnerabilities before production promotion. Minimum thresholds for test coverage. Mandatory rollback procedure definitions. These policies are automatically enforced in the pipeline. Pass, and the change proceeds. Fail, and it's reliably blocked at scale, with no human bottleneck in the critical path.
That's what policy as code is all about: governance that's version-controlled, auditable and applied the same way every time.
Harness DevOps Pipeline Governance lets teams define and enforce pipeline policies in one place. Compliance is not something you check at the end. It's something the pipeline enforces throughout.
4. AI-Assisted Deployment Verification
Even with strong quality gates, production deployments carry residual risk. Test environments do not always mirror what production surfaces.
Harness AI-Assisted Deployment Verification automatically analyzes deployment health using ML to compare metrics, logs and traces against baseline behavior. When something drifts, it surfaces the signal quickly, enabling rollback before an incident escalates. This closes the loop between deployment and validation, making the pipeline genuinely self-correcting, not just self-approving.
Managing Complex, Interdependent Releases
In practice, systems rarely exist in isolation. One change can affect backend services, APIs, web apps, mobile apps and edge targets all at once. In tightly coupled systems, changes to one component can cause another to break, and partial deployments can be risky without careful coordination.
Traditional coordination uses spreadsheets, emails, and war rooms. Modern automated release management means orchestration: platforms that model service dependencies, trigger pipelines in the right order, and ensure all components pass quality gates before release. Multi-team coordination becomes a single-action, end-to-end deployment.
Harness Continuous Delivery has built-in support for orchestrated multi-service deployments with dependency mapping and conditional promotion logic. Deploy Anywhere extends this to cloud, hybrid, on-prem and edge environments without requiring separate toolchains for each target.
Harness pipelines also support canary deployments and GitOps-based progressive delivery for rollout strategies tailored to deployment risk.
Reducing Coupling Over Time
Managing interdependent releases is a good start. The goal is to reduce the coupling itself so teams can ship independently without synchronized multi-team deployments. Three practices tend to accelerate that:
- Contract testing. Services define and verify their contracts, so a change in one will not silently break others.
- Feature flags. Feature flags decouple code deployment from feature activation. Code ships continuously; features turn on when they're ready. They also act as a safety net post-deployment. If a feature causes unexpected behavior in production, it can be disabled instantly without a full rollback.
- Backward-compatible APIs. Designing for backward compatibility means downstream services do not have to be updated simultaneously with upstream changes.
Together, these patterns move teams toward the continuous delivery ideal: frequent, small, independent releases, each of which is safe on its own.
What Automated Release Management Delivers
The results of replacing CAB-driven processes with policy-driven pipelines and automated assurance are measurable:
- More velocity. Releases are continuous, not fixed to a cadence. Time to production goes from weeks to hours.
- Consistent quality. All changes go through the same validation, not just the ones that make it onto a CAB agenda.
- Less risk. Smaller incremental releases mean a smaller blast radius. Automated rollback means quicker recovery when things go wrong.
- Complete auditability. All changes, gates, policy checks and deployments are automatically documented with no manual evidence collection required.
Harness CD Visualize DevOps Data surfaces deployment frequency, change failure rates and mean time to recovery in real time. These are the DORA metrics that measure delivery health with zero instrumentation overhead.
Build Controls That Don't Slow You Down
CABs were created for a slower world, where a weekly review meeting could credibly keep up with the cadence of releases. That world is long gone for most engineering organizations today.
The takeaway here is this: automated release management doesn't remove governance. It rebuilds governance as a system that is fast, consistent, auditable and embedded directly in the delivery pipeline. The teams that move fastest aren't the ones with the loosest controls. They're the ones with controls that don't slow them down.
If you're ready to move from approval bottlenecks to automated assurance, Harness Continuous Delivery is built for exactly that.
Release Management: Frequently Asked Questions (FAQs)
What is automated release management?
Automated release management is the practice of using automated quality gates, policy enforcement and deployment orchestration to replace manual approval steps in the software release process. Rather than routing changes to a committee, the pipeline evaluates each change against predefined criteria and approves or blocks it based on objective results.
What is the difference between automated release management and a CAB process?
A CAB relies on scheduled human review to approve changes before they go into production. Automated release management takes that validation and builds it into the pipeline itself, running the same checks on every change instead of batching them for periodic review. The result is faster delivery with more consistent governance.
What are quality gates in a release pipeline?
Quality gates are automated checkpoints a change must pass before moving to the next stage. Common examples include test coverage thresholds, security scan results, and performance benchmarks. A change that fails a gate is blocked automatically, without human intervention.
What is policy as code?
Policy as code is the practice of expressing governance rules in version-controlled configuration files rather than documents or meeting agendas. The pipeline then automatically enforces those rules on every deployment, making compliance consistent and auditable by default.
What is the role of feature flags in automated release management?
Feature flags decouple code deployment from feature activation. Teams can ship code continuously without exposing unfinished features to users, and can disable a feature instantly if it causes issues in production, without triggering a full rollback.
What deployment strategies work best with automated release management?
Incremental strategies like canary deployments work well because they limit the blast radius of any given change. Paired with automated verification, the pipeline can catch problems early in the rollout and halt or roll back before they affect all users.
How does Harness support automated release management?
Harness Continuous Delivery provides end-to-end pipeline orchestration, built-in policy governance, GitOps-based change tracking, AI-assisted deployment verification, and real-time DORA metrics. It's designed to replace manual release processes with automated systems that scale across any environment.

Disaster Recovery Testing: A Practical Step-by-Step Guide for 2026
Most organizations don't fail at disaster recovery because they lack technology. They fail because they never tested their plans under realistic conditions. A runbook that hasn't been rehearsed is just a document. A backup that hasn't been restored is just a hope. If you're new to the topic, start with our introduction to disaster recovery testing before diving into this guide.
This guide is for teams who want to move from theory to practice. Whether you're an SRE managing recovery playbooks or a manager responsible for business continuity outcomes, the steps here will help you build a DR testing program that holds up when it matters most.
We'll walk through why DR testing is foundational, how to run it end-to-end, where most teams hit friction, and how modern tooling, including Harness, can close those gaps.
Why DR Testing Still Fails Without the Right Foundation
The word "disaster" conjures floods and fires, but the most common causes of major incidents in 2026 are far more mundane. Ransomware, misconfigurations, expired certificates, regional cloud disruptions, supply chain compromises, and plain human error account for the vast majority of outages. The fallout is predictable: revenue loss, missed SLAs, compliance findings, and lasting damage to brand credibility.
Regulatory and contractual pressure is also increasing. Frameworks like ISO 22301, ISO/IEC 27001, PCI DSS, HIPAA, and FFIEC now expect documented evidence of periodic DR testing, recorded outcomes, and tracked remediation, not just recommendations. In cloud environments, shared responsibility models still place the burden of workload recovery squarely on customers.
Teams that test proactively gain real advantages:
- Early detection of configuration drift that can silently break failover paths
- Validation that data is actually recoverable, not just backed up
- Faster, more predictable recovery through rehearsed runbooks and clear role assignments
- Lower operational risk and a stronger position with auditors, regulators, and insurers
- Better cross-team coordination when high-pressure moments arrive
The DR Testing Lifecycle: How to Think About It
The most effective DR programs treat testing as a product, not a project. A one-time exercise produces a snapshot. A repeatable lifecycle produces institutional resilience.
The lifecycle has three phases: Plan and Prepare, Execute and Monitor, and Review and Improve. Each phase feeds the next, and each test cycle should make the following one more efficient and more realistic.
Plan and Prepare
A poorly scoped test wastes time and produces misleading results. Planning is about defining what success looks like before you start.
- Define scope and objectives for each application tier, mapped explicitly to business impact
- Document all dependencies, data flows, and upstream/downstream service relationships
- Set success criteria aligned to your RTO and RPO targets, plus non-functional requirements like performance and security thresholds
- Select the appropriate test type, tabletop, simulation, parallel, or full failover, and determine duration, timing, and rollback criteria
- Establish a change freeze window and communication plan; get executive sponsorship confirmed before you begin
- Prepare test data, isolated environments, and verify that access permissions are in place for all participants
- Confirm vendor participation and review contract obligations and escalation contacts
- Ensure monitoring, logging, and time-stamped evidence capture are configured and tested
Don't skip the last point. Auditors and post-incident reviews both depend on evidence. If you can't prove what happened during the test, the test didn't happen.
Execute and Monitor
Execution is where plans meet reality. The goal is to follow the runbook faithfully while capturing everything that deviates from expectations.
- Follow the runbook step by step and record timestamps for each milestone. This data is essential for accurate RTO analysis.
- Operate with an incident command structure that assigns clear roles across operations, security, networking, application teams, and communications
- Capture telemetry continuously: performance metrics, data consistency checks, error rates, and user experience indicators
- Enforce predefined safety thresholds and be prepared to abort or roll back if risk escalates beyond acceptable limits
- For automated tests, orchestrate workflows that provision recovery infrastructure, validate configurations, and run service health checks end to end
A common mistake is running the test and only reviewing results afterward. Active monitoring during execution lets you catch cascading failures early and make real-time decisions, which is exactly the skill you're building.
Review and Improve
The after-action review is where a DR test becomes a DR program. Skip it, and you'll repeat the same failures.
- Hold a structured review within 48 hours while details are still fresh across all participating teams
- Compare actual performance against defined objectives; document every deviation and its root cause
- Update runbooks, architecture diagrams, configuration inventories, and contact lists based on what the test revealed
- Create clear remediation items with specific owners and defined due dates. Vague action items rarely get resolved.
- Schedule follow-up validations to confirm that fixes actually work and that changes haven't introduced new regressions
Treat your DR testing checklist as a living document. Each cycle should produce a cleaner, more accurate version than the previous one.
Common Challenges in DR Testing and How to Handle Them
Even well-intentioned DR programs run into predictable friction. Here's where teams typically struggle and how to build guardrails that help.
Resource Constraints and Cost
Full failover exercises require infrastructure, staff time, and a willingness to disrupt normal operations, all of which compete with feature delivery and day-to-day priorities.
The solution is a tiered testing schedule. Automate frequent, lightweight checks for lower-priority tiers. Reserve deep exercises for critical systems, and schedule them with enough lead time to secure capacity. Use on-demand cloud resources and ephemeral environments to run tests without provisioning dedicated infrastructure that sits idle between cycles.
Cross-Functional Engagement
Recovery doesn't belong to one team. It spans networking, security, databases, applications, and support functions. Without clear ownership, tests stall at handoff points.
Establish RACI matrices that specify who is responsible, accountable, consulted, and informed for each test phase. Secure executive sponsorship so that participation is a priority, not optional. Design scenarios that reflect the real risks each team faces, people engage more seriously when the exercise feels relevant to their work.
Plan and Dependency Gaps
Tests routinely surface undocumented dependencies, third-party SLA gaps, inconsistent IAM policies, and backups that restore corrupted or incomplete data. These findings can feel like failures, but they're actually the whole point.
Prioritize findings by business impact and remediate iteratively. Maintain configuration baselines and use drift detection to keep recovery environments aligned with production. Retest after remediation to confirm the fix holds.
How Harness Makes This Easier
Traditional DR testing required weeks of manual coordination, isolated toolchains, and one-off scripts that didn't connect to the systems teams already used. Harness Resilience Testing changes that by bringing chaos testing, load testing, and disaster recovery testing together in a single platform.
Instead of running each discipline separately, teams orchestrate everything inside their existing pipelines. Recovery steps can be automatically validated, failovers triggered, and monitored within CI/CD workflows, and risks surfaced early before they become incidents. The Harness Resilience Testing documentation walks through configuring and running these tests end-to-end, including chaos injection, load scenarios, and DR validation within a single orchestrated workflow.
The integrated approach removes the friction that causes most DR testing programs to atrophy. When testing fits into the tools and workflows engineers already use, it stops feeling like a separate project and becomes part of how work gets done. Teams using this kind of platform report faster recovery times and fewer surprises when real incidents occur.
Disaster Recovery Testing Is a Cycle, Not a Checkbox
A single DR test tells you where you stand on a single day, under a single set of conditions. A repeatable testing program tells you whether your resilience is improving over time and gives you the evidence to prove it to auditors, executives, and customers.
The lifecycle described here, planning with clear objectives, executing with discipline, and reviewing with rigor, is designed to compound. Each cycle should refine the next. Runbooks get sharper. Dependencies get documented. Gaps get closed before they become outages.
Once your testing process is solid, the next step is building a mature, metrics-driven program around it. In the next blog in this series, we'll cover DR testing best practices, the role of automation, and the metrics that tell you whether your resilience program is actually working. And if you missed the start of the series, catch up with our introduction to disaster recovery testing first.

The AI Productivity Paradox: We're Measuring the Gains and Missing the Costs
For the past year, I've been hearing a version of the same thing from engineering leaders: AI tools are working, productivity is up, the business case is there. And yet, something about the picture still feels incomplete. So we decided to go find out how widespread that feeling actually is. We surveyed 700 engineers and managers across five countries, and published the results in the State of Engineering Excellence 2026.
89% of engineering leaders say developer productivity has improved since deploying AI. It's a clean story. AI is working. Engineering teams are moving faster.
But, we also found that 81% of those same leaders say code review time has gone up since deploying AI. Significantly up, in a lot of cases. And, developers estimate that roughly a third of their day is now consumed by AI-related work that remains largely invisible to traditional productivity metrics.
So which is it? Is AI making engineering teams more productive, or simply shifting effort into places they don’t yet measure? After sitting with this data for a few weeks, the answer is both. That's the more honest read, even if it's less satisfying.
The gap between generating code and shipping value
AI has been very good at increasing output. Simultaneously, it has not automatically delivered more shipped value.
I talked to a customer recently, a large enterprise engineering org, and they were genuinely proud of how much their output metrics had improved. Lines of code written, PR velocity per developer, tickets closed, features delivered. All of it up. Then we dug into what was actually making it to production, and the numbers looked much less clean. A meaningful share of AI-generated code was not getting to production.
Most organizations can tell you how much AI code was accepted. Very few can tell you how much of it actually landed in production, and that's the number that matters. Hard dollars spent on agent compute that never shipped anything isn't a productivity story. That's a visibility gap, and it's one most organizations aren't measuring today.
What "invisible work" actually looks like
The 31% figure, the estimated share of developer time now consumed by AI-related work that appears in no metric, probably sounds abstract until you break down what it actually is.
It's a developer sitting with a pull request for 45 minutes because the AI-generated code is technically correct but written in a style nobody on the team recognizes, and they need to fully understand it before they can approve it. It's debugging a subtle edge case that the AI missed, which takes longer to track down than writing the function would have. It's working with 10 agents in parallel on 10 different tasks. None of this makes it into velocity or cycle time, and even code review metrics only catch a fraction of it.
What this data shows is that organizations are running a business where the costs are partially off the books. You can show your CFO a 20% productivity improvement and that's true. You just can't show them what it cost to get there.
High confidence in a broken system is its own problem
The finding that surprised me most: 89% of engineering leaders say their current metrics accurately reflect AI's impact. And 94% say key factors like tech debt, validation time, and developer burnout are missing from those same metrics.
When there's no established standard for measuring something, people default to trusting the frameworks they already know. Not because they've validated them for the new environment, but because they're familiar. High confidence in an incomplete system is a coping mechanism, not an accuracy signal.
The lesson: confidence in your measurement system should go up as you add instrumentation, not stay high when important dimensions of the work are still invisible. When 94% of leaders acknowledge gaps and only 6% think they're equipped to close them, that's not a minor calibration issue. That's a signal worth taking seriously.
The trust problem is structural, not individual
54% of practitioners fear individual performance evaluations based on AI productivity data. Managers, by contrast, show far greater comfort with these systems: they are nearly four times more likely than developers to report having no concerns at all.
Measurement systems almost always get built top-down, by the people who won't be measured by them. The practitioners who experience the day-to-day pressures of AI adoption, and who understand where invisible overhead actually lives, are rarely involved in defining the frameworks used to measure it. The result is a system that captures what leadership can see and misses what developers actually experience.
What developers said they need is straightforward: keep improvement data separate from performance evaluation, be transparent about what's being measured, and involve them in defining the metrics. None of that is technically hard. It requires organizational commitment. When measurement feels like surveillance, you don't get accurate data. You get people performing for the system instead of working in it.
What we're doing about it at Harness
The productivity gains from AI are real. The problem is that organizations are making multi-year investment decisions with dashboards built for a different era, and the gap between what those dashboards show and what's actually happening widens as AI adoption scales.
This is a problem we’ve been thinking deeply about at Harness. We’re working on new capabilities in Software Engineering Insights (SEI) that are designed to give engineering leaders visibility into the full picture: not just how much code is being generated, but how much of it is shipping, what the review and validation overhead actually looks like, and where AI spend is producing returns versus producing churn.
We believe the next generation of engineering measurement needs to be built for AI-native workflows, and we’ll be sharing more about that direction in the coming weeks.
Getting the measurement right isn't a reporting exercise. It's what makes the productivity gains from AI sustainable.
Download the full State of Engineering Excellence 2026 report [here].

Introducing Harness Release Orchestration: Enterprise Release Management, Reimagined
Modern software delivery has evolved far beyond single-service deployments. Today's releases span dozens of services, multiple teams, and complex approval workflows—coordinated through spreadsheets, Slack channels, and manual checklists scattered across tools. When a production release involves deploying ten microservices across three environments, enabling five feature flags, running security scans, collecting approvals from four stakeholders, and coordinating with three different teams, the question isn't whether you can ship—it's whether you can track what shipped, when it shipped, and who approved it.
Release Orchestration solves this. It provides a unified framework for modeling, scheduling, automating, and tracking complex software releases across teams, tools, and environments—giving you end-to-end visibility from planning through production deployment and monitoring.
Why Release Orchestration Matters
Without orchestration, enterprise releases become coordination nightmares. Status lives in spreadsheets that go stale within hours. Coordination happens through email threads spanning dozens of messages. There's no single source of truth for what was deployed, when, or by whom. Manual checklists drift out of sync. Approval workflows rely on memory and goodwill. And when something goes wrong at 2 AM, reconstructing what happened requires археology across multiple systems.
Release Orchestration transforms this chaos into structured, auditable, repeatable processes. Model your release blueprint once—defining phases, activities, dependencies, and approval gates—then execute it repeatedly with different configurations. Automate pipeline-backed steps while retaining manual sign-offs where governance requires them. Track activity-level status, phase-level progress, and overall release health in real time. Enforce approvals, capture sign-offs, and maintain a full audit trail linking code to deployment to business outcome.
The result? Releases that used to require days of coordination now run faster with complete visibility and zero spreadsheets.
How Release Orchestration Works
Release Orchestration introduces a structured, visual approach to modeling and executing releases. Define Processes—reusable blueprints composed of Phases (Build, Testing, Deployment) and Activities (automated pipelines, manual approvals, or nested subprocesses). Release Groups define cadences and automatically generate releases. The Release Calendar provides unified visibility across all releases. The Activity Store and Input Store promote reusability—define once, execute many times with different configurations. And ad hoc releases let you execute any process on demand when you need flexibility outside your regular schedule.
At its core, Release Orchestration delivers the foundational capabilities enterprise teams need: process modeling with visual editors, scheduled and recurring releases through release groups, real-time execution tracking with dependency management, comprehensive audit trails for compliance, and AI-powered process creation that transforms natural language descriptions into structured workflows. These capabilities form the foundation for enterprise release management at scale.
What's New: Capabilities Launching with Release Orchestration
Release Orchestration launches with a comprehensive set of capabilities designed for enterprise release management. Here's what you can do today.
Ad Hoc Releases: Create Releases On-the-Go
Not every release fits a scheduled release. Customer-specific deployments, unscheduled maintenance, and process testing need one-off releases. Ad hoc releases let you create and execute releases on demand-select a process, configure timing, provide inputs, and optionally run immediately. Test new processes in isolation, handle customer deployments without disrupting your calendar, or orchestrate emergency maintenance with full tracking and audit capabilities.
Multi-Service & Multi-Environment Support
Modern releases deploy multiple services across multiple environments. Release Orchestration's input system handles this through variable mapping—define global variables like releaseVersion and `targetEnvironment` once, and they flow automatically to all activities. Deploy to QA with "QA Inputs," production with "Production Inputs"—same process, different configurations. This eliminates repetitive data entry, ensures consistency, and scales from three services to thirty without growing complexity.
Notifications: Stay Informed at Every Step
Release Orchestration integrates with Harness's centralized notification framework, delivering alerts when releases start, pause for input, complete, or fail. Route notifications to Slack, email, PagerDuty, Microsoft Teams, or webhooks. Platform teams managing multiple releases shift from reactive monitoring to proactive awareness—get notified immediately when action is required.
Reporting: Download Detailed Execution Reports
Compliance reviews and post-mortems require detailed records. Release Orchestration provides downloadable Excel reports with complete execution history—every activity, status, timestamps, approvals, and inputs used. Generate reports for individual releases (sprint retrospectives) or release groups (quarterly audits). Activity-level detail meets compliance needs; process-level overviews serve executive summaries. All execution data is captured in the audit trail, allowing you to reconstruct exactly what happened during any release.
Filters: Find What Matters Fast
As releases scale, filters help you focus. Filter by source (ad hoc vs recurring), status (in progress, completed, failed), time window (this sprint, Q1 2026), environment (production, staging), or scope (specific orgs/projects). Platform teams filter to ad hoc releases for one-off deployments. Release managers filter by status for in-progress releases. Compliance teams filter by date range for audit periods. Transform an overwhelming calendar into a focused view of exactly what you need.
Hotfix Process: Fast-Track Emergency Releases
Production incidents don't wait for your release cadence. Release Orchestration supports hotfix workflows that fast-track emergency releases while maintaining governance. Mark releases as hotfixes to distinguish them in calendars and reports. The system detects execution conflicts—if a hotfix targets an environment where a release is running, you get visibility to coordinate decisions. Hotfixes use the same process structure, ensuring that approvals and audit trails are maintained. The hotfix designation flows through reports and logs, documenting emergency procedures for post-incident reviews. Speed meets governance.
Manual Activities: Approvals and Sign-Offs in Context
Not everything can be automated. Security reviews, architectural approvals, and stakeholder sign-offs require human judgment. Release Orchestration treats manual activities as first-class citizens with the same visibility and dependency support as automated activities. Manual activities pause execution until someone provides input—an approval, verification, or checklist confirmation. Notifications alert the responsible person; they review the context and complete the activity, optionally leaving notes. Manual activities can depend on automated activities (approval after deployment) or vice versa (deployment after approval). All completions appear in audit trails and reports for compliance documentation.
Building Releases That Match How You Work
Release Orchestration provides primitives—processes, phases, activities, dependencies, inputs—that compose to match how your organization ships software. Model microservice releases with parallel deployments and end-to-end tracking. Define compliance-driven releases with approval gates at critical checkpoints. Create streamlined hotfix workflows for emergencies. Coordinate feature flag enablement with deployments. Assign phase owners for multi-team coordination with notification-driven handoffs. The system scales from simple three-phase releases to complex workflows with fifty activities and nested subprocesses.
AI-Powered Process Creation
Harness AI transforms natural language descriptions into structured processes. Describe your workflow—"Create a multi-service release with phases for build, testing, deployment, and monitoring. Assign owners for Development, QA, and DevOps,"—and AI generates the complete structure with phases, activities, and dependencies. Refine the generated process by adding activities, adjusting dependencies, and configuring inputs. This reduces process modeling time from hours to minutes, making it practical to create specialized processes for different release types.
Real-Time Visibility Across the Release Lifecycle
Release Orchestration provides real-time tracking at three levels: activity (running, succeeded, failed, waiting), phase (overall progress), and process (end-to-end status). The execution graph shows phases as nodes, dependencies as arrows, and color-coded status on each activity. Drill into pipeline executions from the release view with one click. See approval history for manual activities—who approved, when, and with what notes. This unified view eliminates the need to check multiple systems. Platform teams can see at a glance which releases are progressing smoothly, which are awaiting approval, and which need attention. [Learn more →](https://developer.harness.io/docs/release-orchestration/execution/activity-execution-flow)
Get Started with Release Orchestration
Release Orchestration is available now in Harness. Contact Harness Support to enable the module for your account. Once enabled, explore Processes (model release blueprints), Release Calendar (schedule and track releases), Activity Store (reusable activities), and Input Store (configuration sets). The getting started guide walks you through creating your first AI-powered process, adding activities, and executing a release.
What's Next
We're actively developing additional capabilities: deeper analytics and insights (release velocity metrics, phase duration trends, failure pattern analysis), advanced dependency modeling (cross-release dependencies, environment-level locking), enhanced collaboration (in-line comments, Slack-native monitoring), a template marketplace for common release patterns, and API/GitOps for managing processes as code. The roadmap prioritizes capabilities that help teams ship faster with greater confidence.
Transform Your Release Process
Software delivery has evolved far beyond single-service deployments, but release management tooling hasn't kept pace. Spreadsheets, email coordination, and manual checklists don't scale to modern microservice architectures, multi-team workflows, and compliance requirements. Release Orchestration provides the unified framework enterprise teams need to model, automate, and track complex releases across teams, tools, and environments.
Define reusable processes. Execute them with different inputs. Track activity-level progress. Enforce approvals and capture sign-offs. Maintain complete audit trails. All in one place, integrated with the pipelines and deployment workflows you already use.
Ready to see it in action? Explore the Release Orchestration documentation or reach out to your Harness account team to discuss how Release Orchestration can transform your release workflows.
The future of release management isn't about doing the same manual coordination faster—it's about orchestrating releases as structured, repeatable, auditable processes. That future is available today.
Q1 2026 Product Update: Harness Pipeline
Welcome to our Q1 2026 Pipeline update! This quarter brings eight major enhancements that make pipeline development faster, validation easier, and governance stronger. From Git tags for immutable pipeline versions to AI-assisted policy authoring, these capabilities address the most common friction points teams encounter when scaling pipeline automation across their organizations. This update complements our Continuous Delivery & GitOps update released today, which covers expansions to the deployment platform and AI-powered verification.
Git Experience Enhancements
Pipeline development workflows gain significant GitX improvements this quarter, bringing immutable versioning, flexible testing, and pre-commit validation directly into your Git-based workflows.
Git Tags for Pipeline Executions
Pipelines stored in Git can now be triggered and executed from Git tags, not just branches. This unlocks release workflows where pipeline versions align with semantic versioning tags in your repository—when you tag a release as `v2.1.0` in Git, run that exact pipeline version via the UI or API. Tags provide immutable references to specific pipeline states, making it easy to replay historical pipeline configurations for compliance audits, debugging, or managing multiple product versions in parallel.
Learn more about Git tags for pipelines →
Branch Selection for Child Pipelines
Pipeline chaining now supports branch selection for child pipelines, not just the default master branch. When configuring a Pipeline stage, specify which branch of the child pipeline to execute, enabling proper testing of parent-child pipeline integrations before merging to production. This is crucial when output variables from the child pipeline are only available in a feature branch, or when you're testing coordinated changes across multiple chained pipelines.
Learn more about pipeline chaining →
Dry-Run Validation API
A new validation API lets you check pipeline YAML before committing changes to your repository. The API validates YAML syntax, schema conformance, entity references (Services, Environments, Connectors, Templates), RBAC permissions, OPA policy compliance, and expression syntax—all without actually running the pipeline or updating it in Harness. This closes a critical gap in GitOps workflows: changes made directly in GitHub bypass Harness validation, enabling teams to validate bulk updates in feature branches before merging and to catch configuration errors early.
DAG Support
Directed Acyclic Graph (DAG) execution support moves to Phase 2 with full UI integration. Define complex step dependencies in which multiple steps can run in parallel but must complete before downstream steps begin, within a single stage. DAG support enables sophisticated deployment patterns, such as parallel infrastructure provisioning followed by application deployment, or concurrent test suite execution with a final aggregation step. The visual graph makes it easy to understand execution flow and identify bottlenecks, while the declarative YAML representation keeps configuration simple.
Observability & Notifications
Pipeline observability and notification capabilities expand to give platform teams better visibility into queue states and more granular control over failure alerting.
Queued Pipeline Visibility
A new Account Settings page surfaces all queued pipelines across your entire account, showing queue position, org/project filters, and estimated execution order. The queue view includes bulk abort capabilities for queued pipelines and is available to Account Admins. For teams using pipeline queues to manage deployment locks or shared resource access, this visibility eliminates the mystery of why a pipeline is waiting and how long it's likely to remain queued.
Learn more about pipeline queuing →
Step-Specific Failure Notifications
Centralized notifications now support step-specific failure triggers, not just stage-level or pipeline-level failures. Configure notifications to fire only when a particular critical step fails—like a production deployment step or a compliance validation check—reducing alert noise and ensuring teams get notified about failures that actually matter. This granular control means you can route different failure types to different teams or channels: a failed security scan notifies the security team, while a failed deployment step notifies the on-call engineer.
Learn more about pipeline notifications →
Governance & Policy
OPA policy capabilities receive significant AI-powered enhancements and full GitX integration, making governance more accessible and easier to scale across organizations.
AI-Assisted Policy Authoring
An AI assistant helps write OPA policies, reducing the expertise barrier for policy creation. Describe your governance requirements in natural language, and the assistant generates the corresponding Rego policy with explanations of how it works. This democratizes policy authoring beyond Rego experts, enabling security teams, compliance officers, and platform engineers to codify governance requirements without deep OPA expertise.
Learn more about OPA AI Assistant →
Git Experience Support for OPA Policies
OPA policies now support the full GitX experience, including branch switching, bidirectional sync, and package name management. Policies can be developed and tested in feature branches before rolling out to production, with PR workflows providing change review and approval. This brings the same infrastructure-as-code benefits you have for pipelines and templates to your governance layer, enabling version control, change tracking, and collaborative policy development.
Learn more about OPA GitX integration →
Enhanced Policy Evaluation APIs
New APIs support evaluation by both policy set IDs and entity-type/action pairs, giving teams greater flexibility in structuring and applying policies across their organizations. This enables more sophisticated policy architectures in which different evaluation strategies can be applied to distinct workflows or organizational structures.
Learn more about OPA policies →
Get Started Today
The features highlighted in this update are available now in Harness Platform. Ready to see them in action? We've created a comprehensive video playlist that walks through these capabilities, featuring live demos and configuration guides.
Watch the Q1 2026 Pipeline Feature Playlist →
From Git-based pipeline versioning to AI-assisted policy authoring, this quarter delivers capabilities that streamline development workflows, improve validation practices, and strengthen governance controls. Whether you're managing dozens or thousands of pipelines, these enhancements reduce configuration overhead and align with how modern platform engineering teams scale automation across their organizations.
Be sure to also check out our companion post covering [Continuous Delivery & GitOps innovations](#)—including AI-powered verification, Azure Container Apps support, Windows deployment enhancements, and more.
Explore the documentation links throughout this post to dive deeper into each feature, or reach out to your Harness account team to discuss how these capabilities can accelerate your pipeline development and governance workflows.
What's coming next? Q2 2026 will bring advanced pipeline debugging capabilities, expanded expression engine functionality, and continued investment in GitX experience improvements. Stay tuned for more updates - we're just getting started.
Q1 2026 Product Update: Harness Continuous Delivery & GitOps
Welcome back to the quarterly update series! If you've been following along, you've seen how Q3 2025 brought [deeper control and strengthened integrations], while Q4 2025 [closed the year strong] with platform upgrades and quality-of-life improvements. The first quarter of 2026 builds on these foundations with AI-powered continuous verification that eliminates configuration overhead, expanded deployment platform support, and GitOps workflow enhancements that align with how teams actually ship software.
Deployments
Azure Container Apps Deployments
Native support for Azure Container Apps brings serverless container orchestration to your Azure workloads with the full Harness deployment experience. Azure Container Apps provides a fully managed platform for running microservices and containerized applications with automatic scaling based on HTTP traffic or events, and now you can deploy to it with the same confidence and control you have for Kubernetes, ECS, and other platforms.
Harness gives you two deployment strategies designed for Azure Container Apps' architecture. Choose Basic deployments for immediate traffic cutover when you need speed, or leverage Canary deployments with progressive traffic shifting (20% → 70% → 100%) using Azure Container Apps' built-in revision management to validate new versions under real production load. The platform includes an automated rollback that captures container app state before deployment, enabling instant recovery if issues arise. Authentication is flexible—support for both Azure OIDC (keyless authentication) and Service Principal methods means you can deploy across subscriptions using a single connector, with full support for Azure Container Registry (ACR) and Docker Hub as artifact sources.
Learn more about Azure Container Apps deployments →
Accelerating Windows Deployments
This year, we're focusing heavily on Windows deployments to address the performance and scalability challenges that enterprise Windows teams face every day. The two enhancements shipping this quarter are just the beginning—we're bringing the same innovation velocity to Windows deployments that you've come to expect across all Harness platforms. Stay tuned for more Windows Deployment capabilities throughout 2026 that will continue to streamline your deployment processes and eliminate friction in enterprise Windows environments.
Learn more about Windows deployments →
Windows Deployment Session Reuse
Windows Session Reuse eliminates redundant connection overhead by enabling delegate-wide session pooling, cutting connection setup time from 30-60 seconds to instant reuse in JEA environments. When a command step executes, Harness checks the pool for an existing idle session to the target host with matching credentials and reuses it immediately, dramatically reducing pipeline execution time for workflows with multiple command steps.
Learn more about Windows Session Reuse →
Multi-Host Deployment with Dynamic Targeting
Multi-Host Deployment with Dynamic Targeting extends Windows Deployment credential setup to dynamically target different hosts, enabling true parallel execution across multiple Windows servers. Configure multiple host groups within a single credential configuration, and Harness automatically routes commands to the appropriate servers based on your deployment strategy. This unlocks centralized credential management while maintaining the security boundaries required in JEA environments, enabling teams managing large Windows server fleets to deploy faster with reduced credential sprawl.
Learn more about Multi-Host Windows Deployments →
Smarter Amazon Elastic Container Service Management
Amazon ECS deployments get two powerful new capabilities that bring operational flexibility and automation to your container workloads.
Standalone ECS Scaling
Standalone ECS Scaling lets you scale services up or down without triggering a full deployment, enabling operators to respond to real-time demand without triggering change management processes. The new ECS Scale step lets you modify desired task counts on demand—whether you're responding to traffic spikes, performing maintenance windows, or testing capacity limits—without redeploying your application.
Learn more about ECS scaling →
ECS Scheduled Actions
ECS Scheduled Actions enable time-based scaling policies directly within your ECS service deployments, eliminating the need to manage scheduled actions separately in the AWS console while keeping your entire ECS configuration under version control. Define scheduled actions to automatically adjust desired task counts at specific times—scale up services before anticipated morning traffic, scale down during off-peak hours, or align capacity with predictable business patterns.
Learn more about ECS scheduled actions →
Terraform Security Enhancements
Terraform deployments now include automatic security protections that prevent accidental exposure of sensitive data throughout your pipeline workflows.
Masking Sensitive Terraform Outputs
Terraform outputs marked as `sensitive = true` are now automatically masked in the Harness UI, preventing accidental exposure of credentials, API keys, and other secrets in pipeline execution logs and output tabs. When Terraform outputs are marked as sensitive, Harness respects that designation and redacts the values wherever they appear—you can still reference these outputs in downstream steps using expressions, but the actual values remain encrypted and hidden from view.
Learn more about masking sensitive outputs →
Continuous Verification
This quarter's focus on continuous verification centers on eliminating configuration overhead through AI automation and expanding observability platform integrations. From zero-config deployment health analysis to Git-based configuration management, these capabilities make verification accessible to more teams while reducing the time to production-ready monitoring.
AI-Powered Continuous Verification
Alongside AI Verify, AI-assisted health source configuration makes traditional verification setup effortless through a guided workflow that discovers available signals from your observability platform, classifies them by deployment impact, and generates verification-ready configurations. Describe your service and monitoring goals in natural language, and the Configuration Agent automatically discovers relevant metrics, organizes them into intelligent categories, and generates the queries and thresholds for you—with human checkpoints for selection and refinement at every stage.
Fine-tune configurations with simple natural language inputs or create custom composite metrics on the fly. What used to take hours now takes minutes.
AI Verify eliminates the manual setup complexity that has traditionally slowed the adoption of continuous verification. No more baseline configuration, threshold tuning, or monitored service management. AI Verify deploys lightweight data-collection plugins into your Kubernetes cluster that collect, aggregate, and provide observability data while stripping personally identifiable information before it leaves your environment.
The plugins gather logs and metrics from your observability platforms and perform statistical and algorithmic anomaly detection. Large language models then contextualize these anomalies against your deployment verification criteria, filter false positives based on business-criticality, and synthesize natural-language root-cause insights with actionable remediation suggestions—all without requiring explicit baseline data. This shifts continuous verification from weeks of configuration work to immediate, intelligent monitoring that understands your services from day one.
Learn more about AI-powered verification →
Dynatrace DQL Support for Grail Metrics
Harness Continuous Verification now supports Dynatrace Query Language (DQL) for querying timeseries metrics from Dynatrace Grail, their next-generation data lakehouse. Craft sophisticated metric analysis using aggregation functions, enable dimension-based data splitting for per-instance continuous verification, and combine multiple data sources in a single query. This extends beyond the traditional Full Stack Observability model, giving you direct access to custom metric queries rather than relying solely on predefined metric packs.
Learn more about Dynatrace DQL support →
GitOps
GitOps workflows gain AI-powered intelligence, unified notifications, and enhanced PR capabilities this quarter. These improvements streamline application management, improve operational visibility, and align GitOps workflows with how teams naturally collaborate through pull requests.
AI-Powered GitOps Operations
AI-powered operations management brings natural language queries and intelligent automation to GitOps applications, AppSets, and clusters. Ask questions like "What applications are out of sync?" or "Which syncs failed in the past 24 hours?" and get instant answers drawn from your entire GitOps deployment landscape. The AI agent can also trigger operations—such as syncing all applications managing non-prod services with a single command or generating pipeline snippets for common GitOps workflows. This transforms dashboards and manual queries into conversational operations management, making GitOps accessible to platform teams, developers, and operators alike.
[Learn more about AI-powered GitOps →]
Centralized Notifications for GitOps Applications
GitOps applications now integrate with Harness's centralized notification framework, bringing the same notification capabilities available for pipelines to your GitOps workflows. Track application sync events—start, complete, success, and failure—alongside ApplicationSet creation, sync, and error events through Slack, email, PagerDuty, Microsoft Teams, or any webhook-compatible system. Configure notification rules at the account, organization, or project level using the same interface you already use for pipeline notifications.
Learn more about GitOps notifications →
Enhanced PR Workflows for GitOps
GitOps PR-based workflows get two key improvements. The Update Release Repo step can now block until the raised PR is merged, eliminating the need for separate Merge PR steps and manual approval stage coordination—the step creates the PR, waits for review, and proceeds once merged. Squash and Merge Support brings native squash-and-merge strategies to the Merge PR step, working with GitHub App tokens and following your repository's configured merge strategies to maintain a clean, linear repository history.
[Learn more about PR pipelines →]
Get Started Today
The features highlighted in this update are available now in Harness CD and GitOps. Ready to see them in action? We've created a comprehensive video playlist that walks through these capabilities, featuring live demos and configuration guides.
Watch the Q1 2026 Feature Playlist →
From AI-powered verification that understands your deployments from day one to Windows performance breakthroughs and GitOps workflow enhancements, this quarter delivers capabilities that eliminate configuration overhead, expand platform coverage, and align with how modern teams ship software.
Explore the documentation links throughout this post to dive deeper into each feature, or reach out to your Harness account team to discuss how these capabilities can accelerate your delivery workflows.
What's coming next? Q2 2026 will bring deeper integrations with cloud-native platforms, expanded AI capabilities across the deployment lifecycle, and continued investment in developer experience improvements. Stay tuned for more updates—we're just getting started.

AI in Software Delivery: Engineering Excellence or Just Market Hype?
AWS re:Invent 2025 made one thing very clear: enterprise interest in AI is no longer theoretical. The conversation has moved beyond curiosity. Teams are actively experimenting, leaders are looking for production-ready use cases, and engineering organizations are trying to figure out where AI can create real leverage across software delivery, security, platform engineering, and operations.
That part is real. But after five interviews at the event, I came away with a more important takeaway: AI is not removing the need for engineering discipline. It is increasing. Many of the challenges organizations are now running into with AI are not really AI problems at all. They are governance problems, process problems, data problems, platform problems, and measurement problems. AI is just making them harder to ignore.
Pattern #1: AI Is Accelerating Output, but Also Exposing Weak Systems
A lot of the market conversation still centers on speed. Faster code generation, faster documentation, faster testing support, faster issue resolution, faster delivery. And there is truth in that. Across the interviews, there was broad agreement that AI is already creating meaningful value across the software development lifecycle, especially by helping teams move faster through repetitive work.
But speed by itself is not the breakthrough. What matters is whether the system around that speed is strong enough to absorb it.
Tim Knapp, who leads Slalom's product engineering capability in Chicago, put it bluntly: you cannot layer AI on top of broken processes and expect transformation. Many enterprises are still operating from a waterfall mindset dressed up in modern tooling, and that mismatch becomes more expensive the faster AI pushes output through the pipeline. As Tim described it, every team is feeling the AI imperative right now, but the people and the processes are still trying to figure out how to adapt to a technology side that just changed drastically.
If engineering organizations already struggle with inconsistent processes, weak standards, poor documentation, siloed ownership, or unclear governance, then AI does not solve those issues. It amplifies them. The question is no longer just, "Can AI help teams move faster?" The better question is, "Can our engineering system handle what AI is about to accelerate?"
Pattern #2: The Most Practical Value Is Removing Friction, Not Replacing Engineers
One of the more grounded themes I heard was that AI's immediate value is often less glamorous than the headlines suggest. It is not that developers disappear. It is that developers spend less time on drag.
Eric Baran, who manages Amazon's global financial services developer platform business, described this clearly. The teams he works with are finding the most impact not from AI-generated features, but from offloading all the surrounding work (test creation, pipeline configuration, infrastructure templating, deployment patterns) that was eating into developers' days. As Eric put it, many developers were only writing lines of code on actual features for an hour or two out of their day before AI entered the picture. The rest was operational weight. When AI reduces that weight, developers get meaningful time back to focus on what actually differentiates the product.
This is where some of the loudest AI narratives miss the mark. The most valuable use of AI in engineering may not be autonomous software creation. It may be freeing teams from the work that keeps real innovation from happening.
Pattern #3: More Generated Code Creates a Bigger Governance Problem
It is easy to celebrate increased output. It is harder to govern it. That tension came up again and again.
Ron Miller, editor of the Fast Forward newsletter, shared a story that captured this perfectly. He overheard two developers in a Miami coffee shop. One of them was bleary-eyed, telling his friend he had been up all night reading 10,000 lines of code. His buddy suggested using AI to review it. The response: no, I have to know my code. Ron's point was sharp. Even though AI is generating code faster, someone still has to understand what is moving into production, and that responsibility does not shrink just because the volume grows.
Eric Baran echoed this from the enterprise side. His financial services clients are seeing an explosion of code coming off AI engines, but the regulatory and governance requirements have not changed. Teams that already struggled to keep up with compliance before AI are now moving even faster into territory they cannot fully audit. As Eric described it, customers keep coming back to the table saying they need to get better at actually getting this code out, and making sure their audit and governance teams can confirm it was built to spec.
This is where many organizations will get stuck. They will assume the bottleneck is still code creation, when in reality the bottleneck is shifting toward validation, governance, and operational trust. The winners in the next phase of AI adoption will not just be the teams that can generate faster. They will be the teams that can govern faster. be the teams that can govern faster.
Speed without trust is not transformation. It is just a faster risk.
Pattern #4: Platform Engineering Is Becoming Even More Strategic
If AI increases the pace of software creation, platform engineering becomes more important, not less. Someone still has to create the paved road. To make the secure path the easy path, reduce cognitive load, standardize workflows without creating more friction, and design systems where governance is built in rather than layered on after the fact.
Hasif Calp, a technology leader with over 16 years at Cisco who holds both platform engineering and security leadership roles, used a phrase that stuck with me: frictionless security. His argument is that most security friction comes not from the controls themselves, but from how they are implemented. When organizations rely on slow approval chains and human gates that overwhelm the people in them, the result is not better security. It is a clicking exercise where nobody fully understands the implications of what they are approving. Hasif advocated instead for making it easy to do the right thing through platform engineering, so that good security and fast delivery are not in conflict.
The more power AI gives teams, the more important it becomes to have strong internal platforms, clear golden paths, embedded controls, and systems that guide good behavior by default. That is the right goal. Not security by slowdown, not security by ticket queue, but security that fits naturally into how software is built and delivered.
That model was valuable before AI. It becomes essential with AI.
Pattern #5: Context and Judgment Are Becoming Premium Skills
One of the more underrated themes from these interviews was that AI does not just raise the value of technical infrastructure. It also raises the value of human clarity.
Ron Miller made a compelling case for this. As a writer, he has watched the narrative around AI and communication skills closely, and he pushed back hard on the idea that writing becomes less important in an AI-driven world. His argument is exactly the opposite. If you are building an agent or designing a prompt that will drive real automation, the quality of how you articulate intent matters enormously. You have to understand a process deeply, and then you have to be able to communicate it in a way that models can act on. That is a writing skill, and it is becoming more important, not less.
Tim Knapp built on this from the engineering side with the concept of context engineering. His framing was vivid. Every time you make a call to an LLM or invoke an agent in your IDE, you might as well be pulling somebody brand new off the street who knows nothing about what you are trying to do. If organizations do not invest in structuring and maintaining layers of context alongside their codebases, the AI will not perform. Tim described this as an emerging discipline that teams are just beginning to take seriously, and one that could become a real differentiator.
The future is not just model-driven. It is context-driven.
Pattern #6: The Old Enterprise Habits Are Getting More Expensive
AI may be new. Enterprise dysfunction is not. Another pattern that came through clearly is that many organizations are still carrying old habits that were expensive before AI and become even more expensive after it. Slow approval chains, waterfall thinking in modern clothes, measurement that creates theater instead of clarity, security models that rely too heavily on human gates, buying tools without changing operating rhythms, and mistaking experimentation for operational adoption.
Ron Miller captured the broader landscape well. Most of the CIOs and CTOs he talks to know they have to move toward AI, but many are still stuck in experimentation mode rather than production deployment. The knowing and the doing remain far apart.
Piyush Dewan, a director of software engineering at BridgeBio Medicines, offered a concrete example of how process rigidity undermines delivery. He described how over-engineered agile methodologies (the capacity planning rituals, the strict sprint predictability expectations) often cause teams to lose sight of what they actually need to deliver and how they should innovate. In his view, the emphasis on process compliance can become its own form of waste.
Tim Knapp reinforced this point by recommending that organizations remove agile project metrics from QBRs entirely. Story points and defect counts are useful internal signals for delivery teams, but they need heavy context to mean anything, and at the QBR level, they often create more theater than clarity. What matters at that altitude is whether timelines were met, how scope was managed, and what outcomes were actually delivered.
This is part of why so many leaders are now talking about centers of excellence, shared governance, and tighter collaboration between platform, security, and engineering leadership. AI does not just require new tools. It requires a more mature operating model around those tools.
Trying a model is easy. Running the business differently is the hard part.
The Bigger Takeaway: AI Is Testing the Operating Model
This is what all five interviews really pointed out. The AI era is not just about adopting new capabilities. It is about whether the organization itself is ready to operate differently. That includes better internal platforms, clearer governance, stronger delivery controls, more usable system context, tighter alignment between engineering, security, and operations, and a more disciplined way of measuring what is actually improving.
The organizations that benefit most from AI will not just be the ones that experiment the fastest. They will be the ones that modernize the system around the experimentation. That is the difference between a promising demo and durable advantage.
Where This Goes Next
If I had to summarize what I heard at AWS re:Invent in one sentence, it would be this: AI is not bypassing engineering excellence. It is making it more necessary.
Yes, the AI tools are getting better. Yes, the use cases are becoming more tangible. Yes, teams are finding real value. But none of that removes the need for strong platforms, clear governance, trustworthy delivery systems, and disciplined operating models. If anything, it raises the bar.
The next wave of competitive advantage will not come from using AI in isolated ways. It will come from building an engineering organization that can turn AI into reliable, scalable, governed outcomes. That is a much harder challenge than generating more code. And it is the one that matters.

API Security Testing Just Got Easier & Smarter
Application security & engineering teams are under pressure to move faster, cover more, and reduce the operational drag that often comes with security testing. But in practice, two problems keep slowing teams down and adding friction.
- Scan setup is often more complicated than it needs to be. Teams lose time navigating fragmented configuration flows, interpreting unclear fields, and correcting setup mistakes that only surface later. Even when teams know precisely what they want to test, configuring a scan correctly becomes a project of its own.
- Test generation is only valuable when the targets behind it are actually reachable and executable. When APIs are unreachable, improperly mapped, or blocked due to missing authentication, teams end up generating tests that consume runner resources and waste time without producing meaningful results. That creates noise, extends scan times, and makes it harder to focus on other actionable results.
Harness API Testing Enhancements at a Glance
Today, we’re introducing several important enhancements to Harness API Testing that are designed to solve these exact issues and make API scans easier to configure, more reliable, and more efficient.
Improved Configuration Experience
The new scan configuration experience is built to reduce friction from the moment a user clicks “Create Scan.” It simplifies the setup flow, improves validation, and provides users with more guidance directly in context, rather than forcing them to guess or leave the page for help.
The highlights include:
- A simpler, more structured configuration flow - to reduce the cognitive load of stepping through an extensive setup process, the scan creation experience has been consolidated into three clearer sections to help you focus on what matters.
- Field-level guidance everywhere it matters - every configuration field now includes tooltips and helper text, with step-level documentation available alongside the workflow. You get immediate explanations of what each field does and how to configure it correctly.
- Stronger validation early - the new experience focuses on automatic validation to avoid invalid names, incorrect selections, and incomplete inputs before finalizing creation of a scan, which translates to fewer failed setups and less trial-and-error.
- Inline creation for dependent entities - you can now create items such as policies, authentication methods, and runners directly within the scan flow via inline panels, without navigating away in the interface and breaking momentum.
Added API Endpoint Validation
The new reachability validations in XAST Replay and DAST help you confirm whether APIs are actually reachable and properly authenticated, so scan execution stays focused on targets that can produce real results.
The highlights include:
- Dedicated Reachability Test view in scan configuration - each scan now includes a Reachability Test tab that provides a rundown of API endpoint-level readiness before test generation proceeds.
- Detailed endpoint visibility - you can see the full list of API endpoints, service mappings, reachability status, response codes, and response descriptions in one place.
- Downloadable CSV for analysis and troubleshooting - results can be exported for offline review, making it easier for you to share findings, investigate failures, and track patterns across environments.
- Smarter test generation control - helps reduce irrelevant noise by preventing test cases from being generated for APIs that are unreachable or fail authentication.
Why Teams Struggle with API Security Testing
These launches address two persistent sources of friction in API security testing: configuration complexity and execution inefficiency. Both slow teams down, create avoidable rework, and make it harder to get to meaningful security outcomes.
1. Scan setup has been too easy to get wrong
The problem is not just that the setup takes time. It is that the experience in tooling has often lacked enough structure, validation, and in-context explanation.
When configuration is too complex, users are far more likely to:
- Enter incomplete or incorrect settings
- Hesitate because they are unsure what a field requires
- Depend on internal experts or professional services to get a scan configured properly
- Spend more time troubleshooting than actually testing APIs
Security teams have long been dealing with incorrect or incomplete configurations, unclear field usage, and longer times to initially create a successful scan.
2. Weak validation delays necessary feedback
Without strong validation at the point of initial setup, users can move forward thinking a scan is correctly configured, only to discover later that something was malformed, missing, or misunderstood.
That creates a chain reaction:
- Errors are caught after setup instead of during setup
- Users have to backtrack and redo work
- Confidence in the scan creation process drops
- Time-to-value gets stretched unnecessarily
Without validations, helper text, tooltips, and field-specific guidance, it’s easy to make mistakes when entering wrong inputs and making selections.
3. Fragmented workflows break momentum
Context switching creates another major issue. If users need to leave the scan flow to create a policy, configure authentication, or add a runner, the API test setup experience becomes fragmented.
That fragmentation leads to:
- Slower scan creation
- More abandoned or half-finished workflows
- Higher odds of misconfiguration
- Less intuitive user experience
Teams often waste time bouncing between multiple pages and increase the likelihood of mistakes without inline workflows.
4. Test generation doesn’t equate to execution readiness
On the execution end of the equation, teams may encounter cases where tests are generated even when the target APIs are unreachable or not properly authenticated.
That leads to several downstream problems:
- Unnecessary test generation
- Wasted runner resources
- More noise in scan output
- Longer scan times
When API endpoint targets aren’t validated upfront, the result is unnecessary test generation and low-quality output.
5. High activity does not always mean high value
Large numbers of generated tests can look impressive on release dashboards, but if those tests are tied to unreachable APIs, they fail to create real security value.
Teams are left with:
- Inflated scan activity metrics
- Less trust in reported results
- Wasted time separating signal from noise
- Reduced confidence around coverage
Improper scan configurations that produce high volumes of poor results yield inaccurate metrics that are critical to application security programs. This reality can create a false sense of confidence in security posture.
A Closer Look at What’s New in Harness API Testing
These enhancements improve two critical parts of the API testing experience: how scans are configured and how test execution readiness is validated.
Scan Configuration Revamp & Validation Enhancement
Rather than spreading configuration across a larger set of steps, the new flow reduces the experience to three main sections that are:
- General - define the basics, such as scan name, environment, frequency, and incremental scan behavior.
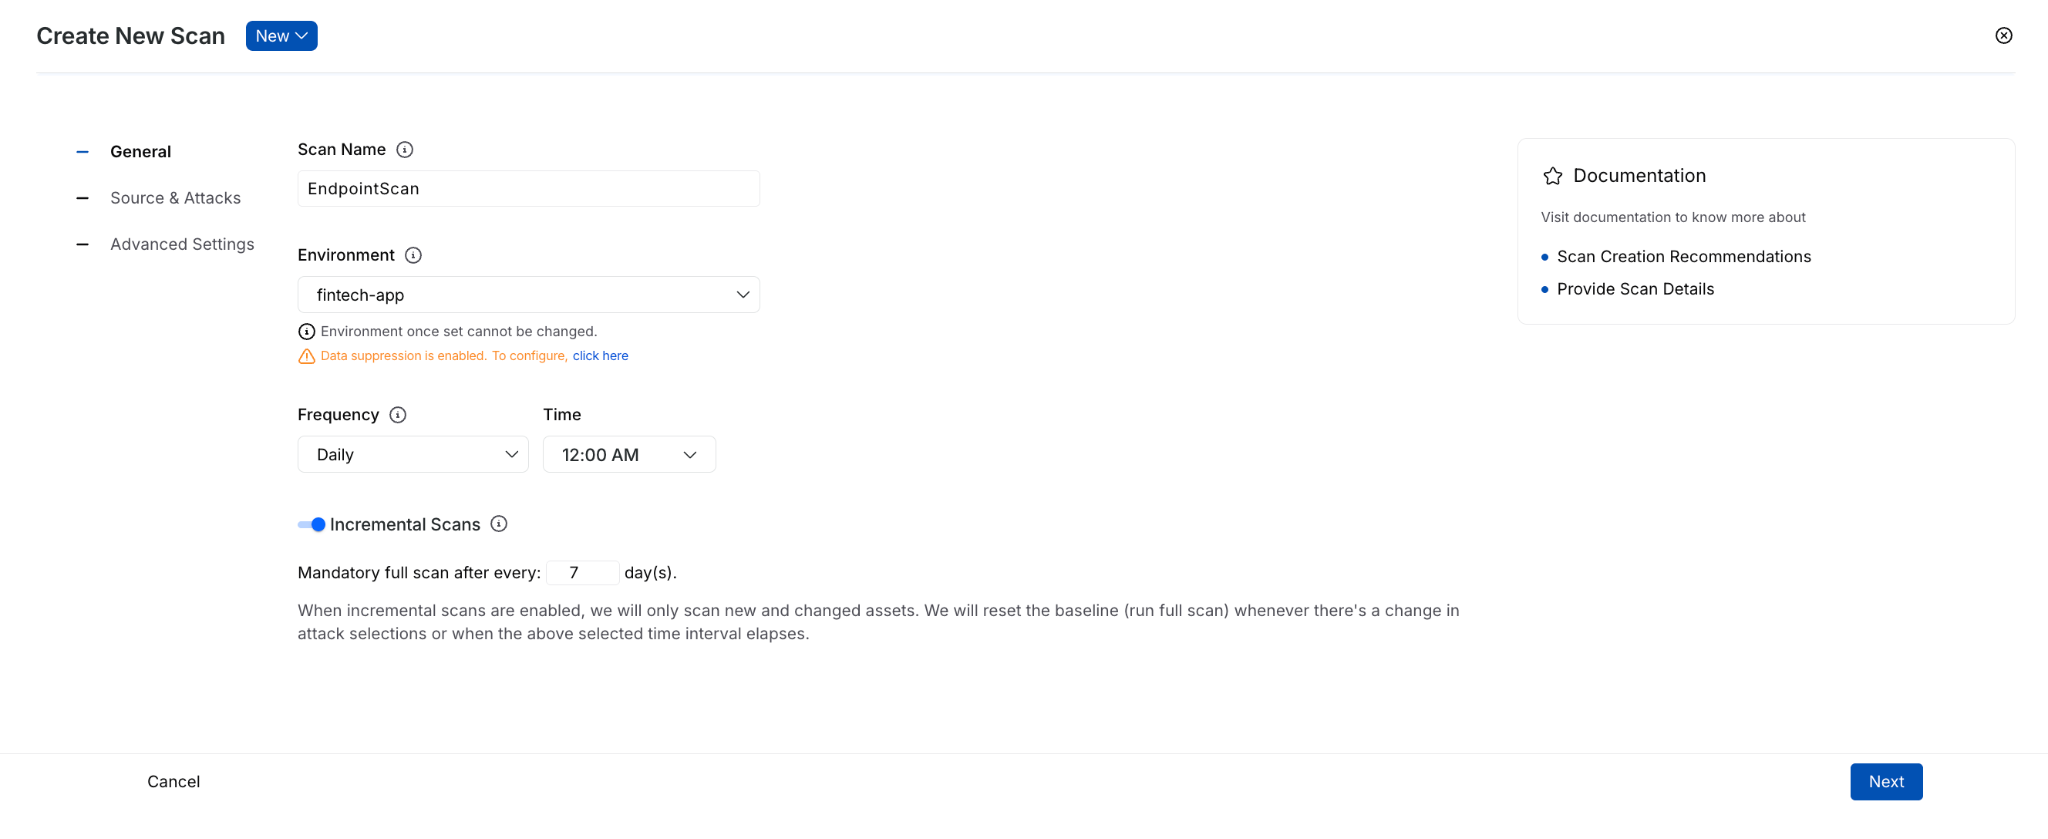
- Source & Attacks - select traffic and policy.

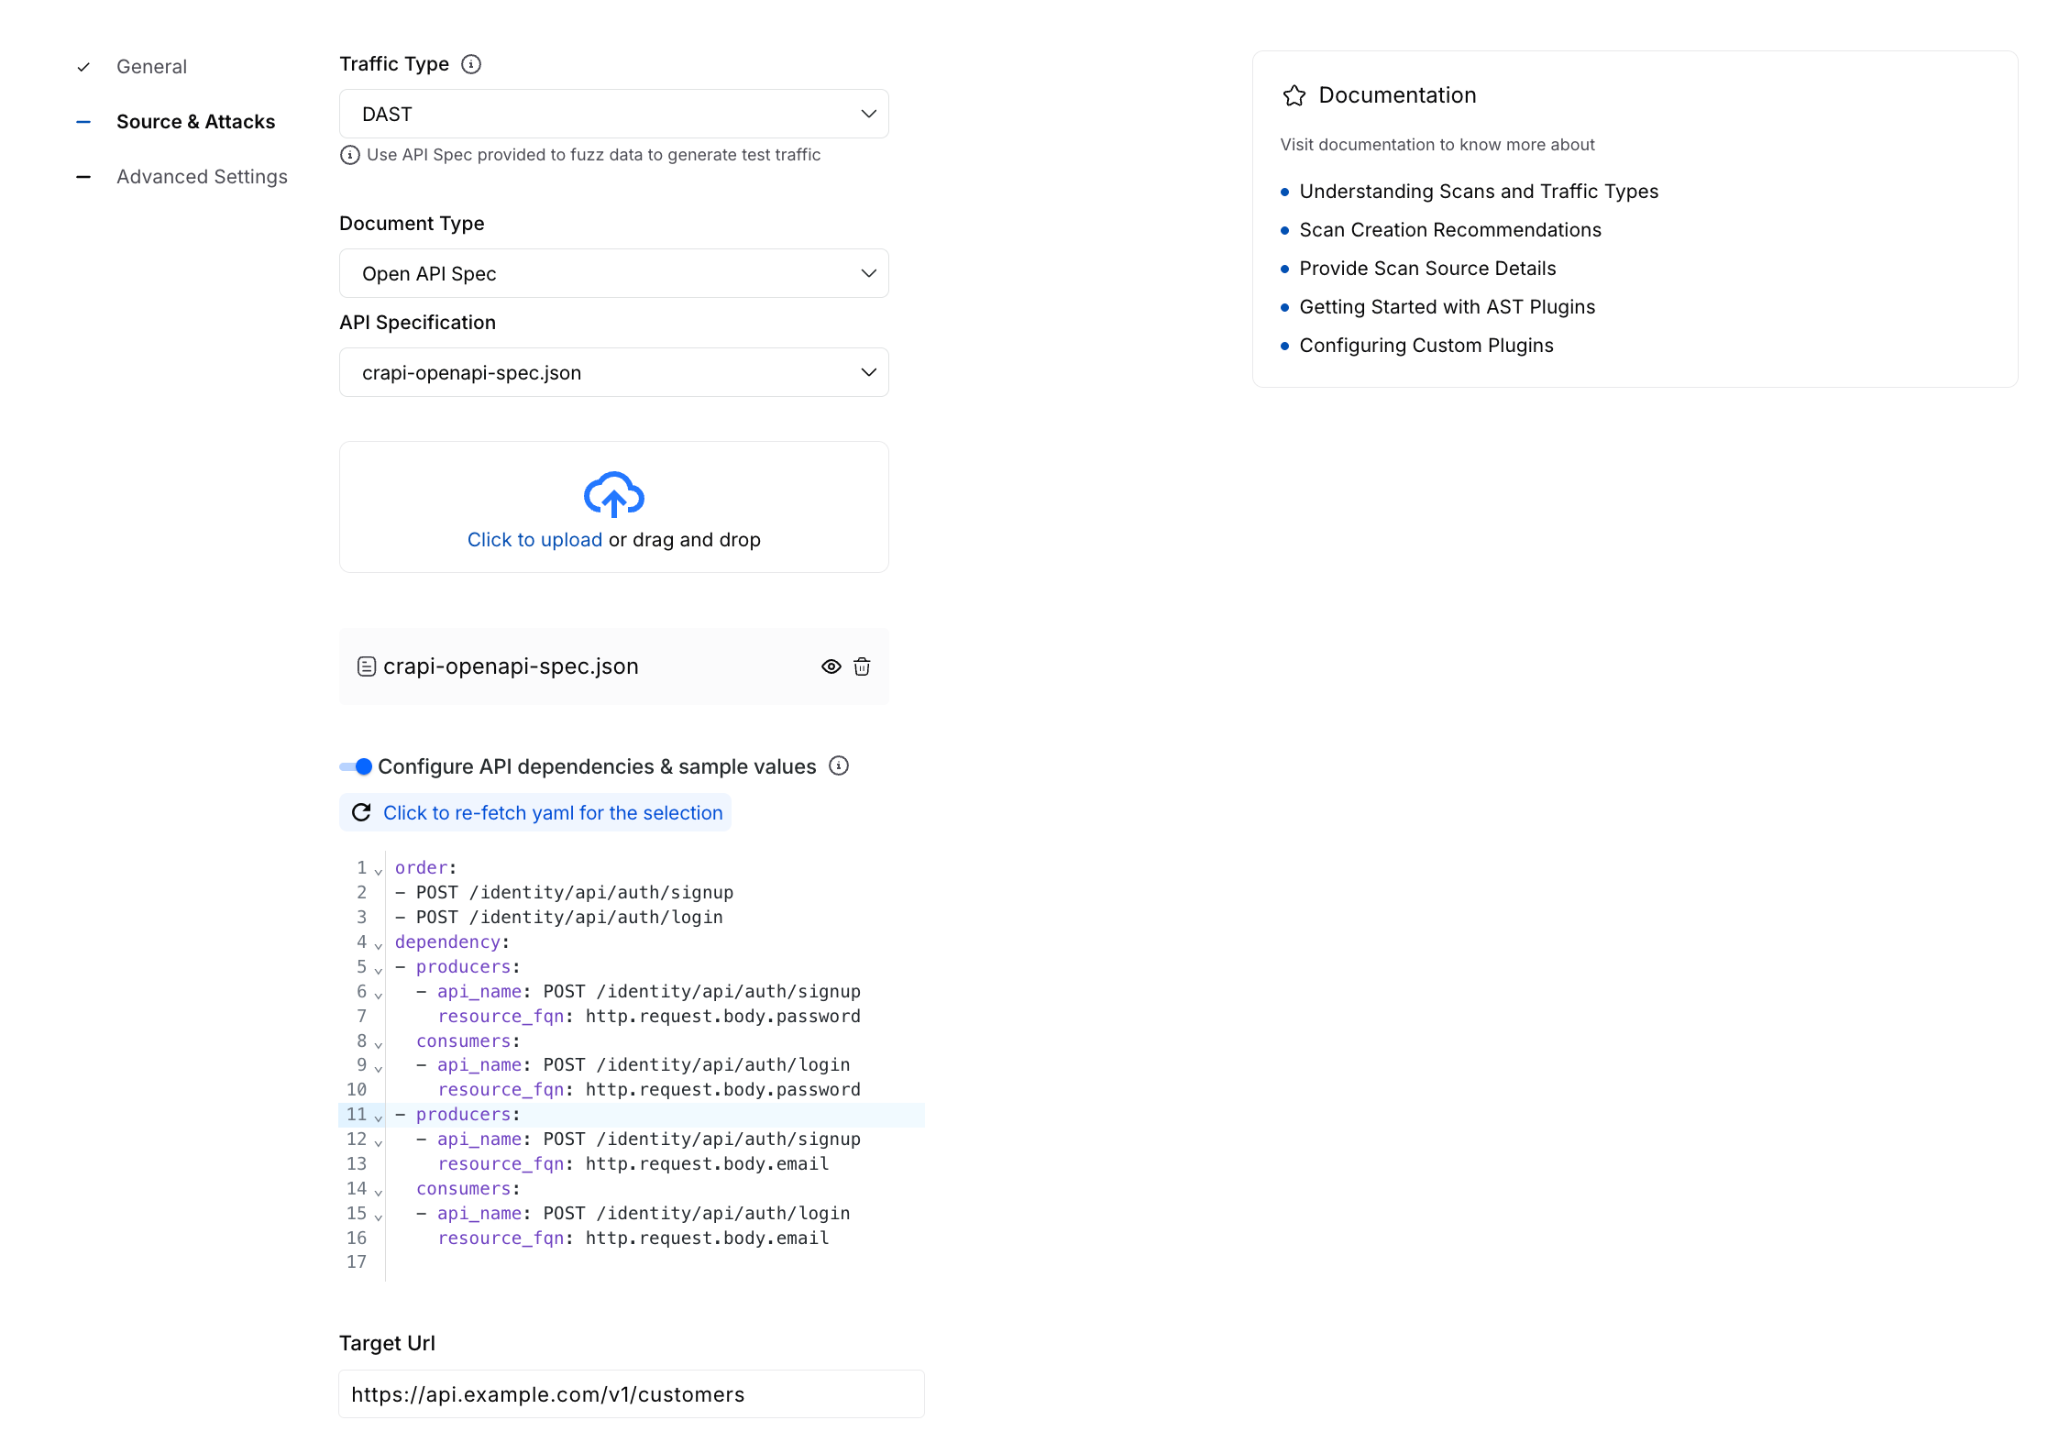
- Advanced Settings - configure optional items such as authentication, runners, traffic filters, URL regex, evaluation criteria, timeout behavior, and integrations.
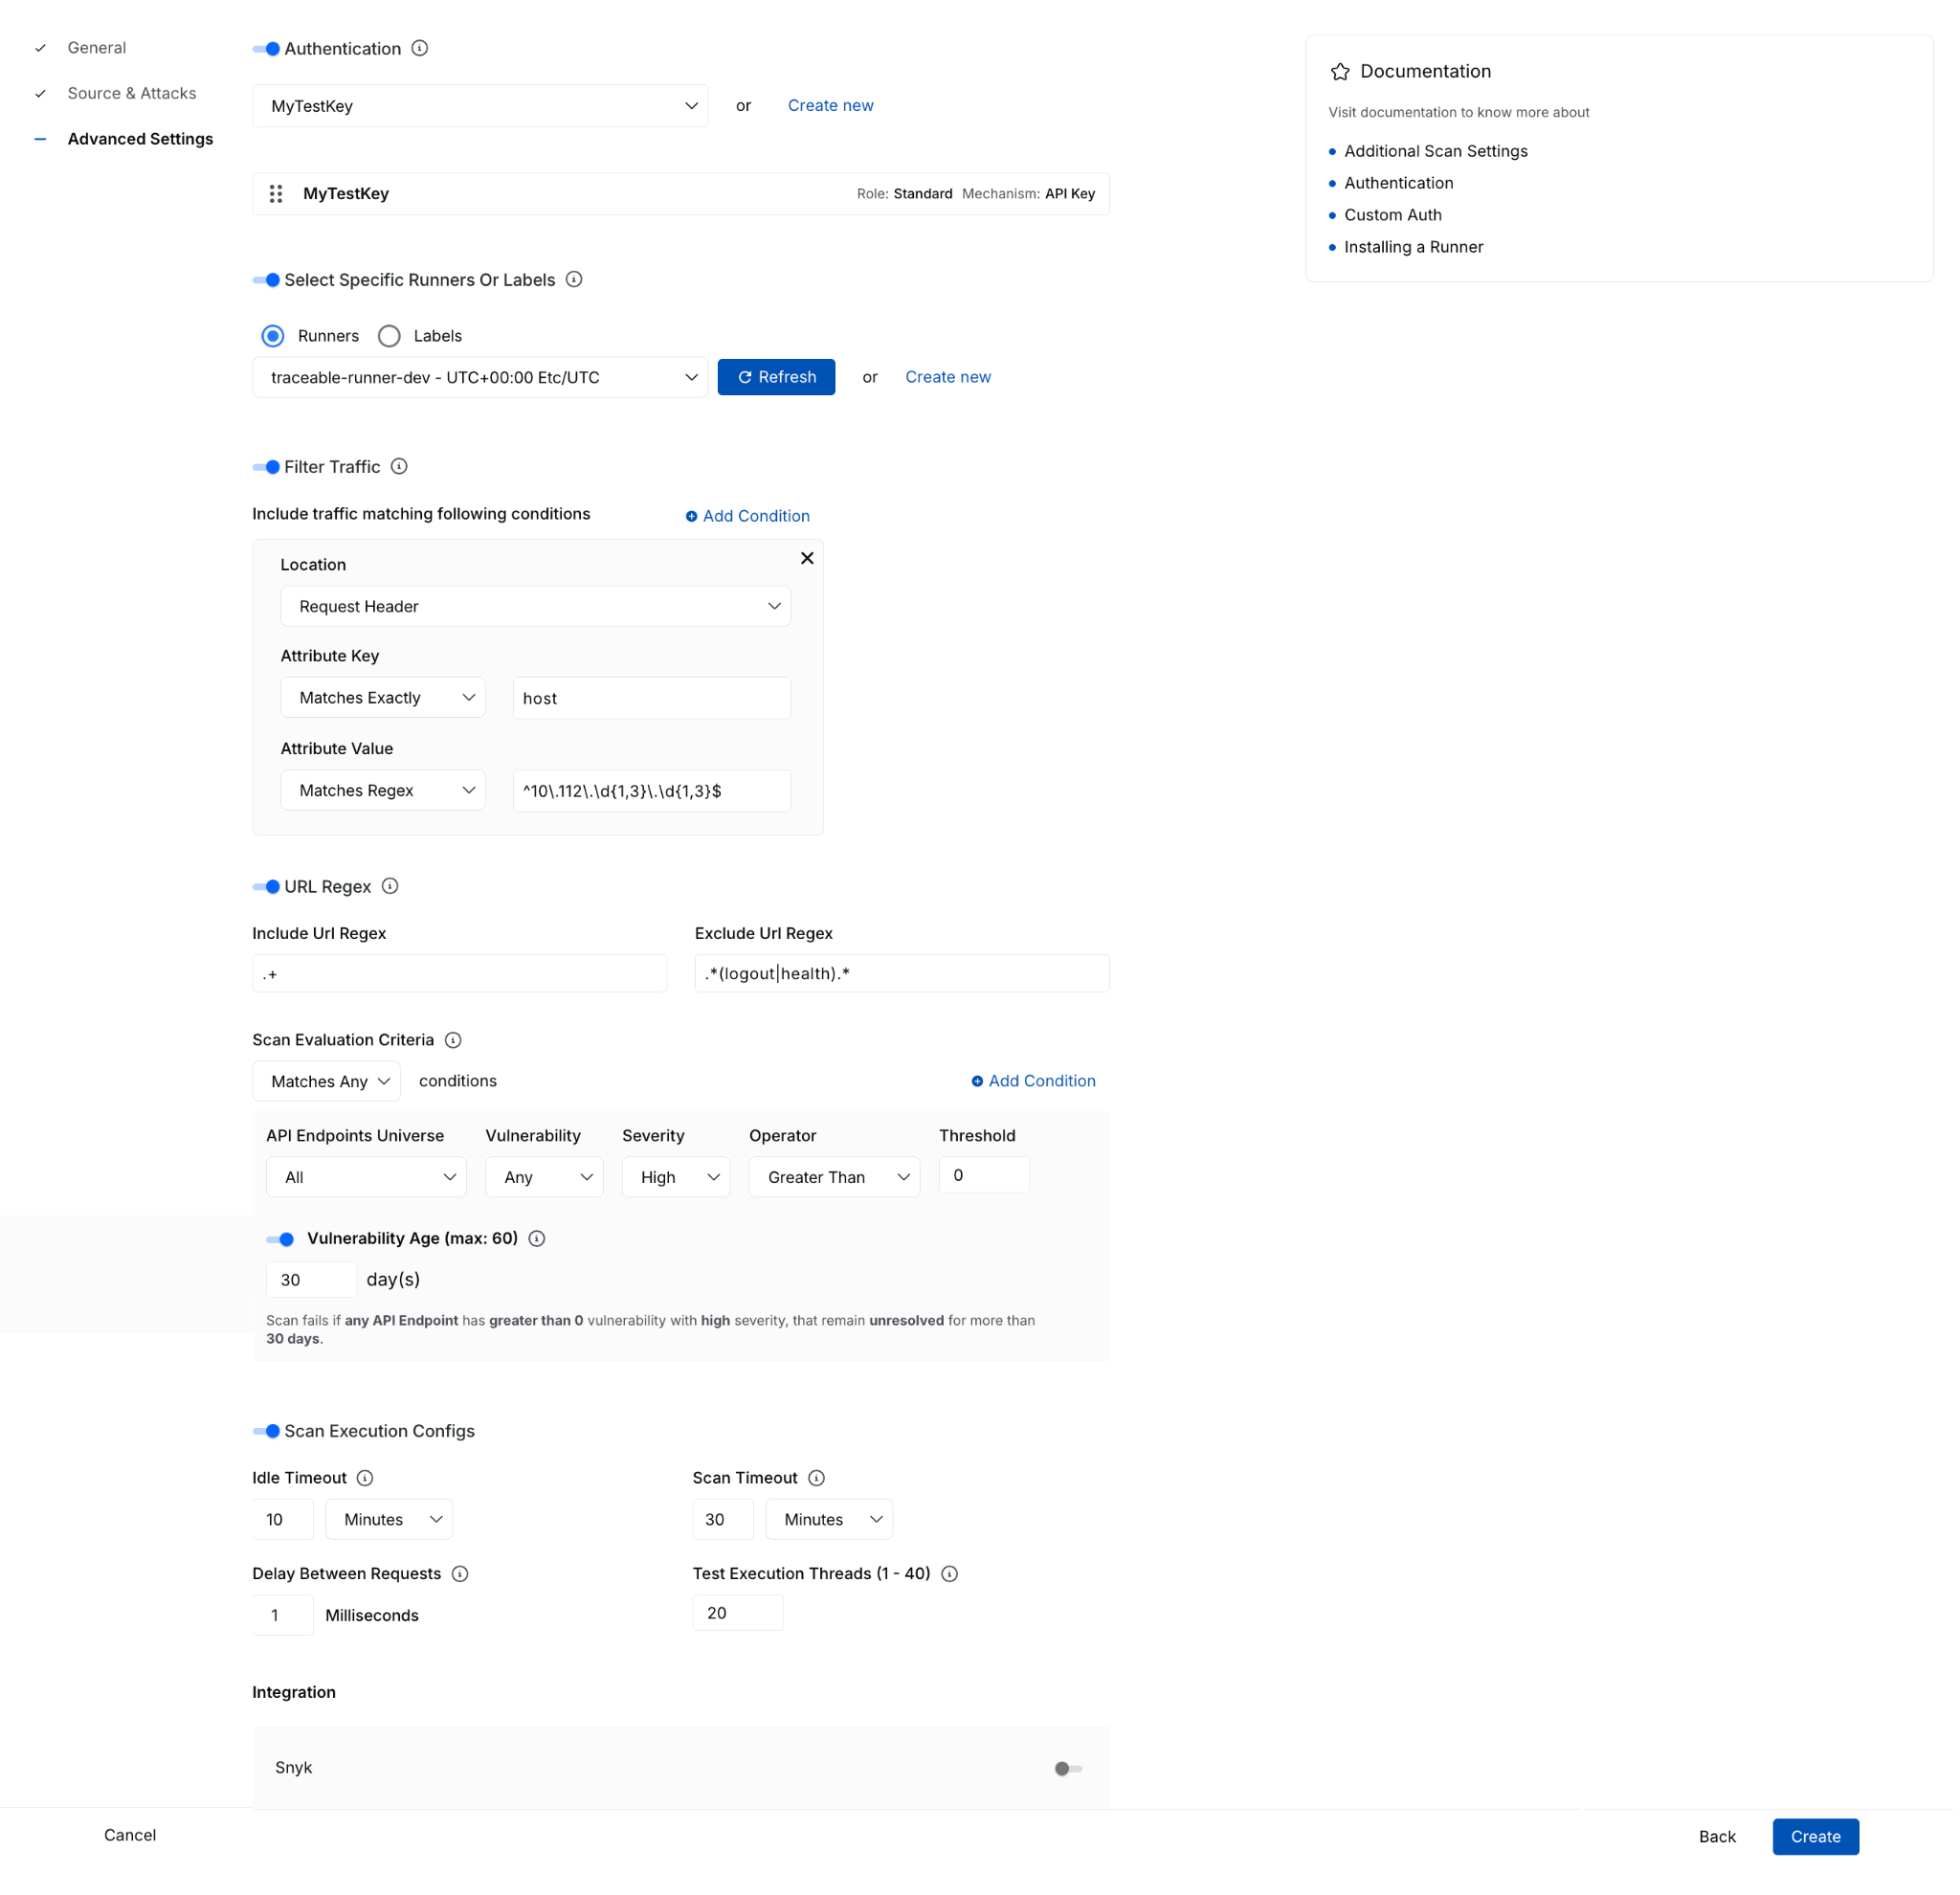
That reorganization does more than simplify the UI. It separates required setup from optional tuning, helping you complete scan creation with more confidence and less guesswork.
With these enhancements, you can now more easily:
- Understand fields in context through tooltips, helper text, and side-panel documentation available during setup.
- Create policies inline without leaving the scan configuration flow.
- Configure authentication inline, including form-based and AI-based authentication options, then immediately select them for use.
- Create or select runners from the same page instead of navigating out to separate workflows.
This enhancement is especially important for teams that want to move quickly without sacrificing correctness. Keeping these dependent tasks in a single flow reduces interruptions and lowers the risk of setup errors.
The advanced settings experience also adds more clarity around complex configuration options, where you can now work with:
- Traffic filter conditions
- URL regex settings
- Scan evaluation criteria with dynamic explanatory text
- Idle timeout and scan timeout execution controls
- Integrations
These details matter because they turn a complex setup from opaque to guided and actionable. You can find more technical documentation here.
For every running or completed scan, you will now see a Validation Summary tab that highlights critical details and the overall health of the configured API testing. Information here includes:
- Total number of reachable and unreachable APIs
- Number of tests failed due to auth issues
- Domain reachability
- Resource utilization during the scan window
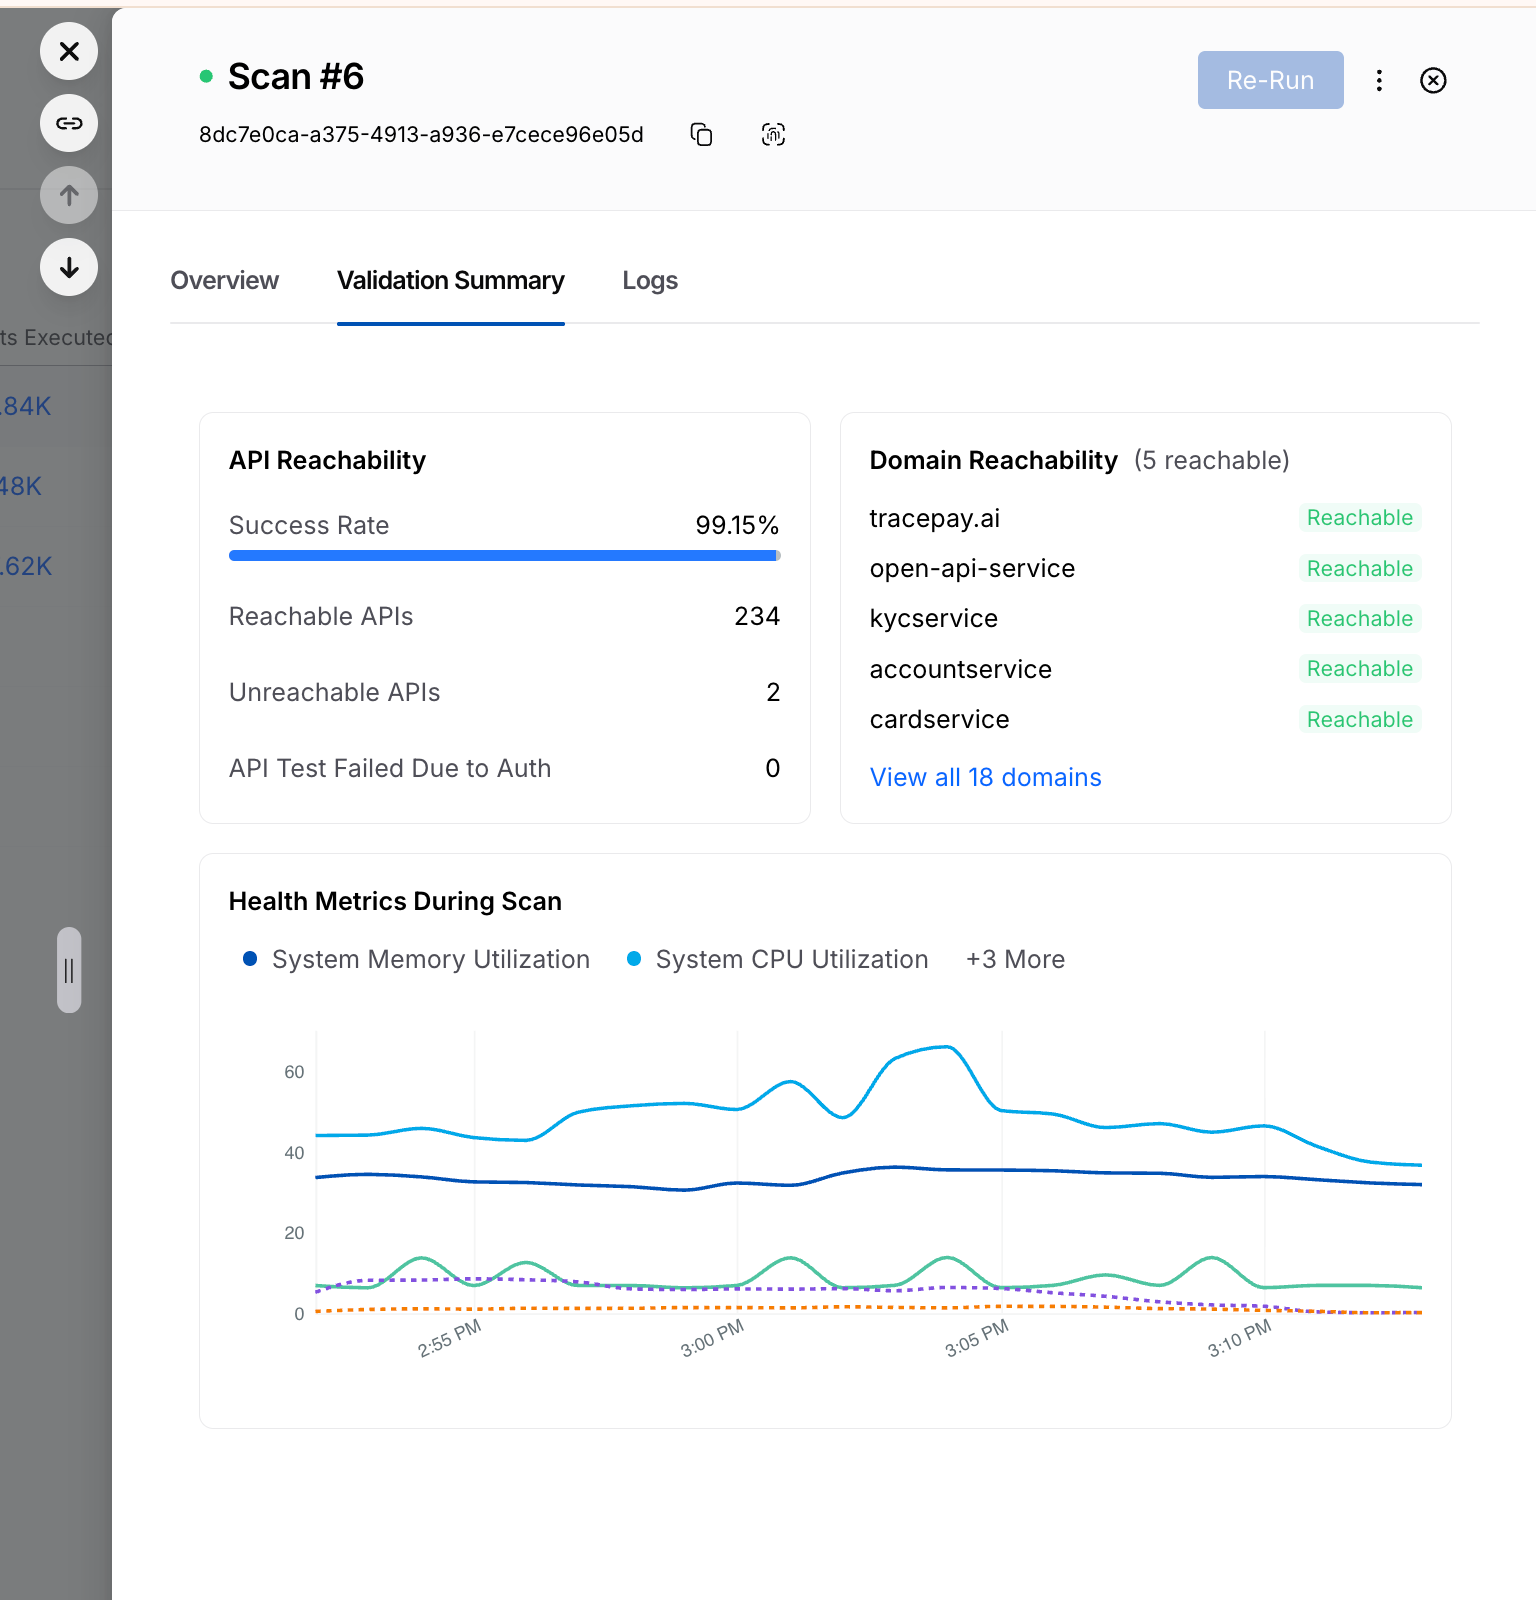
Reachability Test for XAST Replay and DAST
The Reachability Test enhancement brings that same philosophy to execution: validate earlier, execute smarter. Before generating tests, the Harness platform now provides clearer visibility into whether APIs are actually ready to be tested.
The new Reachability Test tab gives you a dedicated place to inspect endpoint readiness before test generation begins. It surfaces:
- the full list of API endpoints
- service mapping details
- reachability status
- response codes
- response descriptions
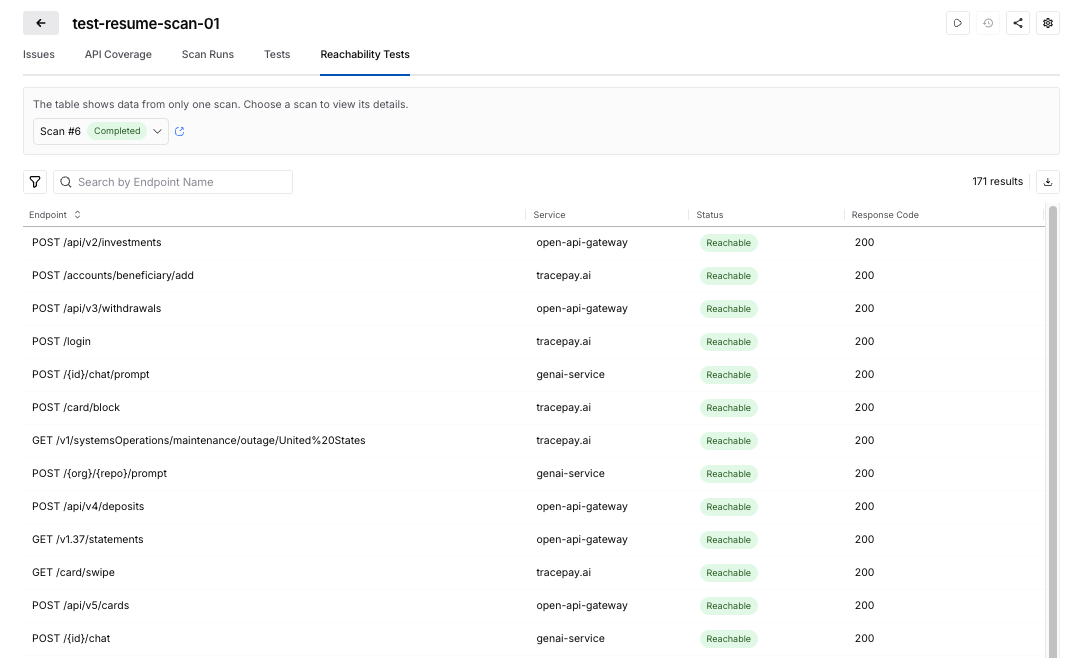
This enhancement turns what was previously harder to diagnose into something visible and actionable.
The Harness platform now uses reachability and authentication readiness as part of test generation control.
That means that no test cases are generated when:
- API endpoints are unreachable
- authentication is missing
- authentication fails
The reachability tests help ensure execution resources are spent on APIs that can actually produce meaningful results. For security teams, this creates a more efficient and trustworthy scan lifecycle with:
- less wasted runner consumption
- fewer irrelevant or misleading test artifacts
- cleaner signal in scan results
- better alignment between reported coverage and executable coverage
You can read more technical details here.
Taken together, these enhancements make API security testing more usable at the front end and more efficient at the back end. Teams can configure scans faster, with fewer errors and less dependency on expert intervention, while also improving the quality of what gets executed once a scan runs.
Get Started Today
These Harness API Testing features are available immediately with your existing Harness subscription. There is no additional cost or setup required.
- Current Customers: Log in to your dashboard today to test the security of your APIs seamlessly and more effectively.
- New to the Platform? If you aren't yet validating your API security, contact us to schedule a personalized demo of Harness API Testing in action.

Google Cloud Next ’26 Recap: AI, Efficiency, and the Rise of Frictionless Delivery
Summary: Google Cloud Next ’26 focused on the future of software delivery, emphasizing that AI, platform consolidation, and an urgent push toward efficiency are reshaping the Software Development Life Cycle (SDLC). The key takeaway from the event was that organizations are moving from AI experimentation to operationalization, actively consolidating fragmented tools onto end-to-end platforms that embed AI for control, intelligence, and speed.
Google Cloud Next 2026 made one thing clear: the future of software delivery is being reshaped in real time by AI, platform consolidation, and an urgent push toward efficiency. From the show floor to executive roundtables, the conversations we had reinforced a consistent theme: teams are looking to tackle the AI Velocity Paradox by simplifying, modernizing, and intelligently automating every stage of the SDLC.
Strong Signal from the Event
We had hundreds of meaningful conversations with engineering, platform, and cloud leaders. The patterns were unmistakable.
Across industries, organizations are grappling with:
- Fragmented CI/CD pipelines
- Manual or inefficient release processes
- Rising cloud costs without clear accountability
- Early, but serious, exploration of AI in the SDLC
These challenges mapped directly to Harness’ core solution areas:
- Software delivery & CI/CD modernization
- Database management & deployments
- AI-powered DevOps & FinOps
And the urgency is real. We spoke with teams:
- Still running homegrown deployment systems, shipping just twice a year due to regulatory constraints, but now exploring AI agents to orchestrate each pipeline step
- Deep in Jenkins-based environments, actively evaluating how to standardize pipelines and modernize security
- Managing multi-cloud footprints and searching for better cloud cost visibility and control
- Using CI tools with agents, but needing help scaling automation across build, test, and deploy workflows
- Leaning into AppSec integrations within CI/CD as security shifts further left
A recurring thread:
“We’re already experimenting with AI, but we need a platform that brings it all together.”
AI in the SDLC: From Curiosity to Commitment
If 2025 was about AI experimentation, 2026 is about operationalization.
We saw a sharp increase in:
- Interest in AI-assisted pipeline orchestration
- Discussions around AI-driven security and compliance workflows
- Demand for intelligent cost optimization tied to engineering activity
Multiple attendees explicitly mentioned:
- Building or planning AI agents across delivery pipelines
- Evaluating vendors based on AI capabilities within CI/CD and DevSecOps
- Wanting to understand how AI can reduce toil without sacrificing control
This shift aligns perfectly with Harness’ vision of AI-native software delivery, where intelligence is embedded, not bolted on. In fact, at Next, we announced a major step forward in making that vision real through our expanded partnership with Google Cloud. By integrating Google Cloud Developer Connect with the Harness Software Delivery Knowledge Graph, we’re enabling a unified layer of AI intelligence across the entire SDLC.
This means AI in Harness isn’t operating in silos. It has full, real-time context across code, pipelines, infrastructure, and runtime signals. The result is smarter automation, faster root cause analysis, and AI agents that can act with confidence, not guesswork. It’s a foundational step in moving from AI-assisted workflows to truly AI-native delivery systems, which is exactly what attendees told us they’re looking for.
A great example of this is Keller Williams. Keller Williams leveraged the Harness platform to transform their software delivery, increasing deployment frequency from a few times a year to over 20+ annual releases. By automating manual pipelines, the platform eliminates operational bottlenecks and allows its developers to focus on rapid innovation rather than deployment logistics.
DevOps Panel: The Future is Frictionless
Harness’s Martin Reynolds joined leaders from Atlassian, Datadog, LangChain, and Google to explore what’s next in a session titled: The Future of Developer Experience is Frictionless
The takeaway?
The next leap in productivity won’t come from isolated tools. It will come from connected, intelligent systems that remove friction entirely. With 150+ attendees on the final day, it was clear this message resonated.
The Bigger Picture: Platform Consolidation is Accelerating
Across every conversation, one strategic shift stood out:
Teams want fewer tools and smarter ones.
Organizations are actively:
- Replacing point solutions and legacy CI/CD tools
- Consolidating onto end-to-end platforms
- Prioritizing security, cost, and delivery in a single workflow
Jenkins modernization alone came up repeatedly. Not as a question of if, but when.
Recognition That Matters
The event kicked off with Google Cloud recognizing its partners. We were proud to be named Google Cloud’s 2026 Technology Partner of the Year, a reflection of the innovation and impact we’re delivering together with GCP.

Final Takeaway
Google Cloud Next ’26 wasn’t just about cloud. It was about control, intelligence, and speed.
The organizations moving fastest right now are:
- Embedding AI into their delivery workflows
- Rethinking how pipelines, security, and cost intersect
- Investing in platforms that eliminate—not add—complexity
Harness is uniquely positioned at that intersection.
And based on what we saw in Vegas, the demand for that future is only accelerating. Here’s the event recap video.
If you connected with us at the event or want to continue the conversation, we’d love to dive deeper.
.png)
Get Ship Done: Everything We Shipped in April 2026
It’s becoming increasingly clear that AI-generated code can create real challenges once it reaches production. At Harness, we’ve been focused on innovating fast and solving those problems, so teams can move quickly without sacrificing reliability.
In the past 30 days, we delivered 70+ new features. These features enable our users to ship fast, not by cutting corners, but by sharpening the feedback loops: faster builds, integrated security checks within the pipeline, deeper visibility into AI across discovery and testing, and deployment tools that are intuitive enough to use without a runbook.
Here’s a look at everything we shipped.
April Highlights
- Harness now lives inside the Cursor IDE. Developers and AI agents go from code change to vulnerability detection, CI/CD execution, security validation, approvals, deployments, and operational insight without leaving the editor.
- Google Cloud Developer Connect now integrates with our Software Delivery Knowledge Graph, giving teams a unified, AI-ready view of the entire software delivery lifecycle.
- With Warehouse Native Experimentation, you can run A/B tests and feature experiments directly in Snowflake, Redshift, or BigQuery, using your existing assignment and metric data as the source of truth. No data exports, no duplication outside your warehouse.
- With SLSA provenance for non-container artifacts, supply chain attestation now covers Helm charts, JAR/WAR files, and standalone binaries, not just container images. If you ship more than Docker images, your provenance story just got complete.
- When an incident closes, Harness AI SRE generates a structured six-section retrospective automatically. What typically takes 2-4 hours comes out in seconds, with action items captured in real time from Slack during the incident.
AI-Powered Development and Delivery
Cursor Plugin
Harness is introducing the Cursor Plugin, bringing AI-native software delivery directly into the Cursor editor. Developers and AI agents move from code changes to vulnerability detection, CI/CD execution, security validation, approvals, deployments, and operational insight without leaving the IDE. The integration includes the Harness Secure AI Coding hook for Cursor. Download the plugin.
Google Cloud Partnership for a unified AI for Software Delivery
We partnered with Google Cloud to integrate Developer Connect with our Software Delivery Knowledge Graph, giving teams a unified, AI-ready view of the entire software delivery lifecycle.
This enhanced context enables smarter, faster AI-driven decisions, helping engineering teams troubleshoot issues, improve accuracy, and deliver software with greater confidence and efficiency. Learn more.
Harness MCP Server Updates
The biggest additions to this version of the MCP server are pipeline YAML support so agent-driven pipelines work with the current schema, OSS vulnerability lookup for supply chain security with anti-fabrication extractors, and added resilience support. Download and get started.
Security Baked Into the Pipeline
SLSA Provenance for Non-Container Artifacts
Supply chain attestation via SLSA now covers Helm charts, JAR/WAR files, standalone binaries, and other artifact types, not just container images. Generate and verify provenance across the full artifact portfolio. Learn more.
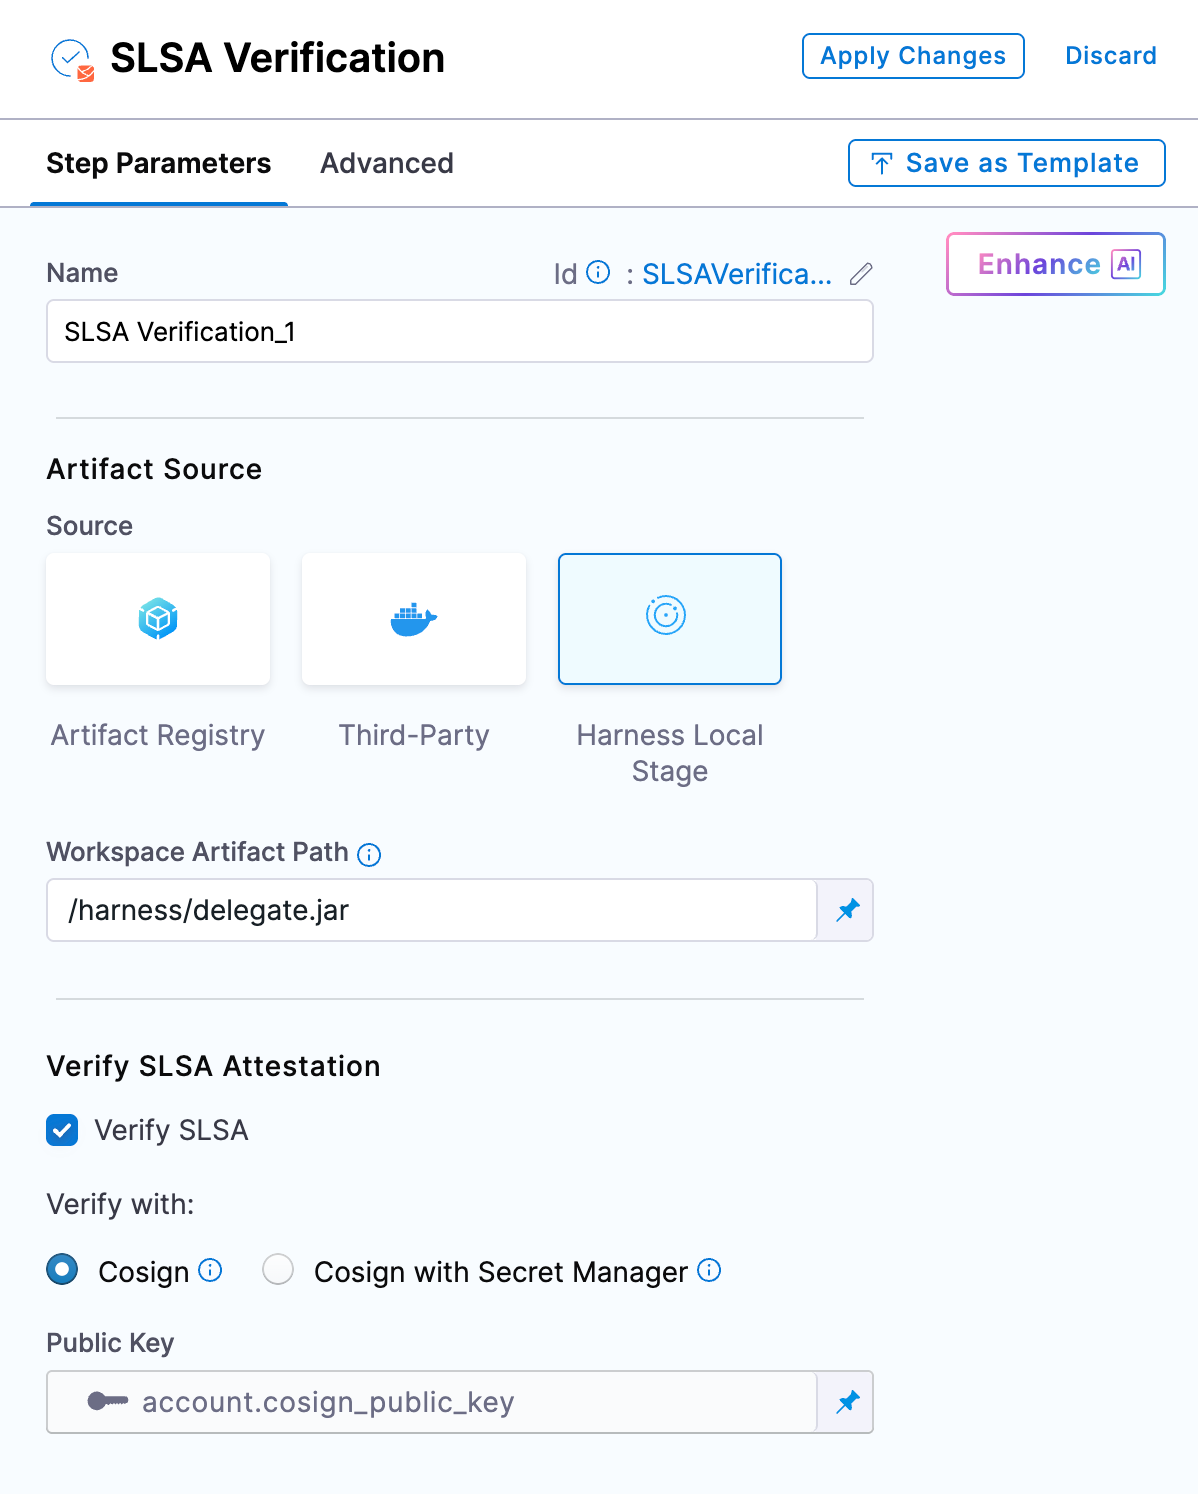
OSS Remediation for Code Repositories
Automated and manual remediation for vulnerable open-source components now runs directly against code repositories. When a dependency has a fix available, the tooling can apply it.
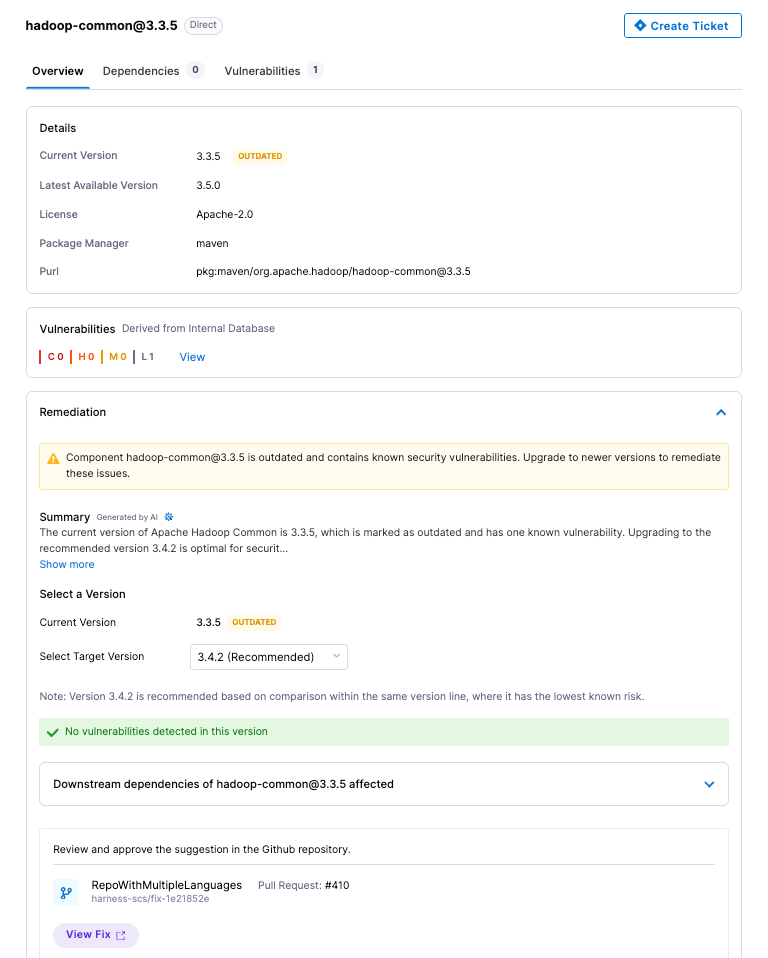
API Security Scan Configuration Revamp
The scan creation flow has been simplified into three logical groups: General, Source and Attacks, and Advanced Settings. Every field now has a tooltip and step-level documentation. Field-level validation catches misconfigurations before a scan runs.
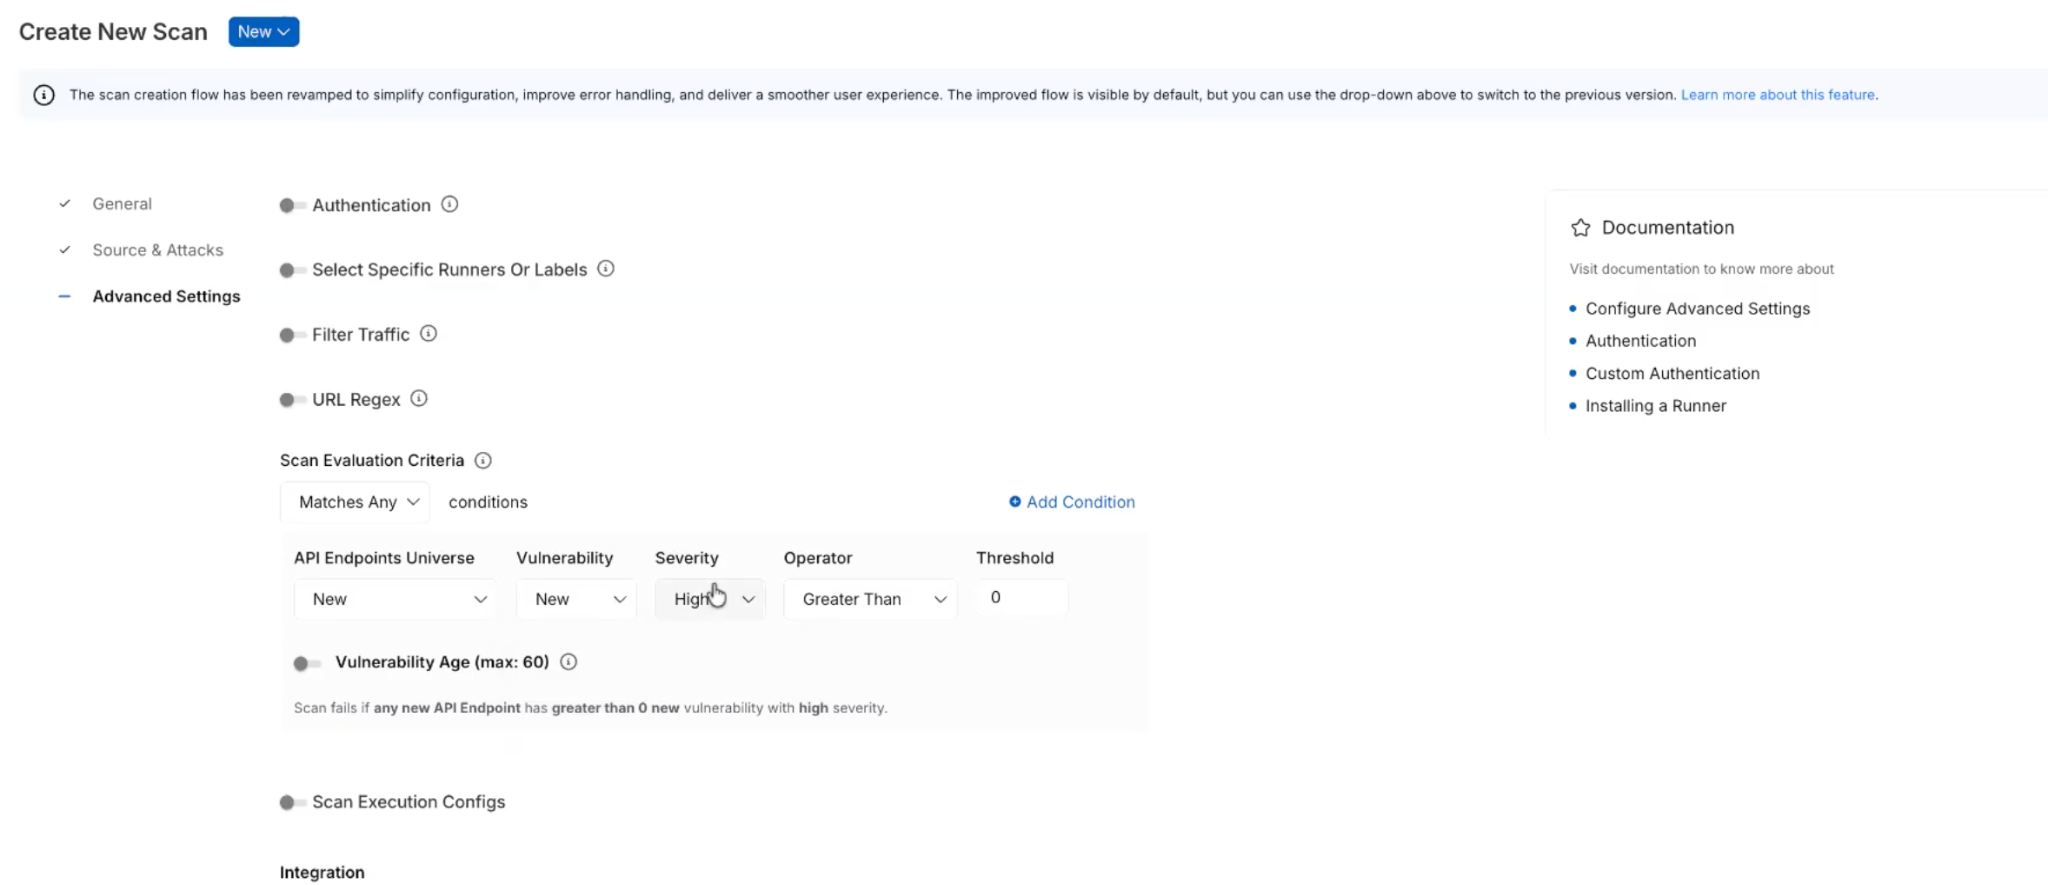
Reachability Test for DAST and API Security Scans
Before generating test cases, a new Reachability Test validates that each API endpoint is actually reachable. Endpoints that don't respond don't generate test cases. Reduces wasted scan time against dead endpoints.
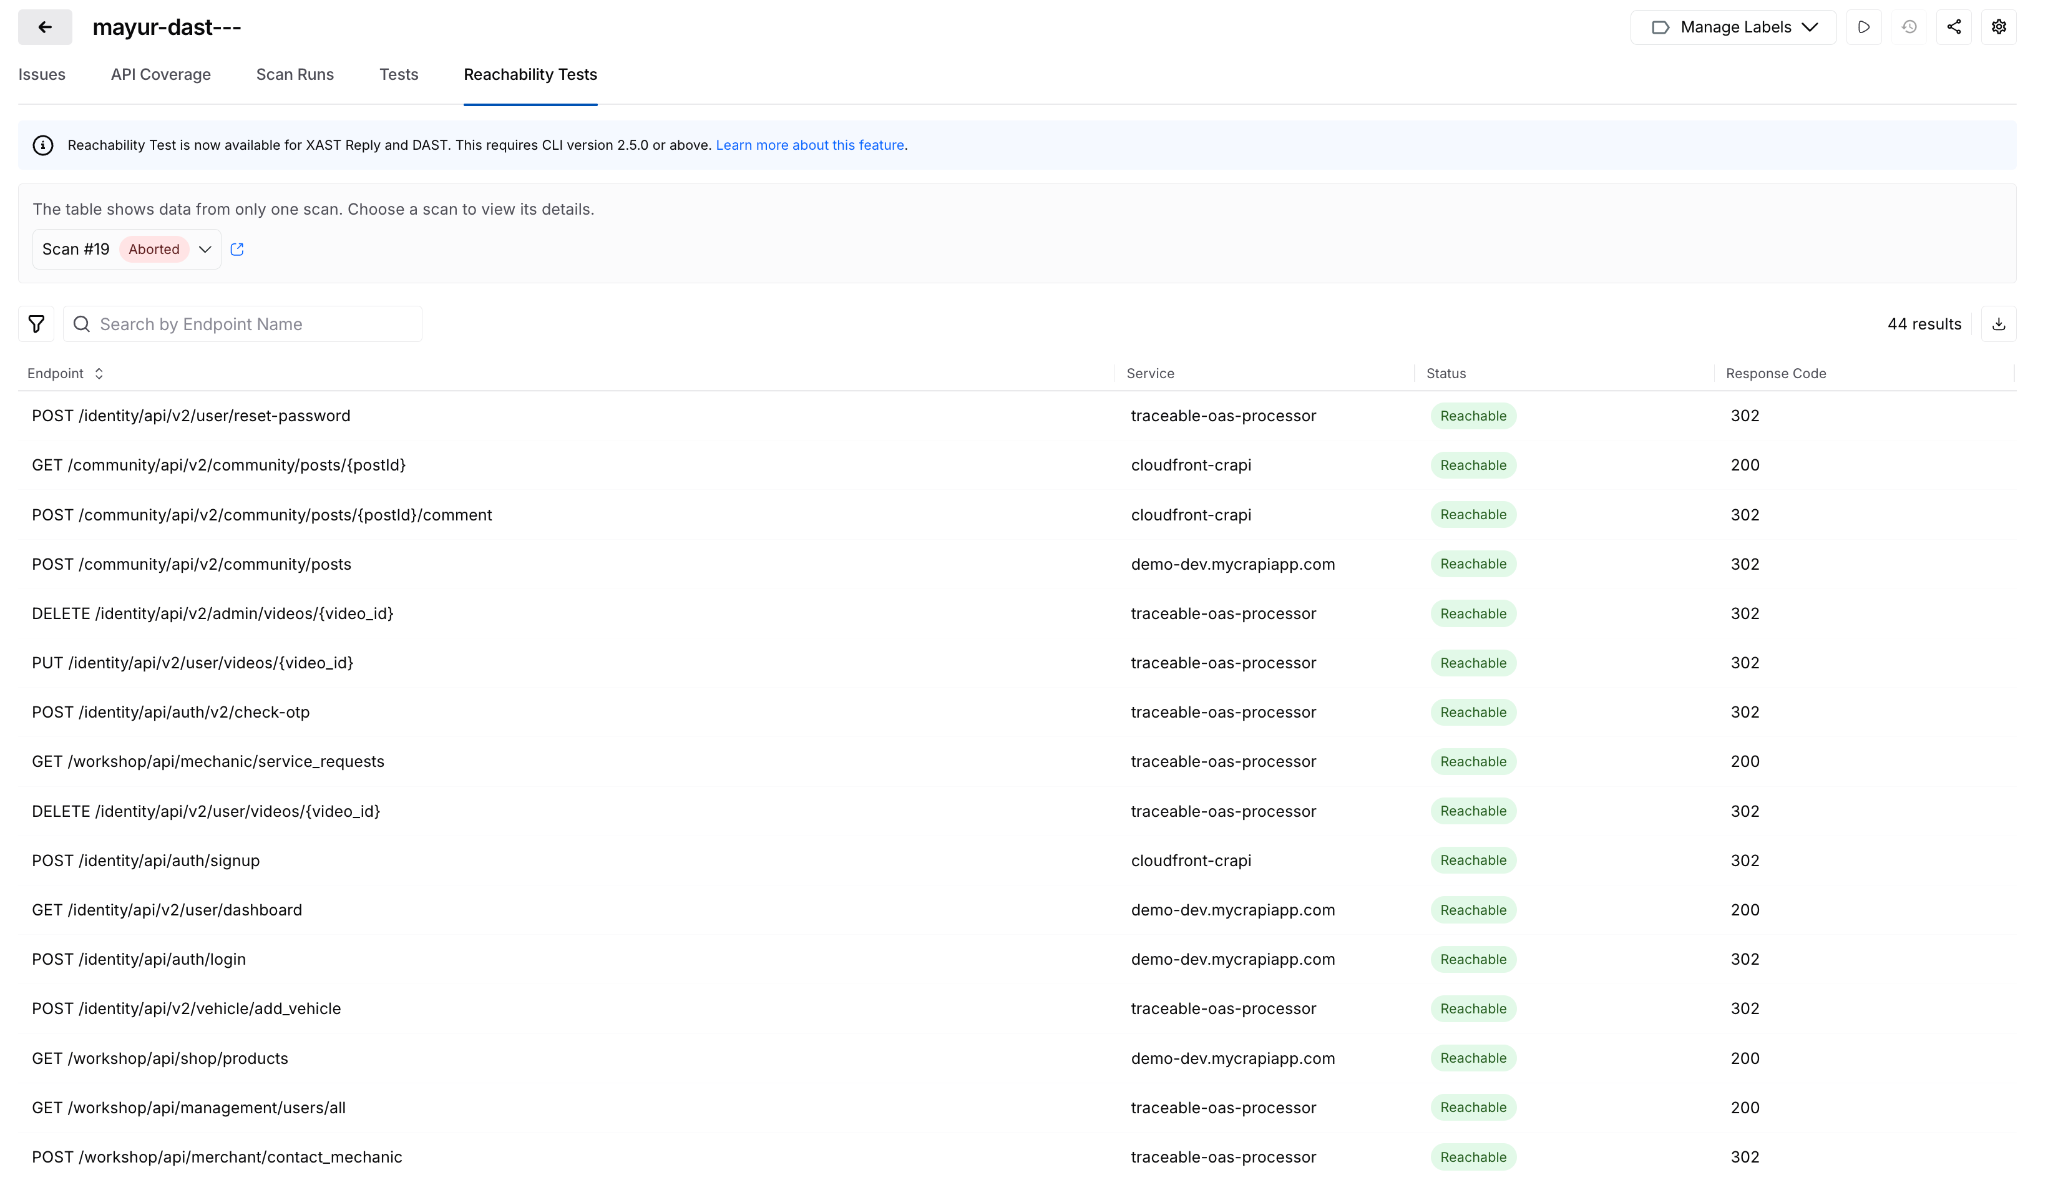
Posture Events: Sensitive Data Evidence
When a posture event involves sensitive data exposure, the finding now shows exactly where: which parameter, in the request or response, with the classification and dataset inline. Previously required navigating across modules to get this context.
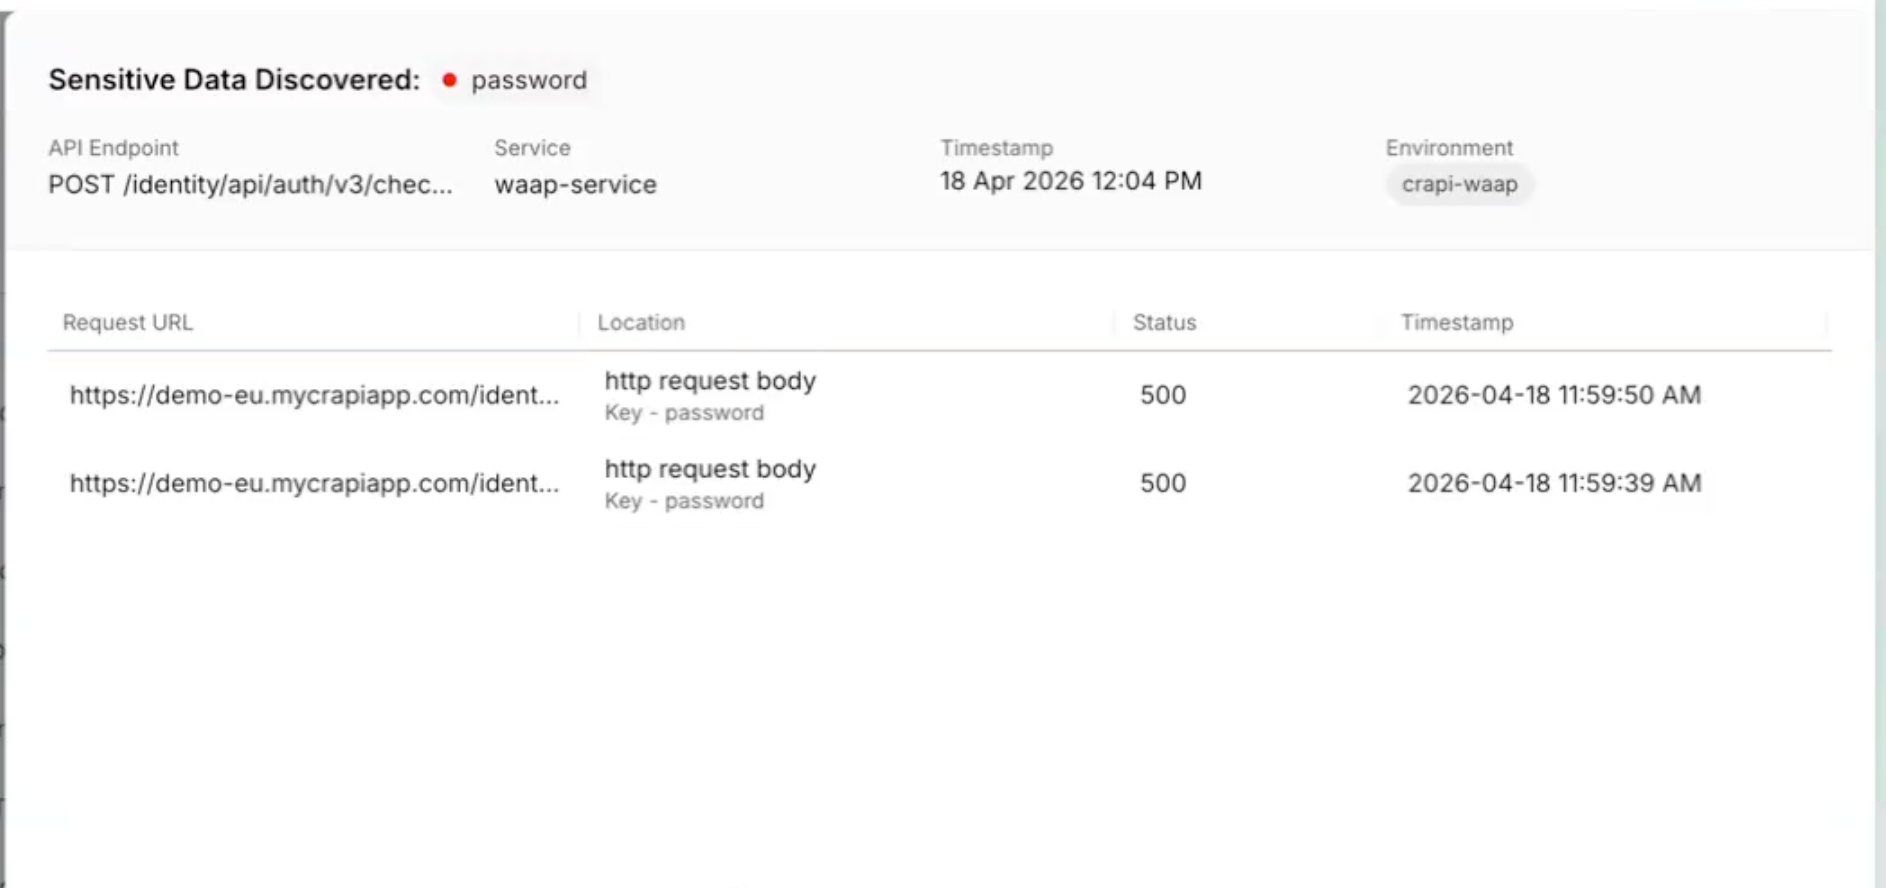
All Occurrences Dashboard
A new account-level dashboard surfaces every raw vulnerability finding across all pipelines, not just the rolled-up view. Filter, export, and drill into file paths, line numbers, and repos. Useful when you need to understand whether a scanner finding is one instance or fifty. Release notes.
Prisma Cloud Scan Result Enhancements
Prisma Cloud (formerly Twistlock) scan results now include File Name, Distro, and Distro Release fields. The file name is derived from packagePath to improve traceability when the same vulnerability appears across multiple package locations.
AI Asset Discovery and Risk Visibility
Third-Party MCP Discovery
Extends AI asset discovery beyond your own application ecosystem. Harness now surfaces external MCP servers and the AI assets they expose, giving security and platform teams visibility into AI interactions that originate outside their direct control.
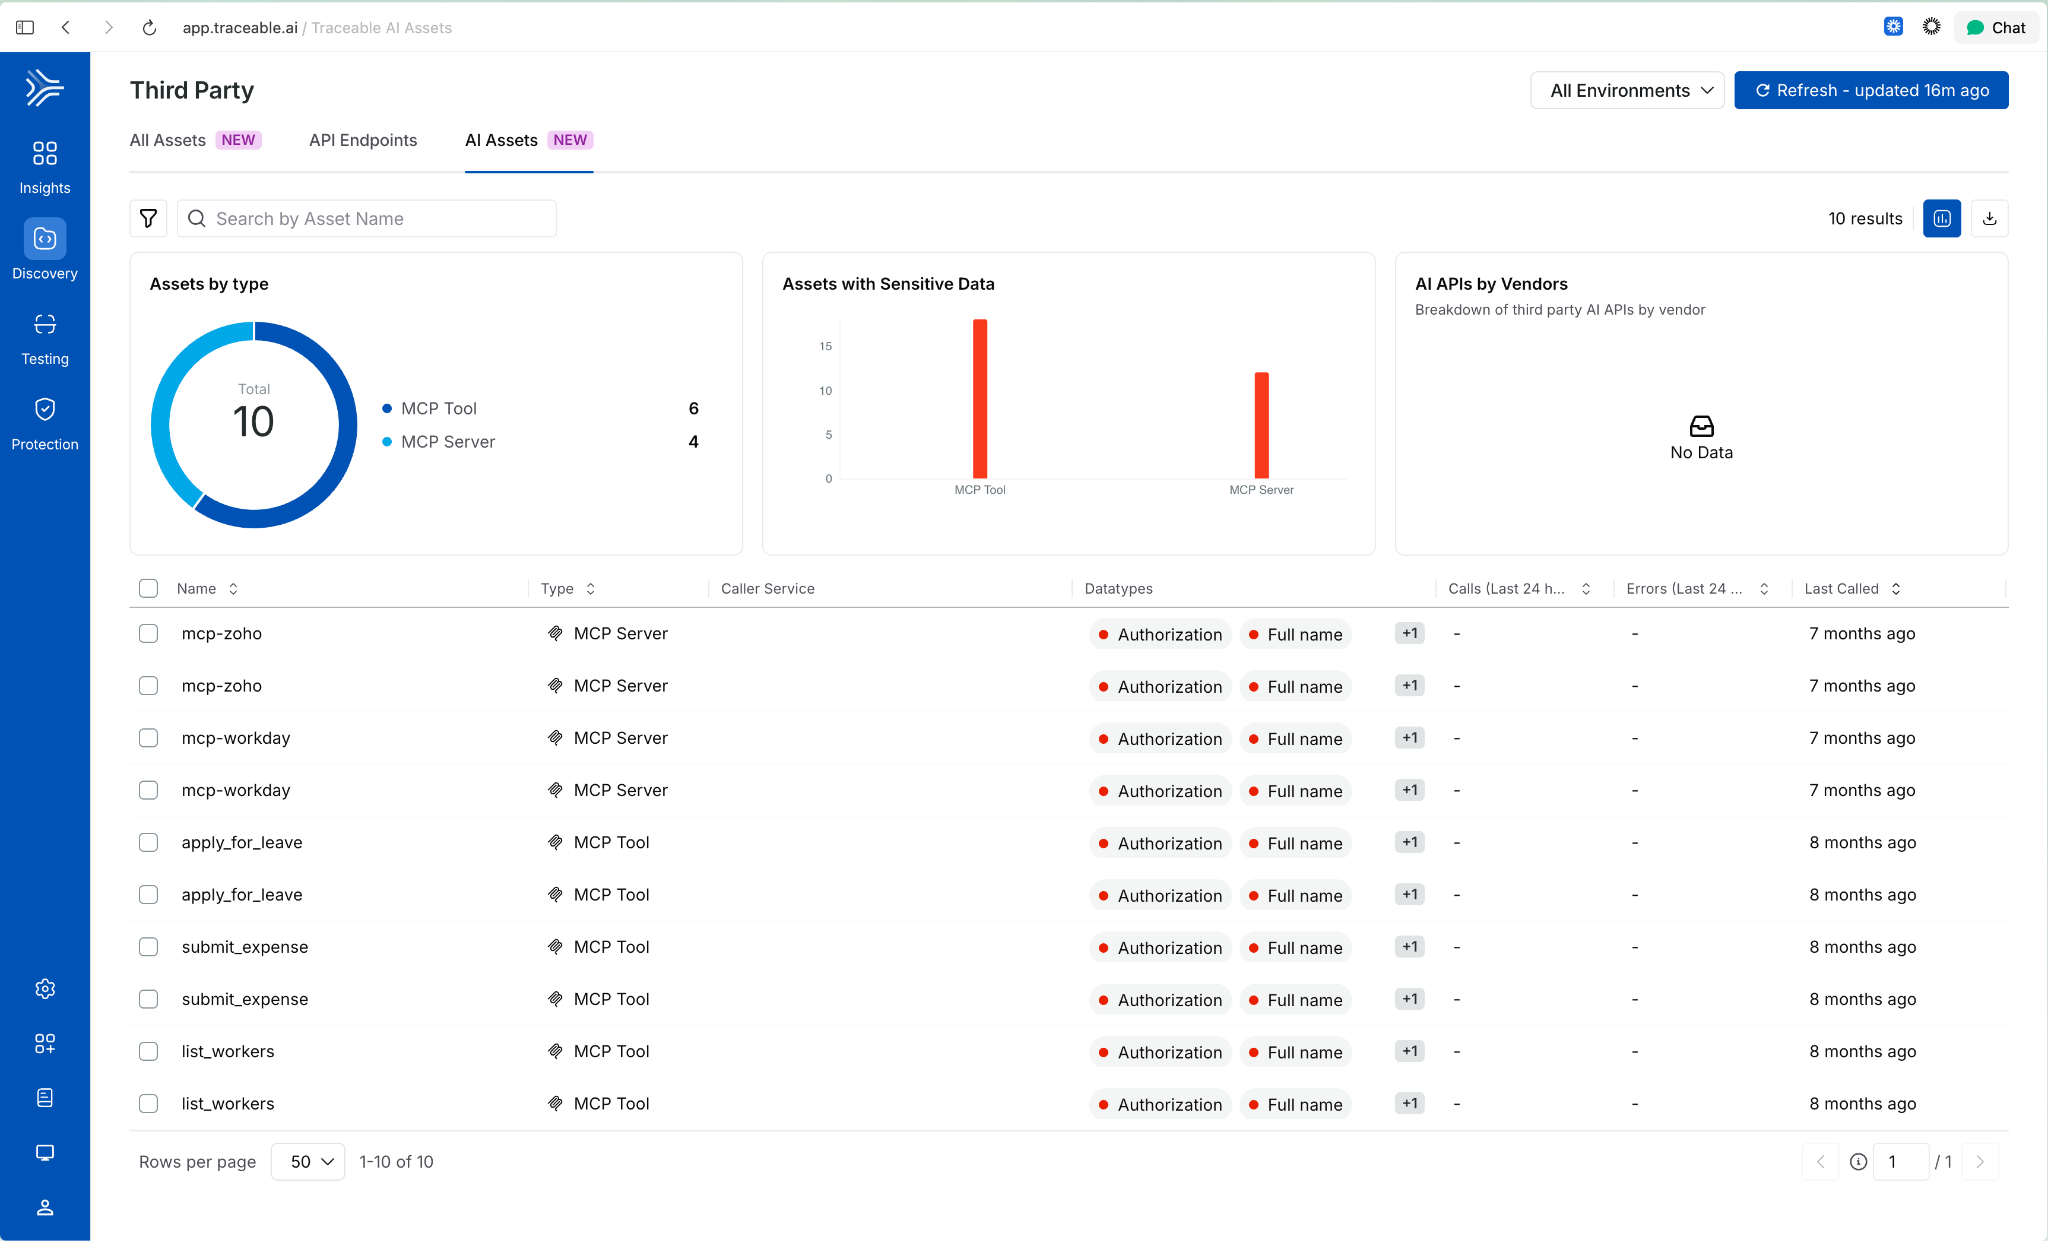
Behavioral Insights Extended to MCP Tools
Internet exposure, encryption status, and authentication usage were previously available for APIs only. Those same behavioral signals now apply to MCP tools. View them via the info tooltip on any MCP tool in the inventory. Helps identify high-risk tools based on actual usage patterns, not configuration alone
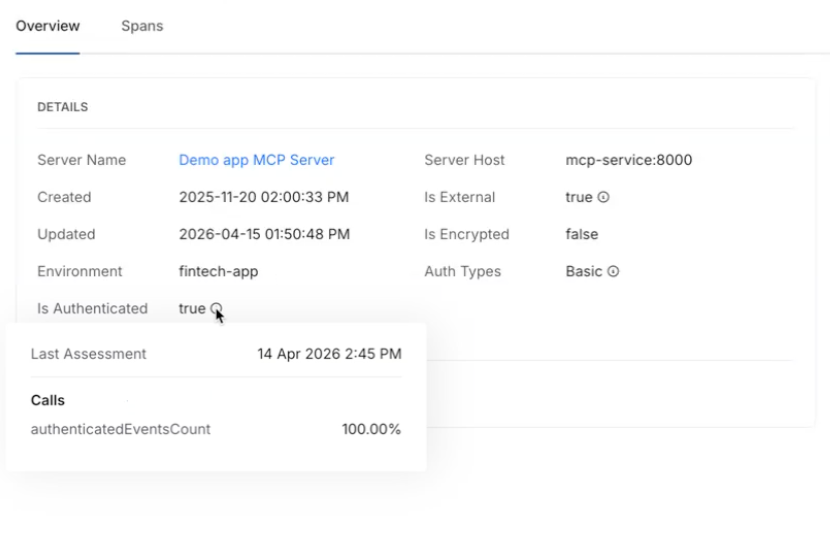
Risk Score Enhancements for APIs and MCP Tools
Two changes in one release: API risk now shows a unified view with contributing factors, the Likelihood vs. Impact calculation, and direct links to underlying issues. MCP tools now have their own dedicated risk scores using the same model. Side-sheet editing means you can act on a finding without leaving context.
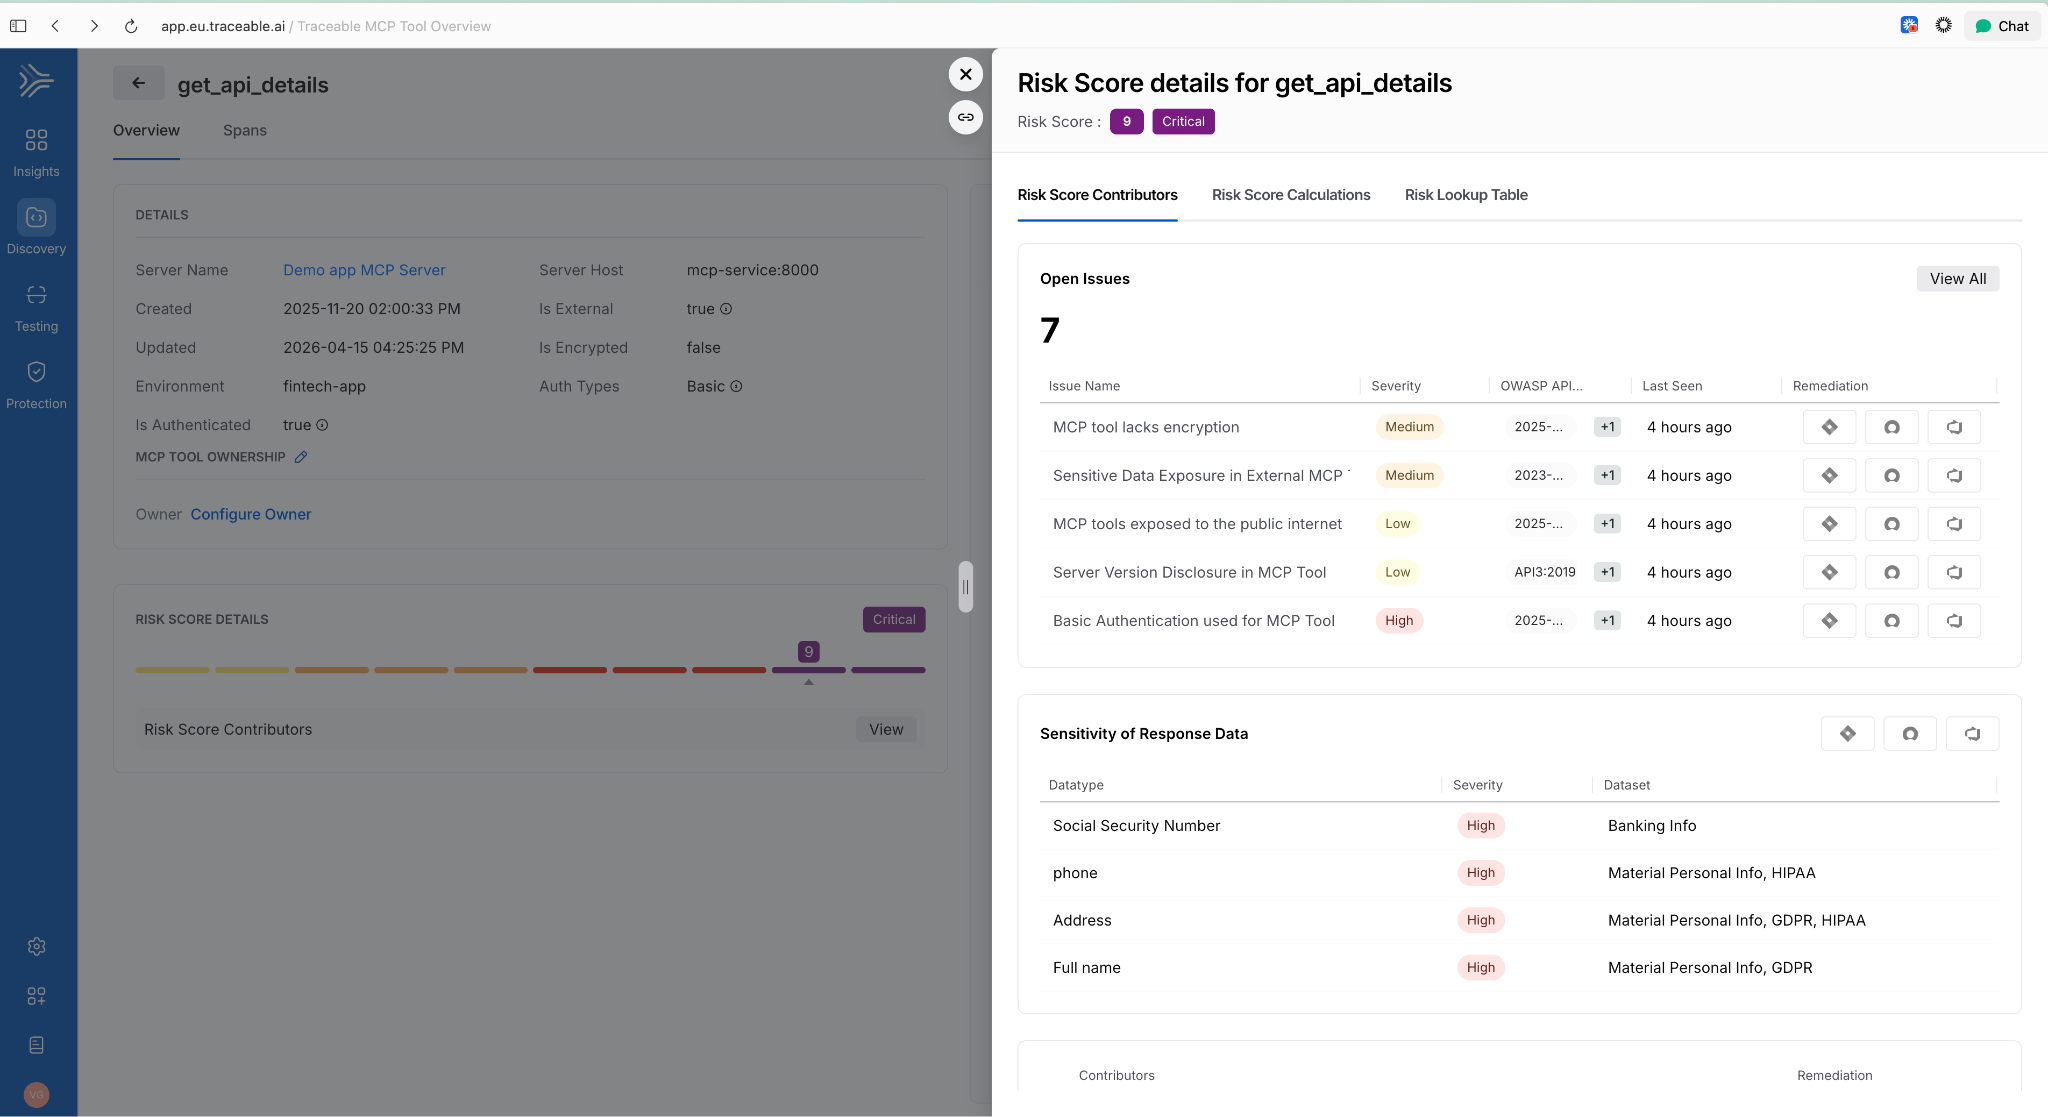
AI Assets Tab and Licensing Visibility
A dedicated AI Assets tab provides a single view of all AI-related assets discovered in customer environments: AI APIs, MCP tools, models, and their usage patterns. Licensing visibility is included so teams can track AI consumption against entitlements.
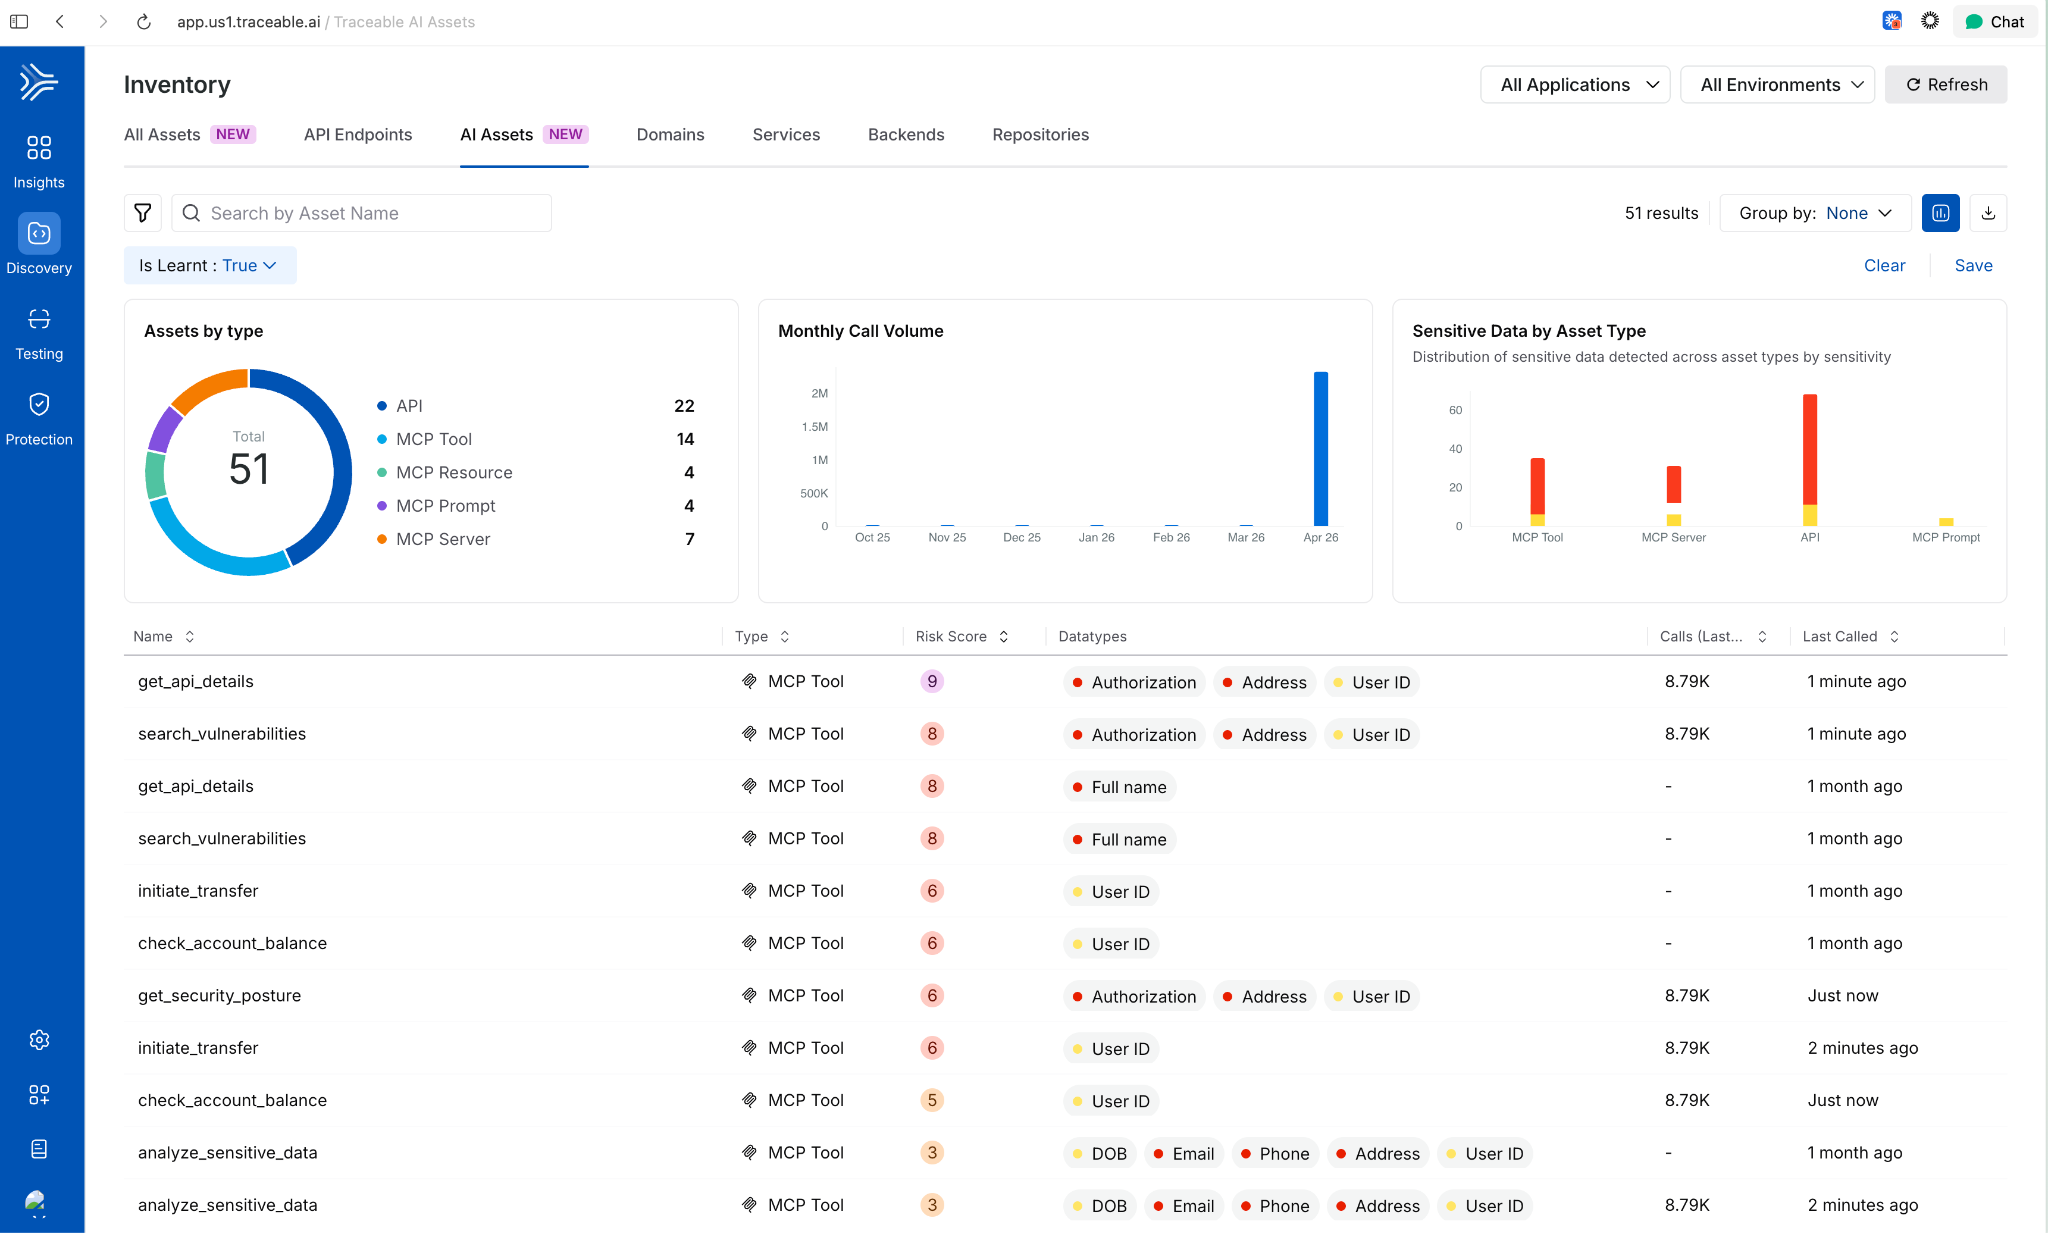
Deploy Faster and More Reliably
Improved Pipeline Execution Layout
The pipeline execution listing page now uses a card-based layout. The Service and Environment columns are replaced by an Update Summary column showing service-to-environment mappings for CD stages and schema-to-instance mappings for Database DevOps stages, i.e., more signal per row!
AWS Connector Validation Without ec2:DescribeRegions
AWS connector validation now uses sts:GetCallerIdentity instead of ec2:DescribeRegions. The new call requires no IAM permissions, which means tighter least-privilege configurations no longer block connector setup.
ApplicationSet TemplatePatch Support
TemplatePatch configuration in GitOps ApplicationSets is now preserved in the Manifest Edit panel. Previously, setting TemplatePatch in the UI and saving caused the configuration to disappear.
Faster Builds
Cache Storage Connector Override in YAML
Self-hosted builds can now specify a stage-level connector override for cache storage in YAML. If not set, the connector from Default Settings is used. Useful when different stages need to read from different cache backends.
Containerless Step Binary Path
Containerless CI steps now use app.harness.io as the default download path for step binaries. This reduces egress dependencies on external sources.
Feature Flags and Experimentation
Warehouse Native Experimentation
Run experiments directly in your data warehouse using your own assignment and metric data. No exporting, no duplicating data outside your analytics source of truth. Supports Snowflake, Amazon Redshift, and Google BigQuery. Release notes.

Reallocate Traffic API
A new Reallocate Traffic endpoint lets you reset the bucketing seed for a feature flag in a specific environment via the API. Useful when you need to re-randomize user assignments without changing the flag configuration.
Infrastructure as Code
Native Terragrunt Support and Multi-IaC Orchestration
Teams can now orchestrate complex deployments across Terraform, OpenTofu, and Terragrunt in a single platform. A unified multi-IaC control plane eliminates fragmented tooling, standardizes workflows, and covers provisioning, configuration, and deployment consistently. Read the blog post.
AWS CDK Support (Beta) Define AWS infrastructure in TypeScript or Python using the AWS Cloud Development Kit and let Harness handle provisioning, state, and pipeline integration. Engineers who already write CDK don't need to learn HCL or adopt a separate tool.
Module Registry 2.0 Store IaC modules as artifacts natively in Harness, auto-sync new versions as they're published, and run module onboarding directly on Harness pipelines. A single place to manage the full module lifecycle: publishing, versioning, and consumption, without stitching together a registry, a pipeline tool, and a version tracker.
Terraform Sensitive Output Masking (Beta)
Output fields marked sensitive = true in your main.tf are now automatically masked in the pipeline Output tab during Terraform Apply step execution. Sensitive outputs remain accessible in downstream steps via Harness expressions, but don't appear in plain text in the UI.
Artifact Management
Swift Package Registry
Artifact Registry now supports Swift packages with full SwiftPM compatibility. Authenticate, publish, and resolve dependencies using the registry URL directly. Existing SwiftPM workflows work without changes. Release notes.
Raw File Registry
A new Raw File registry stores and retrieves arbitrary files by path: archives, reports, configuration files, binaries, anything that doesn't belong to a package manager. Upload and download via HTTP and curl. No specialized client required.
Copy Version Between Registries
Promote a specific package version from one Harness registry to another directly from the UI. No re-pushing from your machine, no scripts to move artifacts between project or organization registries.
Soft Delete for Artifacts and Versions
Deleting a package or version now moves it to a Deleted view where it remains recoverable until the retention window expires. Permanent delete is available from the same dialog when that's the intent.
Artifact Registry Audit Dashboard
An out-of-the-box dashboard records every artifact upload and download across all Harness Artifact Registries. Provisioned and maintained automatically for accounts with Artifact Registry enabled. No setup required.
Webhooks Extended to Python, Maven, and NuGet
Artifact Registry webhooks now cover Maven, NuGet, and Python (PyPI) in addition to existing package types. Use artifact events to trigger CI/CD, security scans, or notifications for more of your package ecosystem.
Database Changes Without the Drama
IBM DB2 Support
Database schema changes and migrations now work across all DB2 variants: DB2 LUW, DB2 for iSeries, and DB2 for z/OS. Mainframe and midrange databases now fit in the same pipeline workflow as everything else. Release notes.
Google BigQuery Support
Deploy database changes to BigQuery using the same Liquibase-based workflow used for relational databases. No separate tooling or custom scripting required.
Percona Toolkit for MySQL
Use Percona Toolkit natively in Harness Database DevOps to make MySQL schema changes safer and virtually downtime-free. Read the blog post.
ECS Support for Database Jobs (Early Access)
Database DevOps can now run deployment jobs on ECS Fargate instead of Kubernetes. For teams not running Kubernetes, this removes the requirement to stand up a cluster just to run database migrations. Contact Harness to enable. Read the docs.
Keyless Authentication for Google CloudSQL
Authenticate to CloudSQL (Postgres and MySQL variants) using the delegate's service account. No credentials to rotate, no secrets to manage. Read the docs.
OIDC Authentication for Google Cloud Databases
Authenticate to CloudSQL (Postgres and MySQL), Google Spanner, and Google BigQuery using OIDC. Works with any OIDC-compatible identity provider already in use for the rest of your Google Cloud infrastructure. Read the docs.
Engineering Metrics and Developer Portal
Environment Management
Developers can now self-serve dev, test, staging, and production environments directly from the developer portal. Platform teams configure the governance rules; developers provision within those bounds without opening a ticket. Read the blog post.
ServiceNow Integration for Engineering Metrics (Beta)
DORA metrics in the Efficiency Insights dashboard can now be calculated from ServiceNow incident and change management data. Deployment Frequency, Change Failure Rate, and MTTR all supported. Useful for teams where ServiceNow is the system of record for incidents, not a secondary tool.
Custom Dashboards in Engineering Metrics (Beta)
A new Canvas page (being renamed to Studio) lets teams build custom Insights dashboards using HQL queries across all data sources. Dashboards support Draft and Published states. Query Variables allow dashboards to adapt dynamically per team or environment.
Custom Entity Kinds in Developer Portal
Platform engineers can now define entity kinds beyond the built-in set (Component, API, Resource, Environment, System). Model domain-specific software components that don't fit existing kinds, with their own name, icon, and JSON Schema for validation. Release notes.
SonarQube Integration in Developer Portal
Harness connects to SonarQube Server (self-hosted) or SonarQube Cloud and brings projects into the developer portal catalog as catalog entities. Code quality data surfaces alongside the rest of your software catalog.
Scorecard Aggregation
Scorecard data can now be aggregated across multiple catalog entities. Roll up compliance and health metrics from individual components to systems or domains without manually combining reports.
Custom Dashboard Data Retention Extended to 12 Months
The data retention period for custom dashboards increased from 3 months to 12 months. Longer historical windows for trend analysis and compliance reporting.
Code Repository Language Breakdown
Developers can now see the language composition of any repository directly in the list view and repo detail page. Particularly useful when migrating off other source control systems and auditing what you're moving.
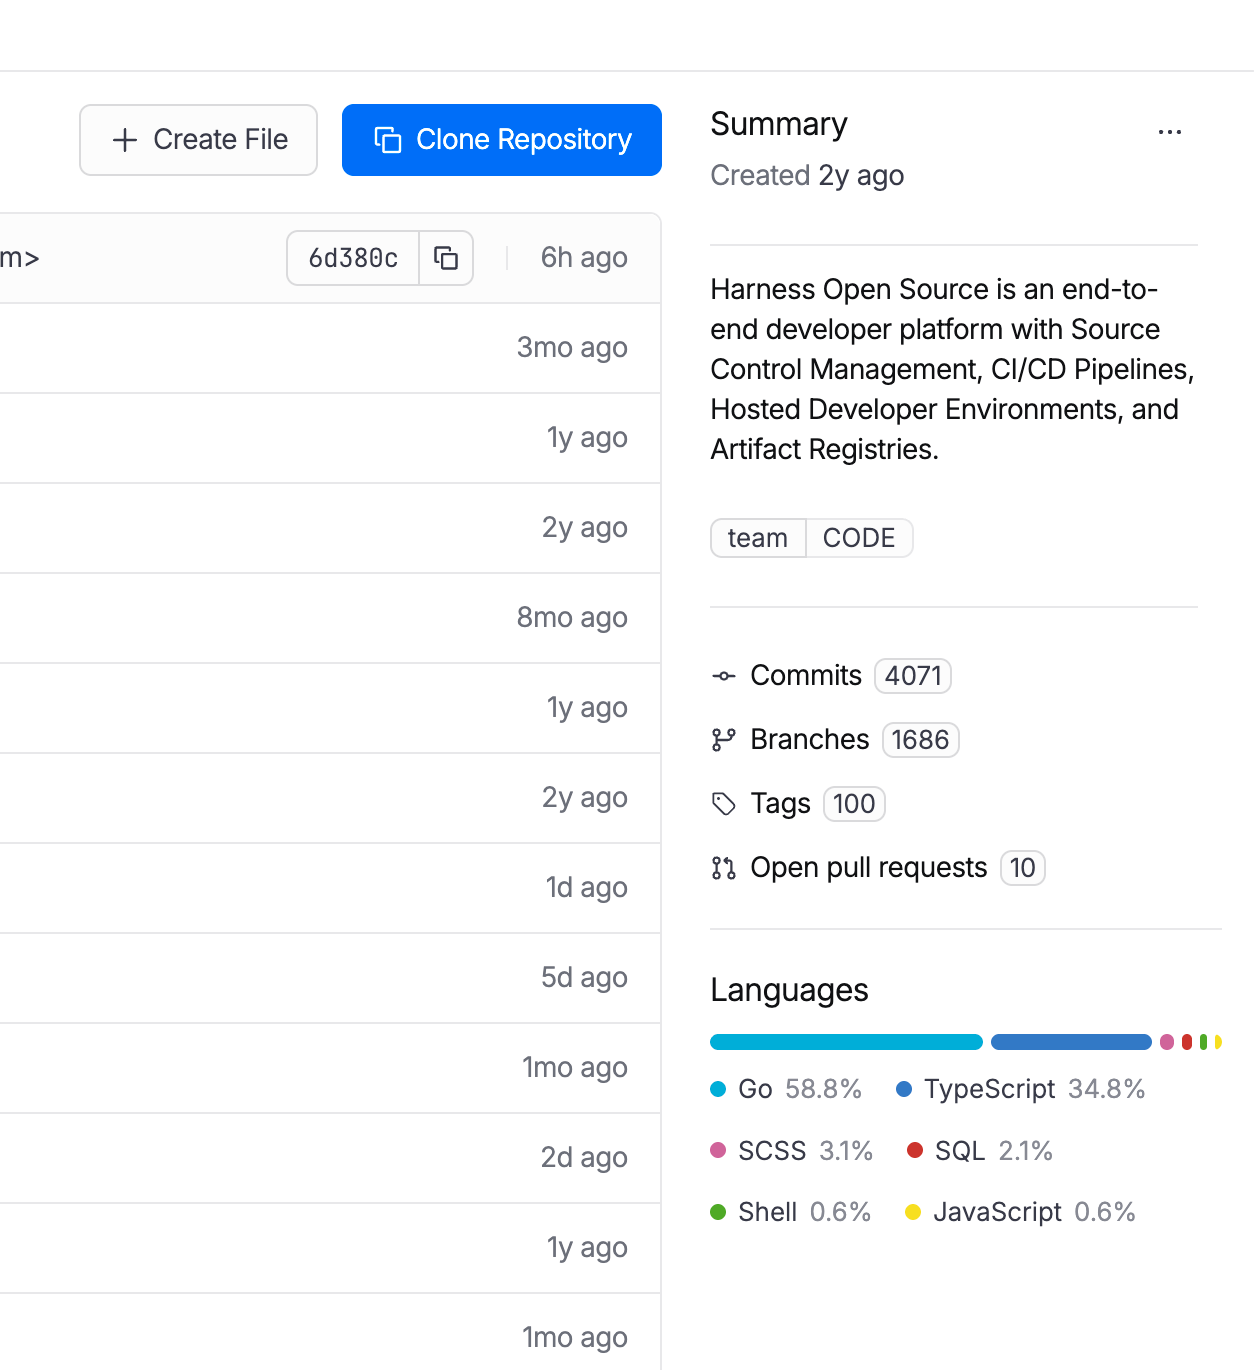
Code Repository Tags Repositories can now be tagged with metadata like team, intent, or domain, consistent with how pipelines, connectors, and other Harness entities are tagged. Useful for filtering, governance, and search at scale.
AI SRE
AI-Generated Post-Mortems with Action Item Detection
When an incident closes, AI SRE automatically generates a structured six-section retrospective: Summary, Impact, Root Cause, Resolution, Insights, and Lessons Learned. The AI synthesizes the full incident context: timeline events, Slack conversations, RCA theories, and responder actions. What typically takes a lead engineer 2-4 hours to write comes out in seconds. Action items are detected in real time from Slack conversations and meeting transcripts during the incident, with each item including a description and the responsible person extracted from context. They carry forward into the post-mortem automatically, so nothing gets reconstructed from memory days later. Release notes.
ServiceNow Change Record Correlation in RCA
When an incident fires, the AI Investigator automatically pulls recent ServiceNow change records and correlates them to the incident timeline. If your organization already has a Harness ServiceNow connector configured for pipelines or approvals, change data flows into root cause analysis immediately with zero additional setup. Change records appear alongside deploy events and code changes in the AI's correlation engine, reducing manual cross-referencing between tools. Documentation.
Stakeholder Status Updates
Incident commanders can now broadcast structured status updates to subscribed stakeholders (executives, customer support, dependent teams) without flooding the war room. Stakeholders subscribe to the services they care about and receive updates triggered by the Incident Lead. The system pre-populates a branded email with incident ID, title, summary, impacted services, and current status. The sender reviews, edits if needed, and sends. Eliminates the "what's the status?" interruptions that pull responders out of active response. Release notes.
Google Chat Integration
Teams running Google Workspace can now run incident response directly from Google Chat: create incident channels, post updates, receive notifications, and collaborate in real time. Uses a Pub/Sub-based architecture for reliable message delivery. Bring incident collaboration to Google Chat on par with the existing Slack integration. One-time admin setup per organization.
Runbook Slug Commands in Slack
On-call responders can now trigger runbook automations from Slack using short slug commands: /harness run <slug>. No UI navigation during high-pressure response. Common actions like restart-pods or scale-up become muscle memory. Removes a context switch from the critical path during active incidents. Release notes.
Chaos Engineering and Resilience Testing
MCP support for Resilience Testing
MCP support for Resilience Testing improves extensibility across chaos and resilience workflows.
Pipeline Integration with Chaos Step Templates
Any experiment template can now be referenced and used from any scope in a pipeline. Makes it easier to standardize chaos execution across delivery workflows.
Probes and Observability Splunk Enterprise and Datadog APM Probes
APM probes now support Splunk Enterprise and Datadog. Teams can validate system behavior during experiments using the observability tools they already rely on.
Namespace Label Filters in ChaosGuard
ChaosGuard conditions now support namespace label filters, giving teams finer-grained control over which namespaces chaos experiments can target. Release notes.
Experiment Run Reports
Experiment run reports are now available in the UI and accessible via a new API endpoint that returns report data as JSON. Useful for integrating chaos results into external dashboards or compliance workflows.
Docker Labels-Based Chaos Injection on ECS
Added support for targeting ECS in-VM SSM chaos injection using Docker labels. Expands targeting flexibility for teams running mixed ECS workloads.
Other Updates
- Service account token notifications: Configure alerts for token creation, rotation, updates, expiration, deletion, and upcoming expiration across your notification channels.
- Cloud cost RBAC enforcement: Users with CCM Viewer (view-only) access no longer see an enabled Save Preferences button in Cost Settings. RBAC is now consistently enforced across the Recommendations and Anomalies pages. Release notes.
- Rejected and Ignored recommendations moved to main view: These lists are now in the Recommendations list itself, enabling direct export without extra navigation.
- AI test automation task nesting limit: Tasks can now nest at most two levels deep, preventing runaway task hierarchies. Enforced in both UI and backend. Release notes.
- Chaos Engineering LLM optimization: Recommendation calls are now processed in chunks instead of one-by-one, reducing latency for experiment recommendation generation.
- IDP sync and delete for integrations: Integration instances (ServiceNow, Kubernetes, SonarQube, GitHub) now include sync and delete actions directly in the UI.
- IDP separates create and edit permissions: Environment and Blueprint permissions are split into distinct Create and Edit actions for finer-grained access control.
- IDP custom user identifiers: The saveDiscoverEntities API now accepts an explicit action_identifier field when registering catalog entities.
Closing
70+ features in 30 days. The teams using AI to accelerate code generation are now running into the same reality we tracked in March: the bottleneck isn't writing code, it's everything downstream. Artifact management, security posture, deployment reliability, incident response, and AI asset governance. April's releases push the feedback loop tighter at each of those stages. Post-mortems that took 4 hours now take seconds. The change record correlation that required manual cross-referencing now happens automatically.
The velocity compounds when the whole software delivery moves together, not just the part where the AI writes code.
See you in May!
From PR to Production Without Leaving Your Cursor IDE
TLDR: Today, Harness is introducing the Harness Cursor Plugin, bringing the power of the Harness AI-native software delivery platform directly into Cursor. This integration, along with the Harness Secure AI Coding hook for Cursor, allows developers and AI agents to move from code changes to vulnerability detection, CI/CD execution, security validation, approvals, deployments, and operational insight without leaving the editor.
AI has completely changed how we write code. You can spin up functions, refactor entire files, and generate tests in seconds. The inner loop, writing and iterating on code, has never been faster. But the moment you try to ship that code, everything slows down. This is what we call the AI Velocity Paradox.
You are suddenly back to juggling pipelines, waiting on approvals, checking security scans, debugging failed runs, and bouncing between tools just to get a change into production.
That gap, between fast code and slow delivery, is what we kept running into. So we built something to fix it.
Today, we are introducing the Harness Plugin for Cursor, a way to go from PR to production without leaving your editor.
AI Made Coding Faster, But Delivery Did Not Catch Up
If you are using agentic coding tools, such as Cursor, you have probably felt this.
You can:
- Generate code instantly
- Understand unfamiliar repos faster
- Fix bugs and open PRs in minutes
But shipping still depends on everything outside your editor:
- CI/CD pipelines
- Security checks
- Approval flows
- Policy enforcement
- Deployment tooling
- Monitoring and debugging
And none of that got simpler just because AI showed up. In fact, AI makes the problem more obvious.
Now you can create changes faster than your delivery process can safely handle. And if those controls are not tight, you are introducing a whole new category of risk. Fast-moving code with fragmented governance.
AI did not break software delivery. It exposed how disconnected it already was.
What If You Could Just Ask
Instead of jumping between tools, what if you could just tell your editor what you want to happen?
Something like:
“Deploy PR #4821 to staging once the security scan passes, and Slack me if anything fails.”
That is the idea behind the Harness Cursor Plugin.
It connects Cursor directly to Harness, so you can trigger and manage your entire delivery workflow using natural language, right inside Cursor.
No tab switching. No manual orchestration. No guessing what is happening in the pipeline.
Some Sample Use Cases
Once connected, you can use Cursor to interact with your delivery system just as you do with your code.
For example, you can:
This builds on what we introduced last month, Secure AI Coding, which integrates directly with Cursor and scans code at the moment of generation rather than waiting for a PR review. Developers see inline vulnerability warnings with the option to send flagged code back to the agent for remediation, without leaving their workflow. Under the hood, it leverages Harness's Code Property Graph (CPG) to trace data flows across the entire codebase, surfacing complex vulnerabilities that simpler linting tools would miss.
The key thing is that you are no longer just interacting with code. You are interacting with the entire delivery system from the same place.
The Important Part: This Is Not Skipping Control
One of the biggest concerns with AI in delivery is obvious:
“Are we about to let agents push code to production without guardrails?”
No.
With Harness, everything runs through the controls that you can rely on:
- Granular RBAC permissions
- OPA policies
- Approval gates
- Audit logs
Instead of being manual checkpoints spread across tools, they are enforced automatically as part of the workflow while you stay in flow.
So AI can help move things faster, but it cannot bypass the governance that matters.
Why We Built It This Way
Most integrations today expose APIs or bolt AI onto existing systems. That is not what we wanted to do.
We designed the Harness Cursor Plugin specifically for how AI agents actually work:
- It is built around actions and workflows, not raw endpoints
- It spans the full delivery lifecycle, not just one step
- It gives agents enough context to reason about what to do next
Because shipping software is not a single action. It is a chain of decisions across CI, CD, security, approvals, and operations. If AI is going to help here, it needs access to that full picture. That’s where the Harness Software Delivery Knowledge Graph comes into play. It provides the necessary context for AI to take actions for you.
The knowledge graph models the relationships between services, pipelines, environments, policies, and operational signals in real time. Instead of treating each step in delivery as an isolated task, it creates a connected system of record that AI can reason over. This allows agents to understand not just what to do, but when and why to do it, based on dependencies, risk signals, and historical behavior.
In practice, this means smarter automation: deployments that adapt to context, approvals that are triggered based on policy and impact, and faster root cause analysis because the system already understands how everything is connected.
This Changes How Ideas Move To Prod
This is not just about convenience. It is a shift in how software actually moves from idea to production.
Instead of:
- Writing code in one place
- Managing delivery somewhere else
- And stitching it all together manually
You get a single, connected workflow:
- Code to pipeline to validation to deployment to operations
All accessible from your editor. Cursor accelerates the building. Harness governs the shipping. And the handoff between the two disappears.
Watch the demo:
Getting Started
If you want to try it:
- Install the Harness Cursor Plugin from the Cursor Marketplace
- Authenticate with Harness using OAuth. No API keys or setup headaches
- Start using natural language to run pipelines, debug issues, and manage deployments
For example:
“Run the CI pipeline for this branch, check if the security scan passed, and promote to staging if it did.”
That is it.
AI is not just changing how we write code. It is changing expectations for how fast we should be able to ship it. But speed without control does not work in real environments. What we are building toward is something simpler:
A world where every step, from PR to production, is:
- Fast
- Governed
- Observable
- Auditable
Without forcing developers to leave their flow. This plugin is one step in that direction.
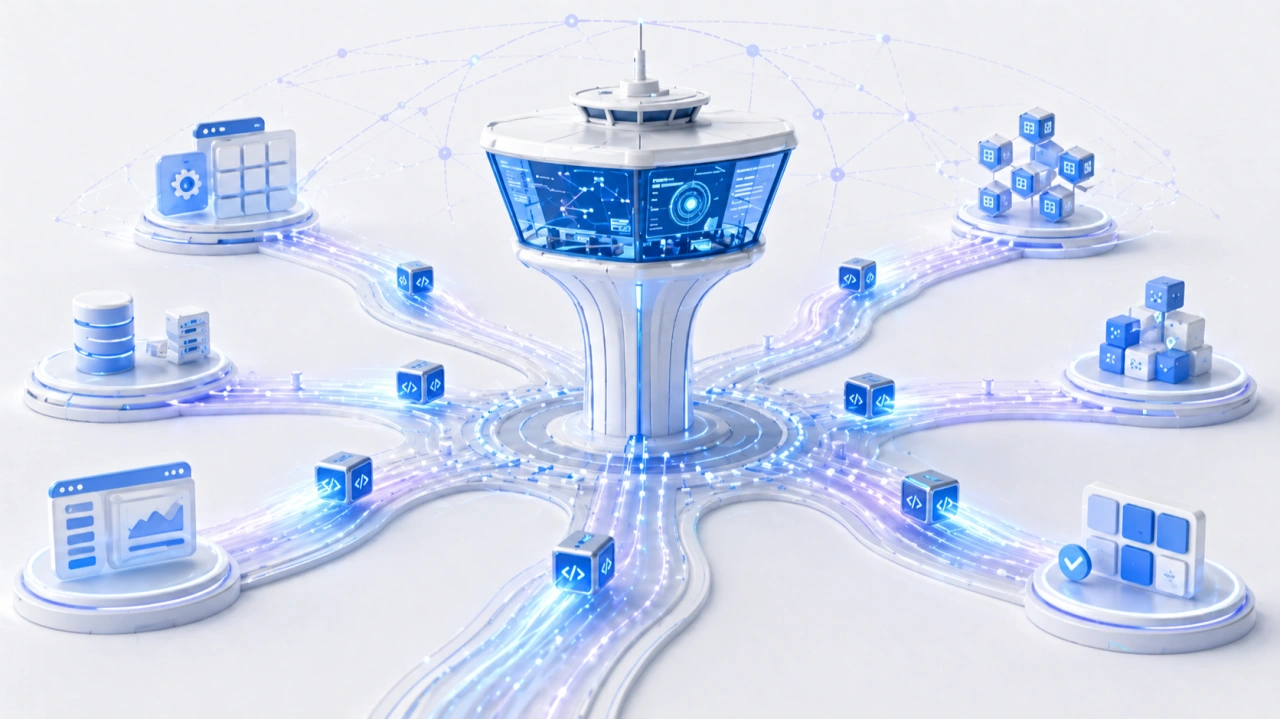
AI writes the code. Who delivers it safely?
The question for enterprise AI in 2026 is no longer just which model. It’s which harness.
An agent harness is the system around the model. It decides what the agent remembers, what context it sees, what tools it can call, what it is allowed to do, and what happens when it is wrong.
The model provides intelligence. The harness provides control.
This is where the real engineering is happening. When Claude Code's source was accidentally exposed earlier this year, reports put it at more than half a million lines. None of that was the model. All of it was the system around the model.
The model gets you started. The harness gets you to production.
In software engineering
Software engineering is one of the first places this plays out. AI coding tools are writing and editing code. Autonomous agents are starting to deploy, operate, and respond to incidents. These are not suggestions anymore. They are changes to running software, made by agents acting on their own.
And one harness is not enough.
Two loops, two harnesses
Software engineering has two halves at the level that matters for agent harness design. Software development, where code gets written. Software delivery, where code becomes running software.
The inner loop is software development. Code gets written, edited, tested, and reviewed. Coding agents work here, close to the developer and bounded by the repository. Whether they live in an IDE, a terminal, a background session, or a web workspace doesn’t change what they do. They help one person write better code faster.
The outer loop is software delivery. Code becomes software that is built, tested, secured, deployed, verified, operated, and sometimes rolled back. That includes CI, security scans, deployments, infrastructure, feature flags, incidents, and approvals.
The two are loops different. The inner loop is about individual productivity. The outer loop is about organizational execution under risk. It crosses teams, touches production, uses secrets, enforces policy, and leaves an audit trail.
An agent delivering software can’t be a coding assistant with API access. It has to run inside a system that enforces the organization’s rules.
What goes wrong without the right harness
The stakes are easier to see by starting with what breaks.
Security. An agent with broad access to deploy, provision, and push config changes is a new attack surface. Prompt injection through a PR description, a poisoned dependency, or a malicious issue comment can turn an autonomous agent into the most privileged insider threat in the company. It acts under its own identity, with its own scoped credentials, doing exactly what it’s authorized to do. The attacker just redirects the authorization. Without an identity model and governed execution, every action the agent can take becomes a potential action path for an attacker.
Compliance. An agent that ships code without the same policy gates, approvals, and audit trails humans use creates a parallel path that regulators and auditors will challenge. A single deployment that skipped EU data residency review can trigger a finding that takes quarters to close. Cyber insurers are starting to scrutinize AI governance, and some are exploring exclusions or tighter terms for poorly governed AI. Within a year or two, “we have autonomous agents deploying code without an evidence trail” will be impossible to defend. Autonomous delivery without verification is autonomous liability.
Confident bad decisions. An agent with partial context looks like it’s working. It deploys during a change freeze. It rolls out a config change that breaks an upstream service. It enables a feature flag during an incident. Each failure is locally reasonable and globally wrong. Without the full knowledge graph, the agent keeps making the wrong call.
AI-specific failure modes. Autonomous agents fail in ways that deterministic automation doesn’t. They hallucinate actions, generating and deploying a Kubernetes manifest that doesn’t match reality. They get stuck in loops, rolling back and redeploying the same change until a human kills the process. They’re confidently wrong, proposing a fix that passes a weak policy gate and breaks production an hour later. No attacker involved. Without verification strong enough to catch them, errors reach production.
All of this has happened with deterministic automation, one mistake at a time. With autonomous agents, errors happen in parallel. A coding agent with bad context can push 10 broken PRs in 10 minutes. A delivery agent without verification can deploy 20 services before anyone notices.
Speed used to be the feature. With autonomous agents, speed is also the damage multiplier.
What a software delivery agent actually needs
A software delivery agent needs four things: memory, context, tools, and verification. The shape and stakes of each element are distinct.
Suppose a team is shipping a new version of a retailer’s checkout service on Thursday. Checkout depends on payments, inventory, fraud, and identity.
Memory: a graph of how your company ships
A Software Delivery Knowledge Graph is a connected map of services, teams, pipelines, deployments, incidents, policies, scorecards, and artifacts. Nodes and edges show how they all relate.
To answer “Is checkout safe to ship Thursday?”, the agent has to know which services checkout depends on, what their scorecards look like, whether any have open critical CVEs, whether there’s a change freeze, and who’s on call Thursday night.
Tha’is a graph query. If the agent doesn’t have the graph, it’s guessing.
Context: the live signal
Memory is the durable map. Context is the live signal. Memory tells the agent how the delivery system is connected. Context tells it what’s happening now.
Back to checkout. The agent sees that a chaos experiment last week showed payments fail when its Redis cache is unavailable. It sees that yesterday’s security scan flagged a critical CVE in a library fraud detection depends on. It sees that the new version changes the same config flag that caused an incident two weeks ago.
None of this is in the pull request. All of it matters.
Context isn’t something you assemble from scratch at runtime. It accumulates in the harness long before the agent is asked to act.
Tools: governed execution
People often assume “tools” means function calls to APIs. For a software delivery agent, it means something different. The agent can deploy to Kubernetes, run a database migration, apply a feature flag, trigger a security scan, run a chaos experiment, open and close an incident. Real actions, inside your network, using your credentials, under your policies, with full audit logging.
At Harness, every action runs through a Delegate: a lightweight worker inside your environment. Your VPC, your Kubernetes cluster, your data center. The agent issues an instruction. The Delegate executes it inside your perimeter and returns the result.
Secrets are decrypted inside the Delegate. Never in the agent’s context window, never in a model provider's memory, never in an audit log.
An agent with arbitrary production access is dangerous. An agent constrained by governed execution is governable.
Verification: proving the action was safe
This is the pillar coding and personal productivity agents don’t need at this depth. Software delivery agents do.
Three mechanisms make it concrete:
- Scorecards grade services against rules the organization defines. Test coverage, SLO compliance, library currency, critical CVEs. Every rule measurable. Every score live. Thresholds set by the organization.
- Policy gates block actions until conditions are met. “No deployment without a passing scorecard.” “No EU infrastructure change without a named EU approver.” The gate sits in the pipeline. The agent can’t route around it.
- Evidence is cryptographically signed proof that each action met its policy. When an auditor asks, “prove last Tuesday’s deployment passed security testing,” the system returns a tamper-evident record.
For checkout, the Thursday release is blocked unless the scorecard passes, no critical CVEs are open, no change freeze applies, and an EU compliance approver signs off. If any of those fail, the agent cannot deploy. If they all pass, the deployment runs through a Delegate and an evidence record is written.
The rules of the organization are enforced in the harness. The agent operates inside them.
The foundation is already built
I mentioned that an agent needs memory, context, tools, and verification. The good news: a modern software delivery platform like Harness already has the foundations, because truly automated delivery has always needed those four things.
A note on our name. We called the company Harness in 2017 because the original thesis was a safety harness for code: let developers move fast without breaking things. Pipelines, policies, approvals, rollbacks, evidence. The scaffolding that lets speed and safety coexist.
That thesis hasn’t changed. The mover has. Developers are still moving fast. AI agents are moving fast too, and faster. The harness has to hold both.
Pipelines aren’t agents. Pipelines are the harness that lets agents safely act. They’re the control plane where agent actions are evaluated, constrained, and executed under policy.
The word “pipeline” carries baggage. Many people hear “script runner.” That isn’t what we mean. Harness pipelines are production orchestration engines: loops, matrix runs, parallel stages, conditions, approvals, OPA gates, rollback, retries, and deterministic-plus-agentic step-chaining.
An agent step can run inside a loop. A deterministic step can pass output to an agent, then to a policy gate, an approval, another agent, and a deployment. The agent isn’t replacing the pipeline. The agent is one kind of step the pipeline already knows how to run.
Harness pipelines execute hundreds of millions of runs a year across enterprise production systems. That isn’t a theoretical runtime for agents. It’s a runtime already hardened at scale, on real delivery, under real policy, with real rollback. That’s the difference between a script runner and a production harness for autonomous action.
The rest of the foundation maps the same way. The Delegate is how actions reach your infrastructure. The Software Delivery Knowledge Graph is the memory. Our platform modules are the tools. Scorecards, policy gates, and signed evidence are the verification. Harness AI, the intelligence layer on top, uses all four of these elements.
We didn’t set out to build an agent harness. We set out to build a software delivery platform with AI at its core. It turns out those two things are the same.
Why coding agents are a different harness
Coding agents (IDE copilots, background agents, terminal-based assistants, cloud coding sessions) are built for a different job. They know your codebase, your style, your recent commits. That’s a real harness, bounded by the repository and the developer. A software delivery harness has different scope, memory, risks, and accountability.
A coding agent’s memory is the repository. A software delivery agent’s memory is the organization.
The context gap. Ask your coding assistant: “Is it safe to deploy this checkout change to production tonight?” It can’t answer. It doesn’t know the current scorecard, the change freeze status, last week’s chaos test results, or who’s on call. None of that lives inside the developer's workspace. A coding agent can write a change. It can’t know if the change is safe to ship.
The blast radius gap. A coding agent’s bad change usually gets caught before it hurts anything: in review, in CI, in a security scan, on a policy gate. Fifteen minutes wasted, not a production incident. A software delivery agent’s worst day is customer data exposure, a production outage, or a regulatory incident. Same agent paradigm, radically different blast radius.
The safety-net gap. Both kinds of agents are moving toward less human oversight. The difference is what catches them when they’re wrong. A coding agent mistake gets caught downstream: by CI, by security scans, by policy gates, by the delivery harness itself. A delivery agent mistake has nothing downstream. It is the downstream.
The control-plane gap. Could a coding agent call Harness as a backend? Of course. It should. But the caller isn’t the control plane. The software delivery harness decides whether the request is allowed, how it executes, and what evidence is retained.
The preference gap. Developers are going to pick their own coding agents. Most enterprises already run two or three: Cursor on some teams, Claude Code on others, Copilot on others, whatever ships next year on yet other teams. That’s healthy. Software development is distributed by design. Software delivery is the opposite: it’s centralized. One company, one delivery control plane. One set of policies, one audit trail, one source of evidence, one place where credentials are held.
The winning pattern is the two meeting cleanly: whichever coding agent the developer picks, the deployment passes through the same delivery harness.
Why model providers aren’t the delivery harness today
Managed agents. Stateful APIs. Server-side memory. Model providers are extending into harness territory, and for many use cases, that works. For software delivery specifically, the architecture runs into a different set of constraints.
The credentials problem. Every software delivery action requires production credentials: cloud admin roles, Kubernetes service accounts, database passwords, secrets manager keys. The most sensitive assets in the company. Enterprises spend years building the controls around them: vaults, rotation, scoped access, audit trails. A model-provider-hosted agent loop would require those credentials to flow through the model provider’s infrastructure on every action. Few CISOs will approve it. Few auditors will sign off. In regulated industries, it’s often a non-starter.
The inversion. A model can be hosted anywhere. Any provider, any cloud. Execution has to happen inside the enterprise, using credentials that never leave. The model stays outside. The control plane runs inside. Intelligence can live anywhere. The control plane can’t.
The live-state problem. A software delivery agent’s answer to “Is this safe to ship?” depends on a state that changes every minute. The current change freeze. The latest incident. The newest CVE. Who’s on call right now. Whether the deployment window just closed. A model provider can reason about what you put in the prompt. It doesn’t naturally own the current state of your delivery system. A model provider knows the world. The harness has to know your world, right now.
The accountability problem. When a delivery agent does something wrong, the model provider isn’t on the incident bridge. The on-call engineer is. The platform lead is. The CTO is. The company is the one that has to explain the outage to customers, the finding to regulators, the miss to the board. Accountability can’t be outsourced. The harness that constrains the agent can’t be either.
A model provider can be the brain. It can’t be the harness for delivery.
AI for everything after code
More and more code will be written by AI. The bottleneck is shifting from code generation to safe delivery.
Coding agents help developers write code. Software delivery agents help teams safely deliver and operate it. Two harnesses. Two categories. Two sets of winners.
The foundation for software delivery is ready. The agents that need it are arriving now. The category now has a name.
We’ve always called it Harness. The idea just got bigger.
Harness Expands Infrastructure as Code Management with Native Terragrunt Support and Multi-IaC Innovation
- Harness IaCM introduces native Terragrunt support, enabling true enterprise-grade orchestration at scale.
- Teams can now manage Terraform, OpenTofu, and Terragrunt in a single platform without fragmented tooling.
- Built-in governance, policy enforcement, and approvals streamline secure infrastructure operations.
- End-to-end visibility and drift detection improve reliability across complex, multi-environment deployments.
- The launch marks a major step toward a unified, multi-IaC control plane for modern infrastructure teams.
Bringing First-Class Terragrunt Support to IaCM
“We’ve been operating in a hybrid environment with both OpenTofu and Terragrunt, and Harness has made it much easier to bring those workflows together into a single, consistent platform with IaCM. The addition of Terragrunt support is a valuable step toward simplifying how we manage infrastructure at scale.”
— Lead Platform Engineer, Enterprise Customer
Infrastructure as Code is now a standard for modern cloud operations, with most enterprises using IaC to provision and manage environments. However, as adoption grows, so does complexity. Teams are no longer managing a handful of environments. They are operating across multiple regions, accounts, and services, often at massive scale.
This is where traditional approaches begin to fall short.
As organizations scale their infrastructure, Terraform alone is often not enough. Teams adopt Terragrunt to manage complex, multi-environment deployments, but they are often forced to stitch together fragmented tooling that lacks visibility, governance, and consistency.
At Harness, we are changing that.
Today, we are excited to announce native Terragrunt support in Harness IaCM, bringing it to full parity with Terraform and OpenTofu while delivering capabilities that go beyond what is available in standalone tooling. This is more than support. It is about making Terragrunt a first-class platform for enterprise infrastructure management.
With Harness IaCM, teams can now:
- Orchestrate complex Terragrunt environments with full visibility across all units
- Apply cost estimation, approvals, and policy enforcement natively
- Detect and manage drift across environments with granular insights
- View infrastructure changes at the resource level across orchestrated deployments
Terragrunt has become a critical layer for managing infrastructure at scale because it simplifies how teams structure and reuse configurations across environments. Harness builds on that foundation with deep, native integration, enabling platform teams to operate with both flexibility and control.
This is especially important for enterprises where a single deployment spans multiple environments and services. Harness abstracts that complexity while maintaining governance, auditability, and consistency.
Extending IaCM to a Multi-IaC Future
Terragrunt is part of a broader shift toward multi-tool infrastructure strategies.
Modern teams are no longer standardized on a single IaC tool. Instead, they operate across:
- Terraform and OpenTofu for provisioning
- Terragrunt for orchestration
- CDK for developer-driven infrastructure
- Ansible for configuration and automation
This creates challenges around consistency, visibility, and governance. Harness IaCM is built for this reality. We are evolving IaCM into a unified control plane for multi-IaC workflows, where teams can manage different frameworks with a consistent experience, shared policies, and centralized visibility.
This means:
- Eliminating fragmented pipelines across tools
- Standardizing governance across environments
- Gaining full visibility into infrastructure state and changes
Instead of managing infrastructure in silos, teams can now operate from a single platform across the entire lifecycle.
What’s Next for Infrastructure as Code?
The next phase of Infrastructure as Code is not just about supporting more tools. It is about making infrastructure systems more intelligent and automated.
We are investing in two key areas:
Expanded IaC Support
We are continuing to support modern frameworks like AWS CDK, enabling developer-centric infrastructure workflows alongside provisioning, configuration, and orchestration tools.
AI-Driven Automation
We are introducing intelligence into IaC workflows to simplify tasks such as drift management and optimization. This helps teams reduce manual effort and operate more efficiently at scale.
Together, these investments move IaCM toward a unified, multi-IaC platform that combines flexibility, governance, and automation. Terragrunt has become essential for managing infrastructure at scale but until now, it hasn’t had a platform that truly supports it. As infrastructure continues to grow in complexity, our focus remains the same. Helping teams move faster, reduce risk, and scale with confidence no matter which IaC tools they use.
Building for Resilience: An Engineering Guide to the Mythos Era
The release of Anthropic Mythos and Project Glasswing marks an exciting and pivotal new chapter in software development. As the industry advances, the speed and economics of vulnerability exploitation have fundamentally shifted. What once took weeks of manual reconnaissance can now be scaled rapidly through automated models. However, this is not just a security problem to solve. It is a massive engineering opportunity to build cleaner, more robust systems. By leaning into AI-accelerated defense, engineering teams are uniquely positioned to lead the charge and redesign the landscape of modern software architecture.
Breaking Down Silos and Establishing Shared Accountability
To succeed in this new era, the traditional silos separating security and engineering must fall. Defense at machine speed requires a unified front.
- Organizations need a shared roadmap and accountability model across Engineering, Infrastructure, and Security.
- These roadmaps must be crafted jointly with clear responsibility assigned per action item.
- Every executive and their corresponding team will be affected and accountable for changing the way work is done.
- Preparations for these improvements should be treated exactly like new product features.
- Savvy customers will start to pay attention to companies who are responding to Mythos, turning your proactive resilience into a highly visible competitive advantage.
Core Engineering Imperatives
The foundation of AI-accelerated defense relies on sound, proactive engineering practices. Developers must take ownership of architectural hygiene from the ground up.
- Accelerate velocity: Teams must focus heavily on shortening patch and change cycles (such as with Harness CI and CD). The single most important metric is how quickly you can safely make changes.
- Shift left completely: You must find bugs before you ship code. Achieve this by integrating SAST, SCA, and auto-pen testing into a secure pipeline, and prefer using memory safe code languages.
- Design for resilience: Always build with breach assumed. In practice, this means implementing zero-trust, isolating services by identity, and using short lived tokens by default.
- Simplify the architecture: As you engineer and build for resilience and simplicity , take time to audit your current code base to reduce dependencies and standardize on known good services and libraries. Additionally, actively reduce and inventory what you expose.
- Pay attention runtime: Aside from bugs, engineering teams haven’t traditionally paid attention to the run-time security of their applications. Aside from the functional insights developers can glean from runtime security tools, understanding how a system is attacked can help you make better architectural and functionality decisions.
Planning for the Unexpected
Even with the best architecture, unexpected friction will occur. Resilient engineering means planning comprehensively for your ecosystem.
- Ensure you know your software dependencies and precisely who to contact in emergencies.
- Engineering teams should build technical work-arounds for times when providers or internal systems experience issues.
- Organizations must establish a surge defense capability. When faced with a severe situation, have a SWAT team established with pre-approved authority, budget, and standard operating procedures across domains and outside help.
- At the company level, pre-position high-visibility incident response. This includes having pre-approved and crafted messaging triggered by established conditions.
Security as an AI-Powered Partner
To keep pace with the increased velocity of engineering teams, Security teams must also evolve their operational models.
- Security needs to leverage AI to de-toil high calorie activities.
- Practical applications include putting a model in front of your alert queue and testing it regularly.
- AI should also handle the triage and prioritization of scan findings alongside ticket ops automation.
- It is crucial to automate the technical incident response pipeline.
- By automating the bookkeeping around incidents, human decisions should be made with assistance at most.
- The ultimate goal is to find places to leverage AI and accelerate the time between incident and resolution.
Leading the Charge
Engineering leaders and developers are in the perfect position to navigate this industry inflection point. By taking ownership of these structural changes today, you ensure the long-term viability of your products and the enduring strength of your codebase. Bring your security, infrastructure, and engineering teams together into the same room and start building your shared roadmap today.

Infrastructure as Code Management: Terragrunt & Multi-IaC
What happens when your Infrastructure as Code management strategy works perfectly in dev, scales reasonably well in staging, and then quietly fractures across seventeen production workspaces because nobody documented which Terragrunt wrapper goes with which AWS account? You spend Friday afternoon reverse-engineering DRY patterns that made sense six months ago, wondering why your team is managing three different IaC execution engines with four incompatible workflow philosophies.
This scenario isn't hypothetical. It's the reality of organizations that adopted IaC incrementally, layer by layer, without a unified management approach. One team standardized on OpenTofu for new infrastructure. Another maintained legacy Terraform configurations because migration felt risky. A third discovered Terragrunt and used it to wrangle complexity across AWS regions, but now those wrappers exist outside any centralized governance model. Each decision was rational in isolation. Together, they created an orchestration problem masquerading as a tooling problem.
The actual challenge isn't choosing between Terraform, OpenTofu, or Terragrunt. It's managing their outputs, enforcing policy consistently across execution contexts, and ensuring that infrastructure changes don't outpace your ability to understand what's deployed.
The Hidden Complexity of Multi-IaC Environments
Most platform teams don't set out to run multiple IaC tools simultaneously. They inherit Terraform state from acquisitions, adopt OpenTofu for licensing predictability, and introduce Terragrunt because someone needed to stop copying backend configurations across 40 AWS accounts. The tools themselves aren't the problem. The problem is that each tool introduces its own state management assumptions, module resolution logic, and workflow expectations.
Terragrunt, for instance, exists specifically to solve Terraform's verbosity problem. It lets you define backend configurations once and reference them across environments. It supports dependency graphs so you can deploy a VPC before attempting to create subnets. These capabilities are valuable, but they also mean your actual infrastructure logic now spans two layers: the Terraform or OpenTofu code that defines resources, and the Terragrunt configuration that orchestrates execution.
When you lack centralized Infrastructure as Code management, those layers drift independently. Someone updates a Terragrunt dependency graph without realizing it breaks a downstream workspace. Another engineer modifies an OpenTofu module but forgets that three different Terragrunt configurations depend on its output structure. You don't discover these issues until a deployment fails in production, and the postmortem reveals that nobody had visibility into the full dependency chain.
Why Workflow Sprawl Defeats Governance at Scale
The typical response to multi-IaC complexity is to standardize on one tool and deprecate the others. That works if you're early in your IaC journey. It's impractical if you're managing hundreds of workspaces across regulated environments where compliance audits expect immutable infrastructure definitions and audit trails for every state change.
Here's what actually happens: platform teams create custom CI/CD pipelines for each tool. Terraform runs in Jenkins. OpenTofu runs in GitHub Actions. Terragrunt configurations use a shell script someone wrote during an incident. Each pipeline implements drift detection differently. Policy enforcement exists as scattered OPA rules that don't share a common evaluation context. When an auditor asks, "How do you prevent unapproved infrastructure changes?", the honest answer is, "We run some checks in some places, and we hope teams remember to use them."
This isn't negligence. It's what emerges when Infrastructure as Code management tooling doesn't natively support the reality of polyglot IaC environments. Teams need a system that treats OpenTofu, Terraform, and Terragrunt as execution details, not architectural boundaries. The workflow layer—plan generation, policy evaluation, approval gates, state locking—should remain consistent regardless of which engine interprets the configuration.
Infrastructure Automation Tools Need Orchestration, Not Just Execution
Running `terragrunt apply` successfully doesn't mean your infrastructure is well-managed. It means Terragrunt successfully invoked OpenTofu or Terraform and applied a configuration. The actual management work—validating inputs, enforcing cost policies, detecting drift, promoting changes through environments—exists outside the execution layer.
This is where most homegrown solutions collapse under their own weight. You build a wrapper script that runs Terragrunt with the right flags. Then you add pre-commit hooks for policy checks. Then you integrate Sentinel or OPA, but only for workspaces that someone remembered to configure. Then you add Slack notifications so people know when drift occurs, but the notifications don't include enough context to act on them. Eventually, you have a Rube Goldberg machine that works until it doesn't, and debugging requires institutional knowledge that exists in one person's head.
The fundamental issue is that IaC workflow optimization requires thinking beyond execution engines. You need orchestration that understands module dependencies, workspace relationships, and policy boundaries. You need variable management that doesn't require copying YAML files between repositories. You need drift detection that runs automatically and surfaces meaningful deltas, not raw Terraform output dumped into a log file.
Terragrunt Support as a First-Class Workflow Primitive
Treating Terragrunt as an afterthought—something teams bolt onto existing Terraform or OpenTofu pipelines—misses its architectural intent. Terragrunt exists because managing backend configurations, passing outputs between modules, and orchestrating multi-account deployments shouldn't require copying boilerplate across dozens of directories. When Infrastructure as Code management platforms support Terragrunt natively, they acknowledge this reality: the DRY principle applies to infrastructure orchestration, not just resource definitions.
Native Terragrunt support means the platform understands dependency graphs without requiring custom parsing logic. It means workspace templates can reference Terragrunt configurations directly, rather than forcing teams to flatten everything into monolithic Terraform modules. It means policy enforcement applies before Terragrunt invokes the underlying execution engine, catching invalid configurations before they generate failed plans.
This matters most in organizations running multi-region or multi-cloud architectures. A typical pattern: one Terragrunt configuration defines networking across AWS regions, another manages Kubernetes clusters, a third provisions databases. Each configuration depends on outputs from the others. Without native orchestration, teams either write brittle shell scripts to sequence these dependencies or accept that deployments sometimes fail halfway through because someone applied changes out of order.
Multi-IaC Tools Require Unified State and Policy Management
The real test of an Infrastructure as Code management platform isn't whether it runs OpenTofu or Terraform. It's whether it provides consistent state visibility, policy enforcement, and audit trails across both. If your platform requires separate workflows for each execution engine, you've automated the mechanics but not the governance.
Consider policy evaluation. A reasonable security requirement: no S3 buckets should allow public read access. With fragmented tooling, you implement this rule multiple times. Once for Terraform workspaces using Sentinel. Again for OpenTofu configurations using OPA. A third time for Terragrunt-managed infrastructure, where you're not sure which policy engine applies because Terragrunt is just orchestrating calls to Terraform or OpenTofu. When an audit occurs, you can't prove consistent enforcement because there's no unified policy evaluation layer.
The same fragmentation affects drift detection. Terraform Cloud detects drift for Terraform-managed resources. Your OpenTofu workspaces might run scheduled reconciliation jobs, or they might not—it depends on whether someone configured them. Terragrunt configurations drift silently unless you've built custom tooling to periodically run `terragrunt plan` and parse the output. The result: partial visibility across your infrastructure estate, where "managed by IaC" becomes aspirational rather than descriptive.
OpenTofu Integration and Terraform Alternatives in Practice
Organizations exploring Terraform alternatives often focus on licensing or community governance. Those considerations matter, but they don't address the operational question: how do you manage infrastructure deployed with multiple execution engines without creating parallel workflow systems?
OpenTofu integration means more than "we can run OpenTofu commands." It means workspaces provisioned for OpenTofu behave identically to Terraform workspaces at the orchestration layer. Variable sets apply consistently. Policy evaluation uses the same rule sets. Drift detection runs on the same schedule. Approval workflows follow the same governance model. The execution engine becomes an implementation detail, not a workflow boundary.
This distinction matters during migrations. Teams don't flip entire infrastructure estates from Terraform to OpenTofu overnight. They migrate incrementally, starting with non-critical workspaces and expanding as confidence grows. If your Infrastructure as Code management platform treats each engine as a separate silo, you're managing two parallel systems during the transition. If the platform abstracts execution details behind a unified orchestration layer, the migration becomes a configuration change, not an architectural overhaul.
IaC Orchestration Beyond Engine Selection
The hard problems in infrastructure management aren't technical; they're organizational. How do you ensure that 40 engineers across six teams follow the same approval process for production changes? How do you enforce cost policies without blocking legitimate deployments? How do you maintain audit trails that satisfy compliance requirements without turning every infrastructure change into a bureaucratic ordeal?
IaC orchestration platforms solve these problems by decoupling policy from execution. Instead of embedding governance rules in CI/CD pipelines—where they're invisible, untestable, and easy to bypass—you define them once at the platform level. Instead of writing custom scripts to sequence Terragrunt dependencies, you describe the dependency graph declaratively and let the platform handle execution order. Instead of building bespoke drift detection logic, you configure detection schedules and let the platform surface meaningful deltas.
This approach doesn't eliminate complexity. It consolidates complexity into a layer designed to manage it. Your IaC configurations remain simple: modules that define resources, Terragrunt wrappers that eliminate boilerplate, workspace configurations that specify execution context. The orchestration platform handles everything else: state locking, policy evaluation, approval workflows, audit logging, drift remediation.
Harness IaCM: Orchestration for Multi-IaC Environments
Harness Infrastructure as Code Management approaches these challenges by treating the execution engine as a deployment detail, not an architectural constraint. Whether you're running OpenTofu, Terraform, or Terragrunt, the orchestration layer remains consistent: standardized pipelines for plan generation and apply operations, unified policy enforcement across all workspaces, centralized drift detection that surfaces actionable insights.
- Native Terragrunt support means dependency graphs defined in Terragrunt configurations are understood and respected during execution. You don't need custom scripts to sequence deployments across modules or AWS accounts. The platform interprets dependencies and orchestrates execution accordingly, applying changes in the correct order while maintaining state consistency.
- The Module and Provider Registry provides a centralized source of truth for infrastructure components, whether they're Terraform modules, OpenTofu modules, or Terragrunt configurations. Variable Sets and Workspace Templates eliminate configuration duplication, letting you define environment-specific values once and reference them across workspaces. Default plan and apply pipelines ensure consistent execution patterns without requiring custom CI/CD configurations for each workspace.
- Policy enforcement happens before execution, not after. Whether you're using Terraform, OpenTofu, or Terragrunt, policies evaluate against the generated plan before any infrastructure changes occur. Drift detection runs automatically, comparing deployed infrastructure against IaC definitions and surfacing discrepancies through a unified interface. Audit trails capture every state change, policy evaluation, and approval decision, providing the compliance evidence required in regulated environments.
For teams managing infrastructure across multiple clouds, regions, or execution engines, Harness IaCM provides the orchestration layer that makes polyglot IaC environments manageable. The platform doesn't force you to standardize on a single tool. It provides governance, visibility, and workflow consistency regardless of which engine interprets your configurations.
Governance Enables Velocity in Multi-IaC Environments
The promise of Infrastructure as Code—reproducible deployments, version-controlled infrastructure, collaborative development—only materializes when you have consistent orchestration across execution engines. Running Terraform in one pipeline, OpenTofu in another, and Terragrunt through a shell script doesn't scale. It creates workflow fragmentation that defeats governance and slows teams down.
Effective Infrastructure as Code management platforms abstract execution details behind unified workflows. They treat Terragrunt as a first-class orchestration primitive, not an afterthought. They provide native support for OpenTofu alongside Terraform, recognizing that organizations migrate gradually, not overnight. Most importantly, they enforce policy, detect drift, and maintain audit trails consistently across all workspaces, regardless of which engine runs the actual infrastructure changes.
The technical lesson: orchestration complexity belongs in platforms designed to manage it, not scattered across custom scripts and fragmented CI/CD pipelines. The operational lesson: governance doesn't slow teams down when it's embedded in the workflow rather than bolted on afterward. Multi-IaC environments are manageable when you have the right orchestration layer. Without it, you're just running tools in parallel and hoping they don't conflict.
Explore how Harness Infrastructure as Code Management handles multi-IaC orchestration, or review the technical documentation or implementation details. The product roadmap outlines upcoming capabilities for workflow optimization and policy enforcement.
The Modern Software Delivery Platform®
Need more info? Contact Sales