TL;DR
- The problem: Teams often deploy Amazon Bedrock AgentCore agents with hand-written scripts or the CLI. That leaves no approvals, no audit trail, and no consistent rule for who can invoke each agent.
- The fix: Harness CD treats the agent as a first-class service. You set the agent authorizer when you register it, and it deploys with every revision.
- Two authorizer types:
AWS_IAMfor callers inside AWS (SigV4).CUSTOM_JWTfor everyone else (OIDC/OAuth tokens from Okta, Auth0, Entra ID, Cognito, and others), with allowed audiences, clients, scopes, and custom claims. - Restrict to Gateway: Turn it on so all calls pass through the AgentCore Gateway, a single point to log and control.
- Two sides of access: The authorizer controls inbound calls (who can call the agent). The Execution Role ARN controls outbound access (what the agent can reach).
- Safe rollout: Canary traffic shifting (for example, 10% to 25% to 50% to 100%), validation between steps, and automatic rollback to the previous revision.
- Governance included: RBAC, OPA policies, approvals, and an audit trail apply to agent stages like any other.
Why agents need their own deployment path
Building an agent has never been easier. Getting one safely into production is still hard, and deployment is where most of the risk sits. As we covered in Introducing AI Agent Deployment in Harness Code Deployments, many teams still push agents out by hand or with one-off CI jobs, which leaves no reliable record of who deployed what.
So why isn't the standard software delivery pipeline enough? Three reasons:
- The runtime is different. Amazon Bedrock AgentCore is a managed runtime built for agents. It provides session and memory primitives, per-session isolation, identity scoped to the agent, and immutable runtime revisions instead of a Deployment you define yourself. Traffic is shifted through an AgentCore Gateway rule, not a service mesh. A generic "build image, apply manifest" pipeline knows nothing about any of this.
- Agent behavior isn't deterministic. A new revision can behave differently in ways a health check won't catch. That calls for gradual traffic shifting, validation between steps, and a fast rollback to the previous revision.
- Agents act, so the stakes are higher. They call tools, touch data and take actions. You need to control who can invoke them, what they can reach, and keep one audit trail of every change.
Harness CD addresses this with native AWS Bedrock AgentCore support. The agent is a first-class service, with purpose-built deploy, traffic shift and rollback steps, and the RBAC, OPA policies, approvals and audit trail you already use for the rest of your software delivery. No hand-rolled scripts.
This post focuses on one piece of that governance story, the agent authorizer, and then walks through the full flow from registering an agent to shipping it with a canary rollout.
Your agent is live. Who can talk to it?
Getting an AI agent running on Amazon Bedrock AgentCore is the easy part. The harder question comes right after: who is allowed to call it?
An agent is not a static web page. It can reason, call tools, read data, and take actions. If the wrong caller reaches it, the damage goes beyond a bad page view. It can mean leaked data, runaway costs, or actions nobody approved.
Access to an agent has two sides:
| Direction | The question | Controlled by |
|---|---|---|
| Inbound | Who can call my agent? | The agent authorizer |
| Outbound | What can my agent call (models, S3, APIs)? | The Execution Role ARN |
Think of an office building. The authorizer is the security guard at the front door, who checks who is allowed in. The execution role is the access badge the agent carries once inside, which decides which rooms it can open.
Many teams still deploy agents with hand-written scripts or the Bedrock AgentCore CLI, outside any delivery pipeline. That leaves no shared history, no approvals, no canary rollout, no rollback, and no consistent way to say who can invoke each agent.
Harness treats an AI agent as a first-class deployment, with the same services, environments, pipelines, RBAC, secrets, and OPA policies you already use. With the new agent authorizer, access control becomes part of the agent's definition and ships with every deployment.
In this post we'll walk through:
- Registering an agent service with an AWS IAM or Custom JWT authorizer
- Creating the environment and infrastructure definition
- Building a pipeline stage with deploy and traffic shift steps
Note: Agent deployments are behind the feature flag
CDS_AGENT_RUNTIME_DEPLOYMENT. Contact Harness Support to enable it.
First, what is an agent authorizer?
An agent authorizer controls who can invoke your agent's runtime after it is deployed. Harness passes the authorizer configuration to AWS Bedrock AgentCore Identity, and AWS enforces it at invocation time. The rule lives in the platform, not in your agent's code.
You pick one of two types while registering an Agent Service in Harness.
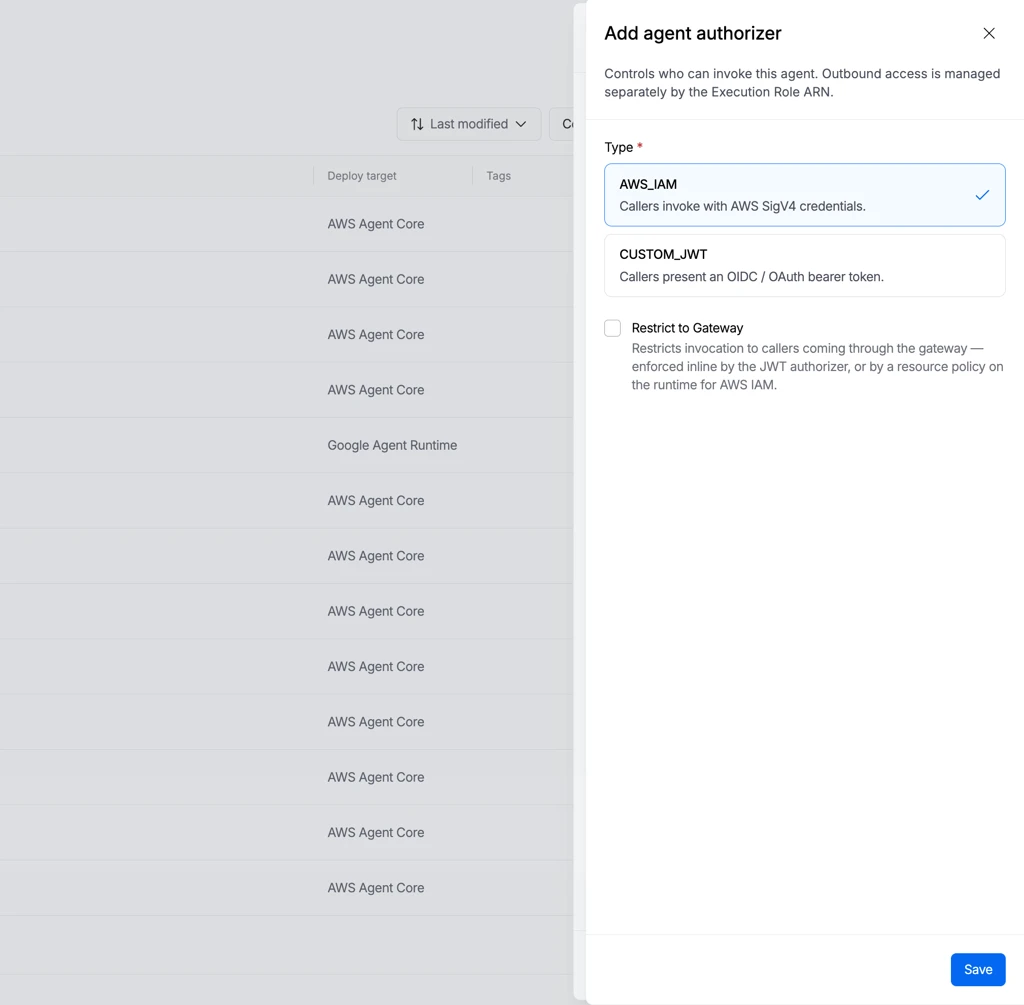
AWS_IAM: for callers inside AWS
Callers invoke the agent with AWS SigV4 credentials. This is a good fit when the callers are other AWS workloads, such as a Lambda function, another service, or an internal application running under an IAM role. There is nothing else to configure beyond the optional Restrict to Gateway setting.
CUSTOM_JWT: for everyone else
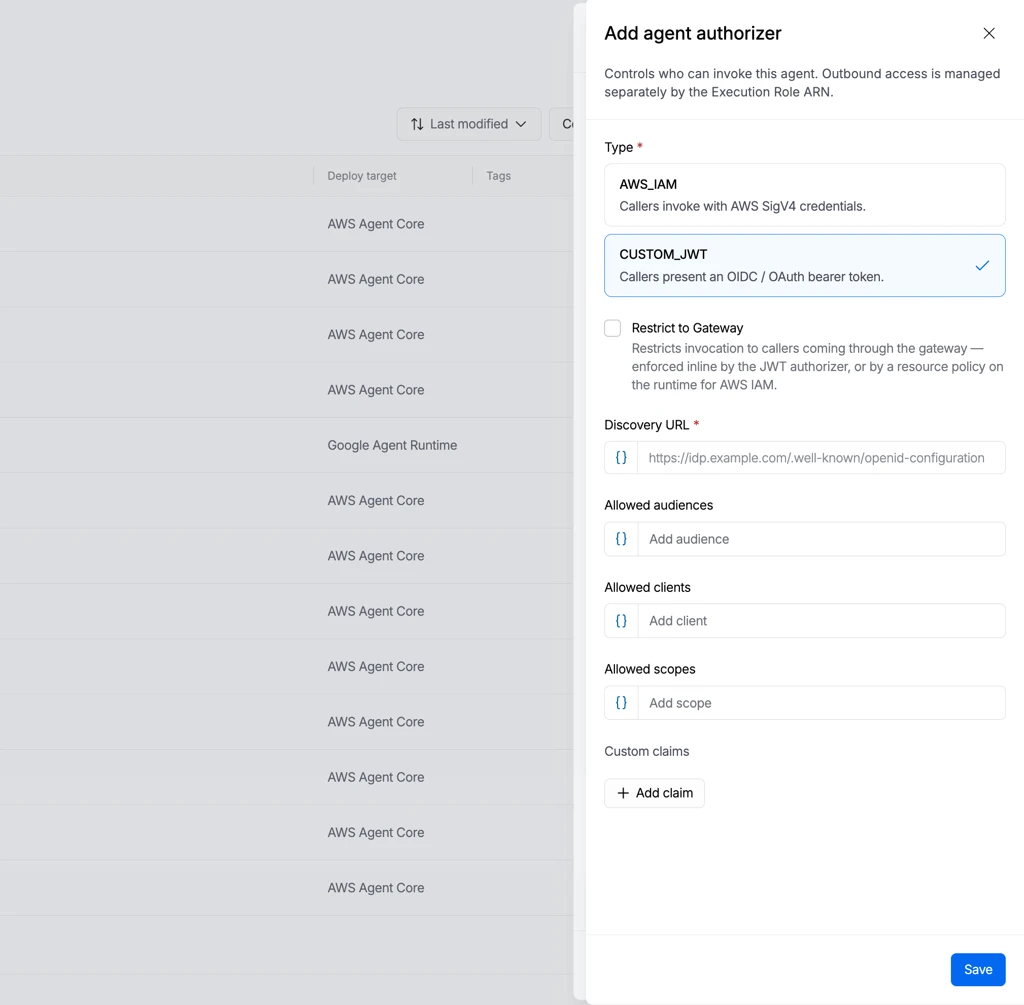
Callers present an OIDC / OAuth bearer token issued by your identity provider (Okta, Auth0, Entra ID, Cognito and others). This fits end-user applications, partner integrations, and anything outside your AWS account. You define the rules the token must satisfy:
- Discovery URL (required): your identity provider's OIDC discovery endpoint, used to validate incoming tokens. For example:
https://idp.example.com/.well-known/openid-configuration - Allowed audiences: the token must be issued for this agent
- Allowed clients: only tokens issued to specific registered applications are accepted
- Allowed scopes: the token must carry specific permissions, such as
agent:invoke - Custom claims: extra matching rules on token contents, such as
departmentequalsplatform-eng. String claims support Equals. String array claims support Contains or Contains any of.
Configure at least one of the audience, client or scope lists, or add a custom claim, so the authorizer has something to match tokens against.
Restrict to Gateway
For both types you can turn on Restrict to Gateway. Only callers that come through the AgentCore Gateway can invoke the agent, so nobody can skip the front desk. Harness enforces it inline for the JWT authorizer, and through a resource policy on the runtime for AWS IAM.
An agent service supports one authorizer at a time.
Step 1: Register the agent service
An agent service represents a single AI agent in Harness CD. It defines the agent's identity, its target runtime, the artifact it runs from, and the configuration it needs.
- In the Code Deployments capability, open Agent Services and select New Agent Service.
- Enter an Agent name. Harness generates the Id for you.
- Under Deploy target, select AWS Agent Core.
Choose the Artifact type:
- Image URI (ECR): for example
123456789012.dkr.ecr.us-east-1.amazonaws.com/agent:1.0.0 - S3 Direct Code: a zip in S3 with a managed runtime such as Python or Node
- Image URI (ECR): for example
- Enter the Execution Role ARN, the IAM role the agent assumes at runtime. This is the outbound side of access control.
- (Optional) Add config variables (including secrets resolved from the Harness secret manager) and an AgentConfig manifest stored in Git or the Harness file store.
Add the authorizer
In the Agent Authorizer section, select Add and choose a type.
Option A: AWS_IAM
Select AWS_IAM. Optionally tick Restrict to Gateway. Save.
Option B: CUSTOM_JWT
Select CUSTOM_JWT and fill in the discovery URL and your allow-lists.
Step 2: Create the environment and infrastructure definition
The environment says where the agent deploys.
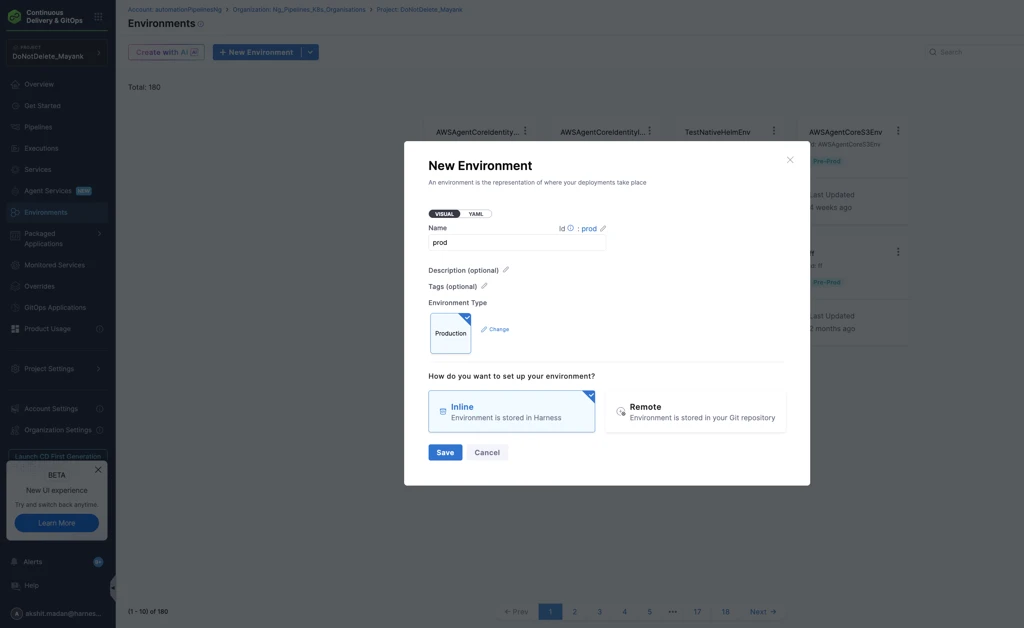
Create the environment
Create an environment (or reuse one) and set its type to Production or Pre-Production.
Add an infrastructure definition
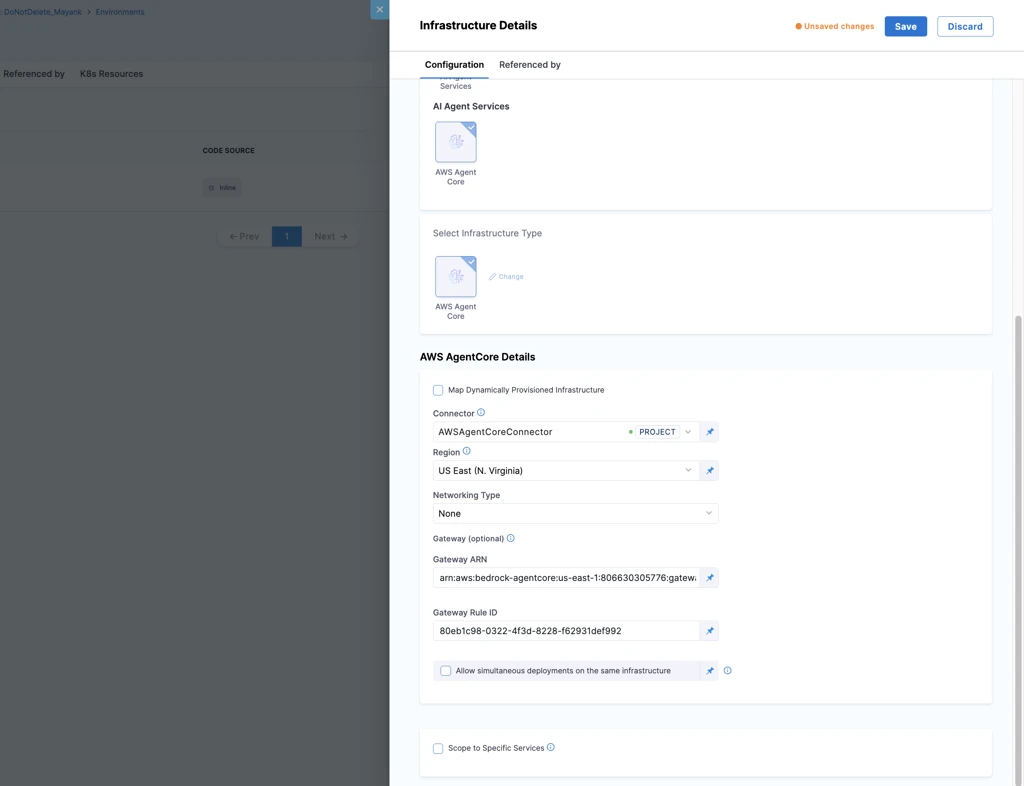
In the environment, open Infrastructure Definitions and add a new one:
- Enter a name.
- Set Deployment Type to AI Agent Services.
- Under Select Infrastructure Type, choose AWS Agent Core.
Under Cluster Details, configure:
- Connector: an AWS connector with permission to deploy to AWS Bedrock AgentCore
- Region: for example
us-east-1 - Networking Type: None by default, or VPC if the agent must reach private resources (provide subnets from the same VPC, and optionally security groups)
- Select Save.
The optional gateway (needed for canary traffic shifting)
An AgentCore Gateway enables weighted traffic shifting between agent versions. It also pairs naturally with Restrict to Gateway, because the gateway becomes the single front door for your agent.
Set it up in this order:
- Deploy the agent once without a gateway configured. This creates the first live endpoint.
- Note the live endpoint ARN. Provision an AgentCore Gateway outside Harness (Terraform, CDK or the AWS console) and create a static target rule that points to that endpoint.
- Return to the infrastructure definition, enter the Gateway ARN and Gateway Rule ID, and save.
Without a gateway, each deploy performs a direct endpoint cutover and the traffic shift step is skipped. With one, Harness manages the live and candidate endpoints for you.
Step 3: Build the pipeline stage
Now we wire the service and environment together and roll the agent out gradually.
- Create a pipeline and add a Deploy stage.
- Under Deployment Type, select AI Agent Services.
- Select your agent service, then your environment and infrastructure definition.
- On the Execution tab, select the Canary strategy. (Canary is the only strategy for agent deployments in this release.)
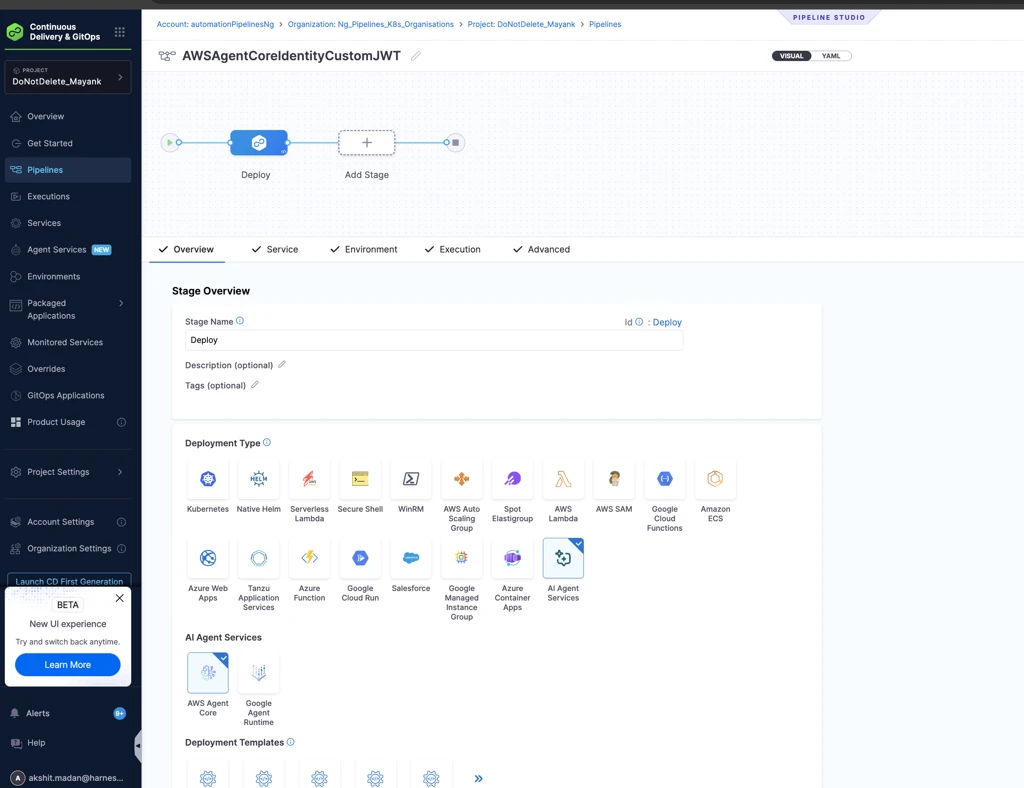
Harness scaffolds the execution for you.
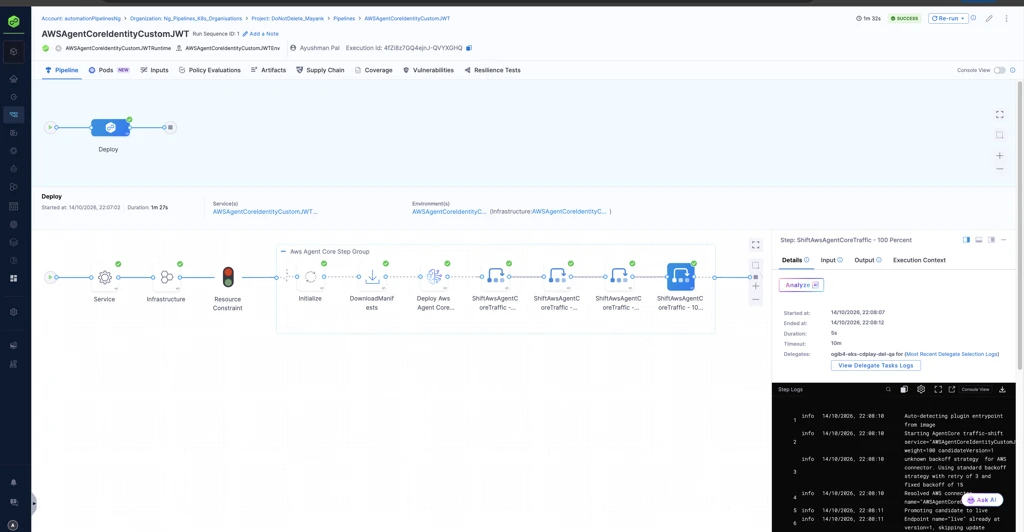
The deploy step
This step creates the agent deployment on AWS Bedrock AgentCore. On the first run it creates the deployment, and on later runs it creates a new revision under the same deployment. It publishes the new revision ID as an output for the steps that follow.
The traffic shift step
ShiftAwsAgentCoreTraffic routes a percentage of traffic to the new revision. It takes the revision from the deploy step as its target, and a Weight (%):
Target Revision ID: <+steps.Deploy_Aws_Agent_Core_Revision.agentDeployment.revisionId> Weight (%): 10
The default scaffold shifts 100% in one step. For a safer rollout, add more steps, such as 10% → 25% → 50% → 100%. Between shifts you can add smoke tests, evals, approval gates or release gates, so the new revision proves itself before it takes more traffic.
Rollback
Harness also adds RollbackAwsAgentCoreRevision to the stage rollback steps. If a deploy or traffic shift step fails, traffic reverts to the previous revision.
Why this matters for governance
Putting the authorizer inside a Harness deployment pipeline gives you governance that scripts cannot:
- Access rules are part of the definition. No agent ships "open to everyone" by accident, and nobody has to remember to configure access in the console afterward.
- Enforcement lives in AWS. Harness defines it, and AgentCore Identity enforces it at invocation time, outside your agent's code.
- Least privilege is possible. Audiences, clients, scopes and claims let you say exactly which app, with which permission, for which team, can call the agent.
- One front door. With Restrict to Gateway, all traffic flows through a single place that can be logged and controlled.
- The usual Harness controls apply. Approvals, OPA policies and RBAC work for agent stages just like any other stage, and you get audit trails and rollback.
Inbound access (the authorizer) and outbound access (the execution role) are defined separately, so you can answer "who can call this agent?" and "what can it do?" independently during a review.
Get started
- Enable agent deployments for your account (
CDS_AGENT_RUNTIME_DEPLOYMENT). - Register your agent service and choose the right authorizer: AWS_IAM for callers inside AWS, CUSTOM_JWT for everyone else.
- Define your environment and infrastructure, with a gateway if you want canary traffic shifting.
- Build a canary pipeline and ship.
Read the full docs: Deploy AI agents to AWS Agent Core.